

Why These Rolls Feel Like a Warm Hug
Every time I make these rolls, I think of my first kitchen disaster. I was 22, and I burned the onions so badly they turned black. My whole apartment smelled like a campfire that went wrong. I still laugh at that memory. But here is why this matters: mistakes teach you how to taste. When you learn to go slow with onions, you learn patience. And patience is the secret to almost everything good in life. These rolls are soft, cheesy, and sweet from the caramelized onions. Does that sound amazing? Have you ever tried making caramelized onions before?The Magic of Roasting Garlic
Roasting garlic is like turning a grumpy vegetable into candy. You slice the tops off the heads, drizzle them with olive oil, and wrap them in foil. Then you pop them in a low oven for almost two hours. When they come out, the cloves are golden and soft like butter. You can mash them into a paste with a fork. *Fun fact: Roasted garlic is so sweet it barely tastes like garlic at all.* Here is why this matters: learning to roast garlic changes how you cook forever. You can spread it on bread, mix it into mashed potatoes, or stir it into soup. It makes everything taste like a restaurant meal. What is your favorite way to use roasted garlic? I love hearing new ideas.How to Win at Onions (Without Crying)
Caramelizing onions takes time, but it is simple. You slice them thin, then cook them low and slow with butter and oil. It takes over an hour, maybe more. You stir them every few minutes until they turn deep brown and sweet. One time, my neighbor came over because she smelled something burning. It was just my onions getting perfect! We both laughed and she stayed for lunch. That is the kind of thing that happens when you cook slowly. A quick poll for you: do you like your onions extra dark and jammy, or just lightly golden? There is no wrong answer.Making Dough That Feels Like Playdough
The dough for these rolls is soft and fun to work with. You start by warming some milk and mixing it with yeast and a pinch of sugar. Wait five minutes until it gets frothy, like a bubble bath. Then you add flour, sugar, salt, butter, and an egg. Knead it for about 15 minutes. Your hands will get tired, but that is okay. The dough will become smooth and stretchy, like a happy little pillow. Let it rise for an hour and a half. When you come back, it will be twice as big. I always say hello to my dough when I come back. It sounds silly, but it makes me smile. Have you ever made yeast dough before? If not, this is a great first recipe to try.The Best Part: Putting It All Together
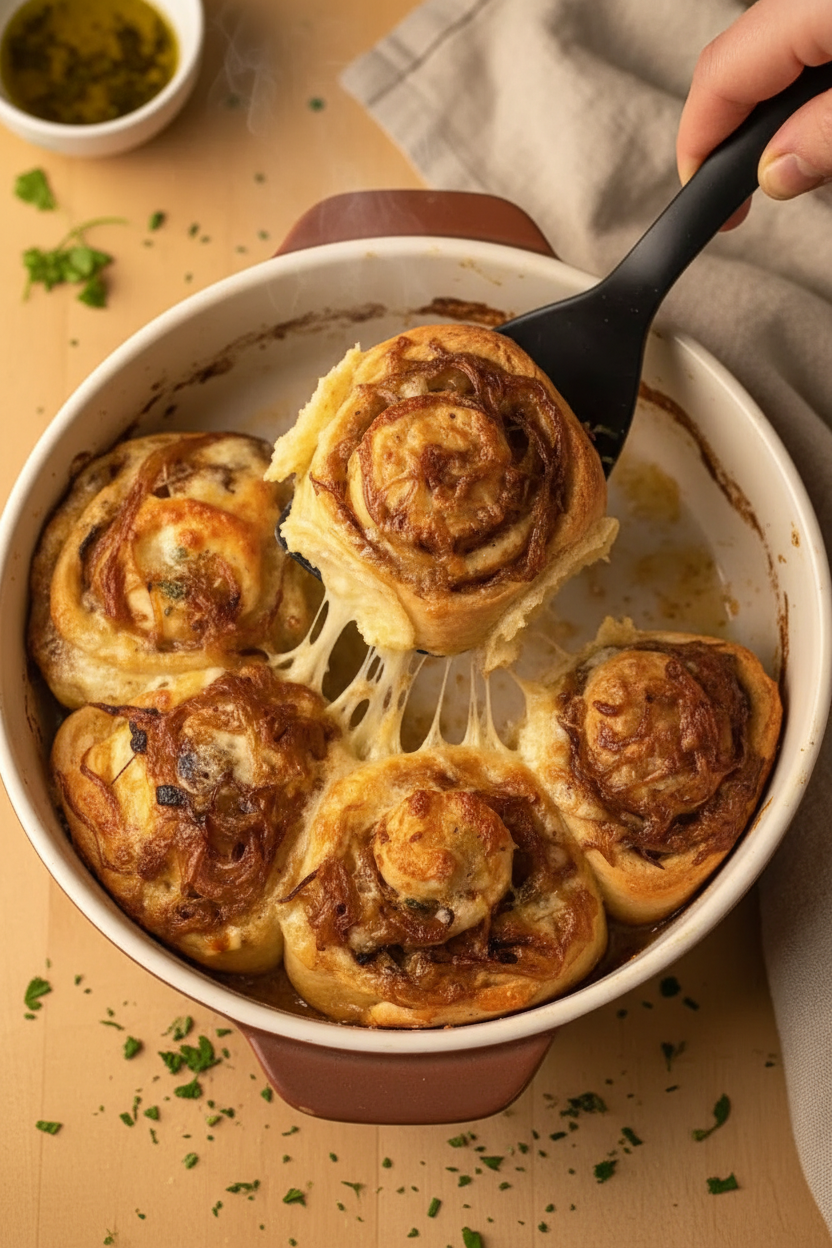
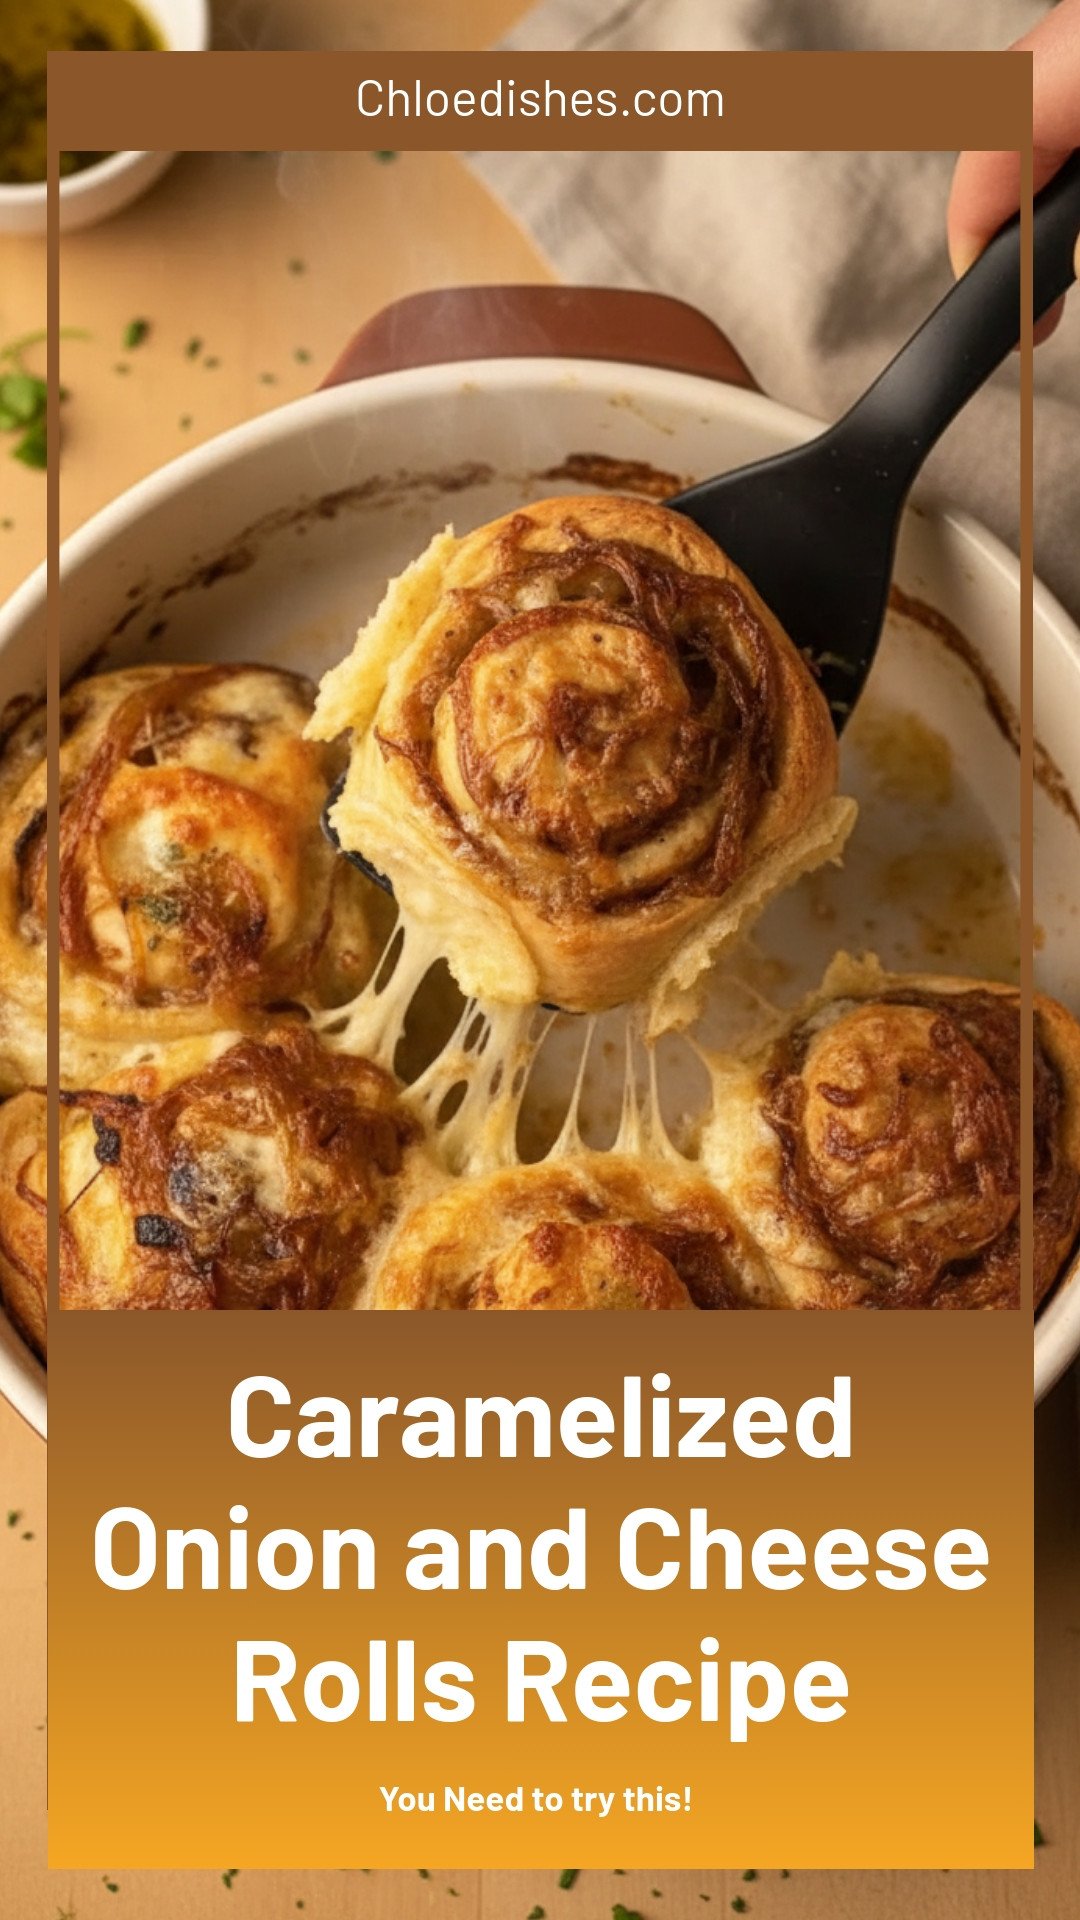
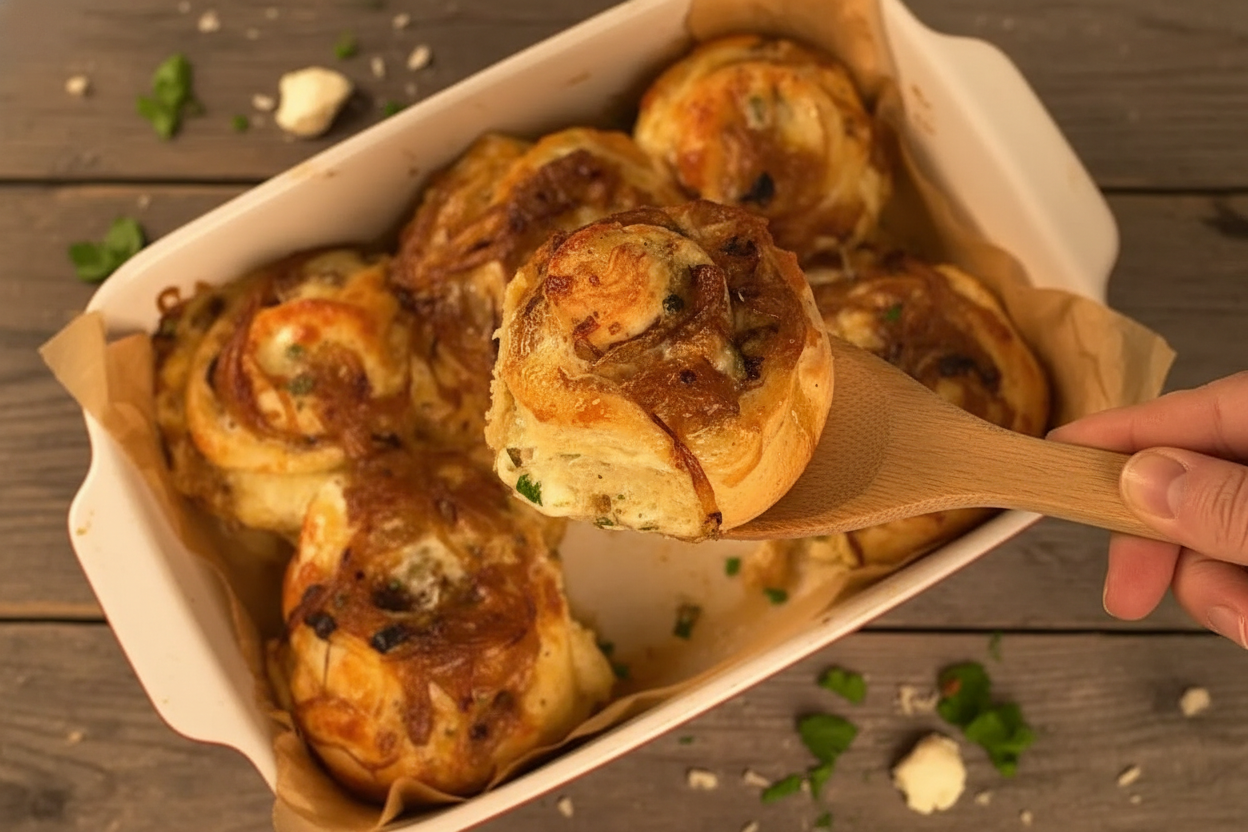
Once your dough has risen, roll it into a big rectangle. Spread on that garlic butter, then sprinkle mozzarella cheese all over. Add the cooled caramelized onions on top. It looks like a happy, gooey blanket. Now cut the rectangle into six long strips. Roll each strip into a little spiral, like a cinnamon roll but savory. Place them in a greased pan and let them rise again. They will puff up like clouds. Brush them with egg wash and bake at 350°F until golden brown. The smell that fills your kitchen is something special. It smells like love and butter and home. I would love to hear: who would you share these rolls with? Maybe for a family dinner or a cozy movie night?Ingredients:
| Ingredient | Amount | Notes |
|---|---|---|
| Warm milk | 130 g (½ cup) | For the dough |
| Active dry yeast | 1 tbsp (10 g) | For the dough |
| Granulated sugar | 1 tsp | For the dough |
| All-purpose flour | 300 g (2 ½ cups) | For the dough |
| Granulated sugar | 20 g (1 ½ tbsp) | For the dough |
| Salt | 1 tsp | For the dough |
| Butter | 50 g (¼ cup) | For the dough |
| Large egg | 1 | For the dough |
| Whole heads of garlic | 2 | For the roasted garlic |
| Olive oil | 30 ml (2 tbsp) | For the roasted garlic |
| Salt | A generous pinch | For the roasted garlic |
| Large onions | 4–5 | For the caramelized onions |
| Olive oil | 3 tbsp | For the caramelized onions |
| Butter | 1 tbsp | For the caramelized onions |
| Salt | ½ tsp | For the caramelized onions |
| Butter | 50 g (¼ cup) | For the garlic butter spread |
| Roasted garlic | All of the roasted garlic | For the garlic butter spread |
| Infused oil | 1 tsp | For the garlic butter spread |
| Freshly chopped parsley | 2 tbsp | For the garlic butter spread |
| Salt | ½ tsp | For the garlic butter spread |
| Mozzarella cheese | 300 g (about 3 cups) | For assembly and baking |
| Egg (for egg wash) | 1 | For assembly and baking |
The Best Little Rolls You’ll Ever Make
My grandma always said the secret to a happy kitchen is patience. I still laugh at how she’d stir onions for what felt like forever. But oh, the smell that filled her house! Doesn’t that smell amazing? This recipe is my love letter to her slow, sweet way of cooking. Let’s make some magic together.
These rolls are soft, cheesy, and full of sweet, jammy onions. The roasted garlic butter on top is like a cozy hug for your taste buds. You will need a few hours for this, but I promise the wait is worth every second. Think of it as making a slow, delicious memory.
We start by roasting garlic and caramelizing onions, side by side. The kitchen will smell like a dream while they cook. Then we make a soft, buttery dough that rises into fluffy clouds. By the end, you will have a pan of the most golden, bubbly rolls.
Ready to get your hands a little floury? Grab a grown-up helper if you need one, and put on your favorite music. This is the kind of baking that feels like a warm hug on a chilly day. Let’s begin, roll by roll!
Step-by-Step Instructions
Follow these steps slowly, and don’t rush the good parts. Each step is like a little story. (Okay, here is my hard-learned tip: never rush the onions. They need time to get sweet and brown, or they will taste sad.) Let’s cook.
Step 1: First, we roast the garlic. Peel both heads of garlic and pop the cloves in a small dish. Drizzle with olive oil, add a pinch of salt, and cover tightly with foil. Roast at 140°C (285°F) for 1.5 to 2 hours, until they are soft and golden. When they are cool enough to touch, mash them into a paste. Do you prefer roasted garlic or raw garlic in your cooking? Share below!
Step 2: While the garlic roasts, start the onions. Slice 4 to 5 large onions very thin. Cook them in a pan with butter and oil over medium-low heat. The first time I made these, I walked away and burned the pan. Now I stir and listen to a podcast. Add salt once they turn a little golden. Keep cooking, stirring often, for over an hour and a half until they are dark and sweet. Let them cool completely.
Step 3: Now for the dough. Warm up the milk until it is just warm to the touch. Mix it with a pinch of sugar and the yeast, then wait 5 to 10 minutes until it turns frothy. In a big bowl, add the flour, sugar, salt, softened butter, and an egg. Knead this dough for 15 to 20 minutes until it feels smooth and springy. Place it in a greased bowl, cover it, and let it rise in a warm spot for 1.5 hours until it doubles in size.
Step 4: While the dough rises, make the garlic butter. Mix the softened butter with your roasted garlic paste, a little salt, a teaspoon of oil, and fresh chopped parsley. Stir it until it is smooth and looks like a fancy spread. My neighbor once used dried parsley, and we still tease her about it. Fresh is best here, I promise.
Step 5: Time to assemble the rolls! Punch down your risen dough and roll it into a rectangle on a floured counter. Spread that beautiful garlic butter all over the surface. Sprinkle about 3 cups of shredded mozzarella cheese on top, then scatter your cooled caramelized onions evenly. Cut the rectangle into 6 long strips, then roll each strip into a tight little roll. Place them in a greased baking dish, cover, and let them rise again for 30 to 45 minutes until puffy.
Step 6: Preheat your oven to 180°C (350°F) while the rolls finish their second rise. Beat one egg and brush it over the tops of the puffy rolls. Bake them for 25 to 30 minutes until they are a deep, golden brown and the cheese is bubbly. Let them cool in the pan for about 10 minutes. The hardest part is not eating them straight from the pan. I always burn my tongue, and I still laugh at that.
Cook Time: 4–6 hours
Total Time: 4 hours 15 minutes
Yield: 6 large rolls
Category: Dinner, Snack, Side
Three Fun Twists to Try
Sometimes I like to shake things up. These little changes make the recipe feel brand new. Try one next time and tell me how it goes. Which one would you try first? Comment below!
Spicy Kick Rolls: Add a big pinch of red pepper flakes to the garlic butter. Or sprinkle some diced jalapenos over the onions. They will give your rolls a fun, warm heat.
Herby Garden Rolls: Swap the mozzarella for crumbled feta or goat cheese. Add a handful of fresh spinach and some chopped sun-dried tomatoes. It tastes like a summer garden in every bite.
Sweet and Savory Breakfast Rolls: Leave out the cheese and add a spoonful of brown sugar to the onions. Sprinkle cooked, crumbled bacon on top before rolling them up. They are perfect for a lazy Sunday morning.
How to Serve and Sip
These rolls are wonderful all on their own, warm from the pan. But they also love a good friend on the plate. Serve them with a simple green salad tossed in lemon vinaigrette for a fresh crunch. Or dunk the edges into a bowl of warm tomato soup. The cheese and soup together is pure comfort.
For a bigger meal, place these rolls next to a bowl of roasted chicken or a big plate of pasta. They soak up sauces beautifully. A sprinkle of fresh parsley on top makes them look fancy in under five seconds.
Now, what about a drink to go with them? For a grown-up choice, a glass of crisp white wine like Pinot Grigio is lovely. For the rest of us, a tall glass of cold apple cider or sparkling lemonade is perfect. Which would you choose tonight?
Storing and Reheating Your Rolls
These rolls taste best fresh from the oven. But leftovers are a gift. Let them cool completely first. Then wrap them tightly in foil or plastic wrap. Pop them in the fridge for up to three days.
For longer storage, freeze them. Wrap each roll in plastic wrap. Then place them all in a freezer bag. They will keep for up to one month. I once froze a batch for a busy week. Pulling them out on a tired Tuesday felt like magic. Have you ever tried storing it this way? Share below!
To reheat, use the oven. Preheat to 350°F. Place the rolls on a baking sheet for about 10 minutes. This keeps the outside crisp and the cheese gooey. Avoid the microwave, or the dough gets tough. Why this matters: Proper storage saves time and avoids waste. You get a warm, delicious snack whenever you want.
Common Problems and Easy Fixes
Sometimes the dough does not rise. That can happen if the yeast is old or the milk was too hot. Always test your yeast first. Let it sit in warm milk with a pinch of sugar. If it gets frothy, you are good to go.
Another problem is burnt onions. I remember when I walked away for just two minutes. My onions turned black and bitter. The fix is simple: cook them low and slow. Stir often and be patient. It takes over an hour, but the sweet reward is worth it.
The third issue is cheese leaking out while baking. This happens if you overfill the rolls. Use a light hand when sprinkling cheese. Leave a little room around the edges. Why this matters: Solving these small problems builds your cooking confidence. You learn to trust your hands and your kitchen. Which of these problems have you run into before?
Reader Questions and Quick Answers
Q: Can I make this recipe gluten-free?
A: Yes, use a 1-to-1 gluten-free flour blend. The dough will be a bit stickier, so add a little extra flour when kneading.
Q: Can I prepare these rolls the night before?
A: Absolutely. Assemble the rolls, then place them in the fridge. Let them rise slowly overnight. Bake them fresh in the morning.
Q: What can I use instead of mozzarella?
A: Try provolone or gouda. Both melt nicely and add a different flavor. A sharp cheddar also works well.
Q: How do I scale the recipe for a smaller pan?
A: You can easily halve all ingredients. Use a 8×8 inch pan instead of a 9×13 inch one. Bake time stays the same.
Q: Any tips for easier cleanup?
A: Line your baking dish with parchment paper. The cheese and butter will not stick. It makes lifting the rolls out a breeze. Which tip will you try first?
A Warm Goodbye from My Kitchen
I hope these little stories and tips help you in your own kitchen. Cooking is about sharing love, one roll at a time. I always feel happy when someone tries my recipes and makes them their own. Have you tried this recipe? Tag us on Pinterest! I love seeing your photos and reading your comments. It feels like you are right here beside me, kneading dough and laughing. Keep rolling, keep tasting, and keep sharing. Happy cooking! —Chloe Hartwell.
Caramelized Onion and Cheese Rolls Recipe
Description
Fluffy caramelized onion and cheese rolls recipe, perfect for appetizers or snacks. Easy, cheesy, and irresistible homemade rolls.


Leave a Reply