

The Heart of the Kitchen
My kitchen always smells like onions and garlic. I think it’s the best smell in the world. It means something good is coming. It means home.
This recipe starts right there. You warm your oil. Then you add those chopped onions. Let them get soft and sweet. Doesn’t that smell amazing? It matters because this step builds the flavor base. Everything else sits on this.
A Little Story About Spice
My grandson once asked why we add spices. I told him they are like the story in the food. Cumin is warm and earthy. Cayenne is a little wink of heat.
You add them with the garlic next. Mash it into a paste right in the pan. This makes the flavor stick to every bean. Fun fact: Cumin seeds were found in ancient Egyptian tombs! People have loved this spice for a very long time.
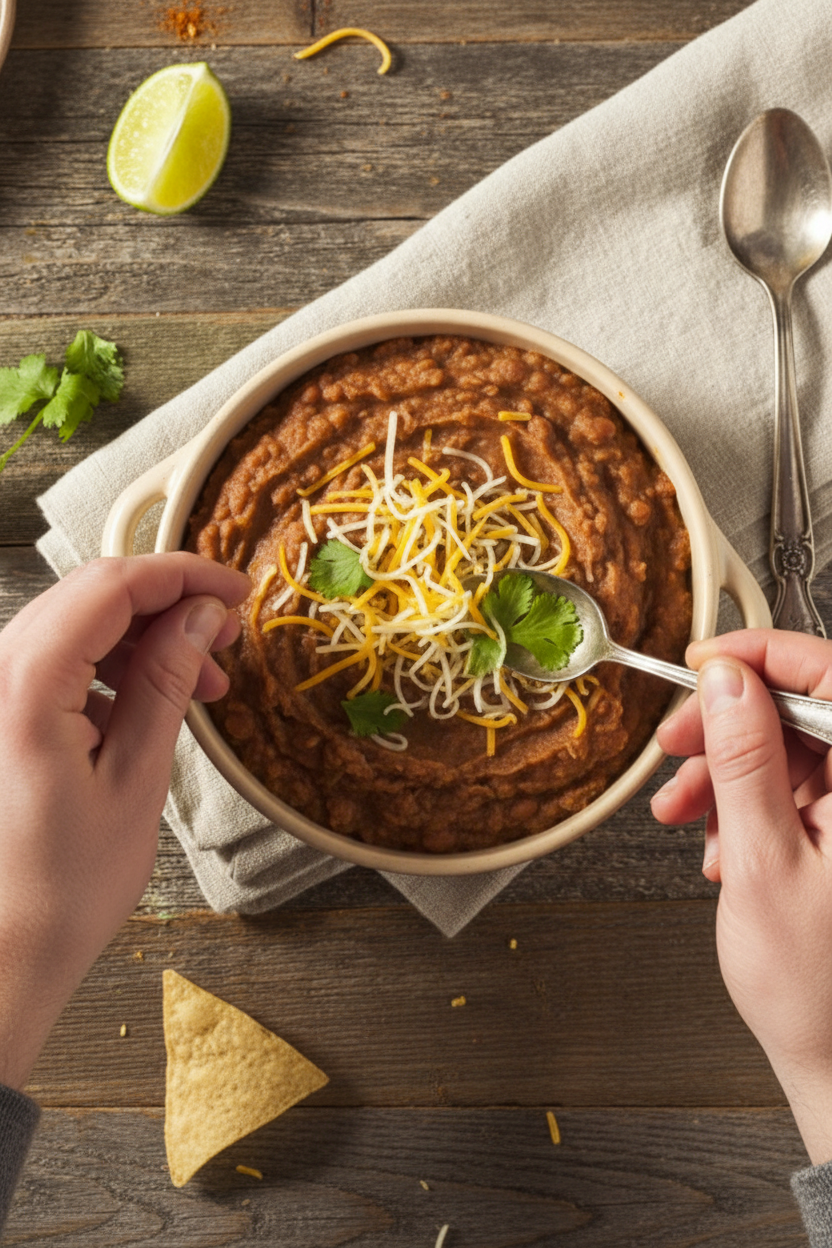
The Smash and Mash
Now for the beans. Drain them and let them join the party. They get warm and soak up all that good flavor. Then comes the fun part.
You take your potato masher. You press and smash. I still laugh at the sound it makes. You stop when it looks right to you. Some like it smooth, some like it chunky. What’s your favorite way? Let me know.
The Magic Touch
Here is a secret. The beans might get thirsty. A splash of water loosens them up. Then you add the lime juice. This is the magic touch.
The lime makes all the flavors sing. It brings a fresh, bright zing. Always taste as you go. This matters because you are the boss of your beans. Does your family like things more salty or more zesty?
More Than Just a Side
These beans are not just a side dish. They are memory food. I serve them with warm tortillas. We use them for tacos, too.
Making them from scratch feels good. You know exactly what’s in your food. It’s simple, real cooking. What will you serve with your beans? I’d love to hear your ideas. Share them with me next time.
Ingredients:
| Ingredient | Amount | Notes |
|---|---|---|
| Finely chopped onion | 2/3 cup | |
| Canola oil | 4 teaspoons | |
| Garlic cloves, minced | 4 cloves | |
| Ground cumin | 1 teaspoon | |
| Salt | 1/2 teaspoon | |
| Cayenne pepper | 1/4 teaspoon | |
| Beans, rinsed | 2 cans (15 oz each) | |
| Water | 1/2 cup | |
| Lime juice | 4 teaspoons |
My Cozy Skillet Refried Beans
Hello, my dear! Let’s make something warm and comforting. This is my easy refried beans recipe. It always reminds me of my tiny kitchen years ago. I would make a big batch every Sunday. The smell of cumin and garlic is just wonderful. It makes the whole house feel like home.
We are not really “frying” them twice, you know. It’s more about mashing them in the pan. That’s the fun part! You get to decide how smooth or chunky they are. I like mine with a few whole beans left for texture. Doesn’t that smell amazing already? Let’s get started.
Step 1:
Grab your favorite skillet. Pour in the oil and let it get warm. Now add your chopped onion. We cook them until they’re soft and sweet. Stir them now and then. This takes about five minutes. I still laugh at how I used to rush this step. Good things take a little time.
Step 2:
Time for the good stuff! Add your garlic and spices. Stir it all around for one minute. The smell will make your tummy rumble. Use your fork to press the garlic into a paste. (My hard-learned tip: don’t let the garlic burn! It turns bitter fast.)
Step 3:
Now for the beans. Make sure you rinse them first. This makes them easier to digest. Pour them right into your spicy onion mix. Give everything a good stir. Let it all get cozy and warm for five minutes. Stir it once or twice while it cooks.
Step 4:
Here is the best part! Take your potato masher. Start squishing those beans right in the pan. Mash until it looks just right to you. I like a rustic, lumpy mash. Do you like yours super smooth? How do you like your beans mashed? Share below!
Step 5:
Almost done! Taste a little spoonful. Needs more zip? Add that fresh lime juice. It makes all the flavors sing. If the beans seem too thick, splash in a little water. Finally, add more salt if you like. Then it’s ready to serve.
Cook Time: 15 minutes
Total Time: 20 minutes
Yield: 4 servings
Category: Side Dish, Snack
Three Fun Twists to Try
This recipe is like a friendly blank canvas. You can change it up so easily! Here are three of my favorite ways to play. Try one next time you feel adventurous in the kitchen.
The “Fiesta” Twist: Stir in a handful of chopped cilantro at the end. Top with crumbled cheese. So bright and fresh!
The “Smoky” Twist: Swap the cayenne for a teaspoon of smoked paprika. It tastes like a campfire in the best way.
The “Extra Creamy” Twist: Mash in a spoonful of cream cheese at the very end. It becomes unbelievably rich and smooth.
Which one would you try first? Comment below!
How to Serve Your Masterpiece
Now, what to do with these lovely beans? I love them spooned into warm tortillas. Add a little shredded lettuce on top. They are also perfect as a dip for sturdy chips. For a real treat, fry an egg and put it right on top. The runny yolk is magic.
What to drink? A cold, fizzy lemonade is perfect for kids. For the grown-ups, a light lager beer goes so well. It cuts through the richness beautifully. Which would you choose tonight?
Keeping Your Beans Cozy: Storing & Reheating Tips
These beans are perfect for making ahead. Let them cool completely first. Then pop them in a sealed container. They will be happy in your fridge for five days.
You can also freeze them for later. I use a freezer bag and flatten it. This saves space and helps it thaw faster. It will keep for three months. I once forgot a batch in my freezer for six months. It was still delicious!
Reheating is simple. Use a saucepan with a splash of water. Stir on low heat until warm. This little bit of water brings back the creamy texture. Batch cooking like this saves so much time on busy nights.
That’s why it matters. Having a ready-to-go meal makes weeknights peaceful. Have you ever tried storing it this way? Share below!
Simple Fixes for Common Bean Troubles
Sometimes our cooking needs a little help. First, beans too dry? Just add more water, a spoonful at a time. Stir until it looks creamy again. I remember when my beans turned into a brick. A little water fixed everything.
Second, not enough flavor? Let the beans sit for ten minutes after cooking. The flavors get to know each other and become stronger. This matters because patience makes simple food taste special.
Third, texture too lumpy? Keep mashing! Use the back of a sturdy cup if you don’t have a masher. Getting the texture right builds your cooking confidence. You are in charge of your own perfect beans. Which of these problems have you run into before?
Your Bean Questions, Answered
Q: Are these beans gluten-free?
A: Yes, they are! All the ingredients are naturally gluten-free.
Q: Can I make them ahead?
A: Absolutely. They taste even better the next day. The flavors blend beautifully.
Q: What if I don’t have cumin?
A: Try a little chili powder instead. It will give a different, but still yummy, taste.
Q: Can I double the recipe?
A: You sure can. Just use a bigger pot so you have room to stir and mash.
Q: Any optional tips?
A: A tiny sprinkle of cheese on top is lovely. *Fun fact: Refried beans aren’t actually fried twice. The name comes from the Spanish word “refritos,” which means well-fried!* Which tip will you try first?
From My Kitchen to Yours
I hope you love making these beans as much as I do. They are a simple, comforting food. I make them for my grandkids all the time.
I would love to see your creation. Sharing food pictures is like sharing a smile. Have you tried this recipe? Tag us on Pinterest! You can find me at @ChloesCozyKitchen.
Thank you for cooking with me today. Happy cooking!
—Chloe Hartwell.


Easy Homemade Refried Beans Recipe
Description
Creamy, flavorful homemade refried beans in 20 minutes! Perfect for tacos, burritos, dips, and meal prep. A healthy, budget-friendly staple.
Ingredients
Instructions
- Medium heat the oil in a skillet until it shimmers. Next, add the finely chopped onion. Stir occasionally and keep the pan on the heat for around five minutes or until the onions are soft.
- Add the garlic, cumin, salt and cayenne pepper to the pan. Cook the mixture for 60 seconds, while stirring as frequently as possible. Use the back of a fork to gently smash the garlic so it forms a paste-like consistency.
- Drain the beans and add them to the skillet. Cover and cook on a medium heat for around five minutes, stirring regularly.
- Remove the cover and lower the heat. Use a potato masher to mash the beans up. Keep going until you reach the consistency that you desire.
- Taste the mixture to see whether you’ve got the right blend of seasonings. If it seems a little dry, you might want to give it a splash of water to loosen it up. You can also add some lime juice to give it a fresh flavor. Add salt to suit your taste buds and serve!


Leave a Reply