
A Sweet Secret from My Kitchen
I have always loved a big bowl of ice cream. But sugar sometimes makes me feel tired later. So I found a happy trick. We can use sweet agave nectar instead. It comes from a desert plant. Doesn’t that sound neat?
This matters because food should make you feel good, before and after. You can enjoy a treat without a tummy ache. That is a win in my book. What is your favorite ice cream flavor? Tell me in the comments.
The Magic of Tempering Eggs
Let’s talk about the eggs. We must be gentle with them. If we add hot milk too fast, we get sweet scrambled eggs! I still laugh at the time I made that mistake. So we whisk a little warm milk into the eggs first. This is called tempering.
Then we mix it all back into the pot. We cook it slow until it coats a spoon. This step makes the ice cream wonderfully smooth. It is worth the extra care. Fun fact: This creamy base is called a custard. Many fancy ice creams start this way!
Patience Makes Perfect
Now, we must cool everything down. I use a big bowl set in a pan of ice water. It looks like a science project. Stir it for a few minutes. Doesn’t that smell amazing? Then add the cream and vanilla.
Here is the hard part. You must walk away. Cover it and let it sleep in the fridge for hours. This matters because cold mix freezes better. It makes tiny ice crystals for a creamy scoop. Do you have the patience to wait, or is it tough for you?
The Final Chill
Time for the ice cream maker! Only fill the cylinder two-thirds full. It needs room to dance and get fluffy. Let the machine do its whirring magic. Then it goes back to the freezer to firm up.
This second freeze is key. It turns soft cream into perfect, scoopable ice cream. I like to top mine with fresh berries. The sweet and tart taste is so good. What would you put on yours?
Why This Recipe Matters
This is more than just dessert. It is summer in a bowl without the guilt. You control what goes in it. That is a wonderful feeling. Making it yourself is an act of love.
Sharing homemade treats creates the best memories. I think that is the sweetest part of all. Will you try making this with someone you love? I hope you do.
Ingredients:
| Ingredient | Amount | Notes |
|---|---|---|
| whole milk | 1 cup | |
| agave nectar | 1/2 cup | |
| eggs | 2 | |
| salt | Dash | |
| sugar-free chocolate | 8 ounces | melted and cooled |
| heavy whipping cream | 2 cups | |
| vanilla extract | 1-1/2 teaspoons |
My Guilt-Free Chocolate Ice Cream Secret
Hello, my dear! Come sit at the table. Let’s make some magic. Today, we’re making my favorite chocolate ice cream. It’s sweet but without the sugar rush. Doesn’t that sound lovely? We use agave nectar instead. It comes from a desert plant. I think that’s so neat.
This recipe reminds me of my grandson, Leo. He loves chocolate more than anyone. His smile when I pull this from the freezer is everything. I still laugh at that. He always gets a little dab on his nose. Making it is like a little science project. But a delicious one! Are you ready? Let’s begin.
Step 1: Grab a small saucepan. Whisk the milk and agave nectar together. Warm it on the stove over medium-low heat. Watch for tiny bubbles at the pan’s edge. That’s our signal. It should smell gently sweet. (My hard-learned tip: Don’t let it boil! Just a gentle warm-up.)
Step 2: Mix your eggs, salt, and melted chocolate in a bowl. Now, go slow. Add a spoonful of the warm milk to the eggs. Whisk it fast! This is called tempering. It keeps the eggs from scrambling. Then pour it all back into the saucepan. Cook on low, whisking until it coats a spoon. What’s your favorite ice cream topping? Share below!
Step 3: Time for an ice bath. Nest a bowl in a pan of ice water. Pour your warm mixture in. Stir for two minutes to cool it down. Then stir in the heavy cream and vanilla. Cover it with wax paper right on the surface. This stops a skin from forming. Pop it in the fridge for a few hours. Patience is key!
Step 4: Now for the fun part! Pour the cold mix into your ice cream maker. Fill it only two-thirds full. It needs room to dance. Churn it following your machine’s song. Then freeze it solid for a few more hours. The waiting is the hardest part, I know.
Cook Time: 30 minutes
Total Time: 4–6 hours
Yield: 1 quart
Category: Dessert, Ice Cream
Three Tasty Twists to Try
Once you master the basic recipe, you can play! Here are three of my favorite ways to change it up. Each one feels like a whole new treat. The kitchen is your playground, my dear.
Berry Swirl: Fold in a cup of mashed raspberries after churning. So pretty and fruity!
Peanut Butter Cup: Swirl in sugar-free peanut butter. Add chopped nuts for crunch.
Minty Fresh: Use mint extract instead of vanilla. A little green food color makes it fun.
Which one would you try first? Comment below!
Serving It Up With Style
This ice cream is wonderful all on its own. But let’s make it special. Scoop it into a chilled bowl. Top it with fresh strawberry slices. A few roasted almonds add a nice crunch. You could also make a mini sundae. Use a small fancy glass. Layer it with sugar-free whipped cream.
What to drink with it? For a cozy night, I love a cup of decaf coffee. The bitterness pairs so well with sweet chocolate. For a festive touch, a small glass of chilled dessert wine is lovely. Which would you choose tonight?

Keeping Your Ice Cream Happy
Let’s talk about storing your homemade treat. First, use a container with a tight lid. This keeps ice crystals out. Your ice cream will stay creamy for about two weeks. Let it sit on the counter for five minutes before scooping. This softens it perfectly.
You can make a double batch easily. Just mix the recipe twice in a big bowl. I once made four batches for a family reunion. It was a hit! Storing food well saves time and money. You always have a sweet reward ready. Have you ever tried storing it this way? Share below!
Smooth Sailing for Your Sweet Cream
Sometimes cooking has little bumps. Here are three common ones. First, the eggs might scramble in the hot milk. To fix this, whisk fast and pour slowly. I remember when I made lumpy pudding. We still ate it, but it was funny!
Second, your ice cream can be too hard. This happens if it freezes too fast. Let your mix chill completely first. This matters for a soft, scoopable texture. Third, the chocolate might seize and get grainy. Make sure your melted chocolate is cool, not hot.
Fixing small problems builds your kitchen confidence. You learn how ingredients work together. Which of these problems have you run into before?
Your Ice Cream Questions, Answered
Q: Is this ice cream gluten-free?
A: Yes, all the ingredients are naturally gluten-free. Just check your chocolate label to be sure.
Q: Can I make it ahead?
A: Absolutely! The mix chills overnight. This actually improves the flavor.
Q: What can I use instead of agave?
A: You can use honey or maple syrup. The taste will change a little, but it’s still good.
Q: Can I double the recipe?
A: You can, but only churn one machine’s worth at a time. Churning too much won’t freeze it right.
Q: Any fun add-in ideas?
A: Try a handful of chopped nuts or berries after churning. Fun fact: Vanilla extract comes from orchids! Which tip will you try first?
From My Kitchen to Yours
I hope you love making this cool, creamy dessert. It always reminds me of summer evenings on the porch. I would love to see your creation. Sharing food connects us all.
Have you tried this recipe? Tag us on Pinterest! You can find me at @ChloesKitchen. I look at every single photo. Thank you for cooking with me today.
Happy cooking!
—Chloe Hartwell.


Guilt-Free Summer Sugar-Free Ice Cream Recipe
Description
Enjoy a creamy, delicious summer treat without the sugar! This easy homemade ice cream is healthy, refreshing, and perfect for hot days.
Ingredients
Instructions
- Heat the milk and agave nectar: In a small saucepan whisk together the milk and agave nectar over medium-low heat. Let the sweetened milk heat until bubbles start to form around the edges of the pan.
- Temper the eggs: Combine the eggs, salt and melted chocolate in a small bowl. Slowly add a small amount of the sweetened milk to the chocolate and eggs, whisking constantly. Transfer the mixture to the saucepan and whisk over low heat. Continue to cook and whisk until the mixture has thickened and is able to coat the back of a spoon.
- Cool the mixture: While the mixture is cooking, put an ice bath together. To do so, grab a large bowl and roasting pan, making sure the bowl can nest inside. Place the bowl in the pan then fill the rest of the pan with ice cubes and cold water. When the ice cream mixture has reached the desired consistency, transfer it from the saucepan and into the bowl in the ice bath. Stir the ice cream mixture for about two minutes, then stir in the heavy whipping cream and vanilla extract. Remove the bowl from the ice bath then cover the bowl with wax paper. You’ll want to make sure the waxed paper is touching the surface of the ice cream mixture. Then pop the bowl in the refrigerator to cool for a few hours, or overnight.
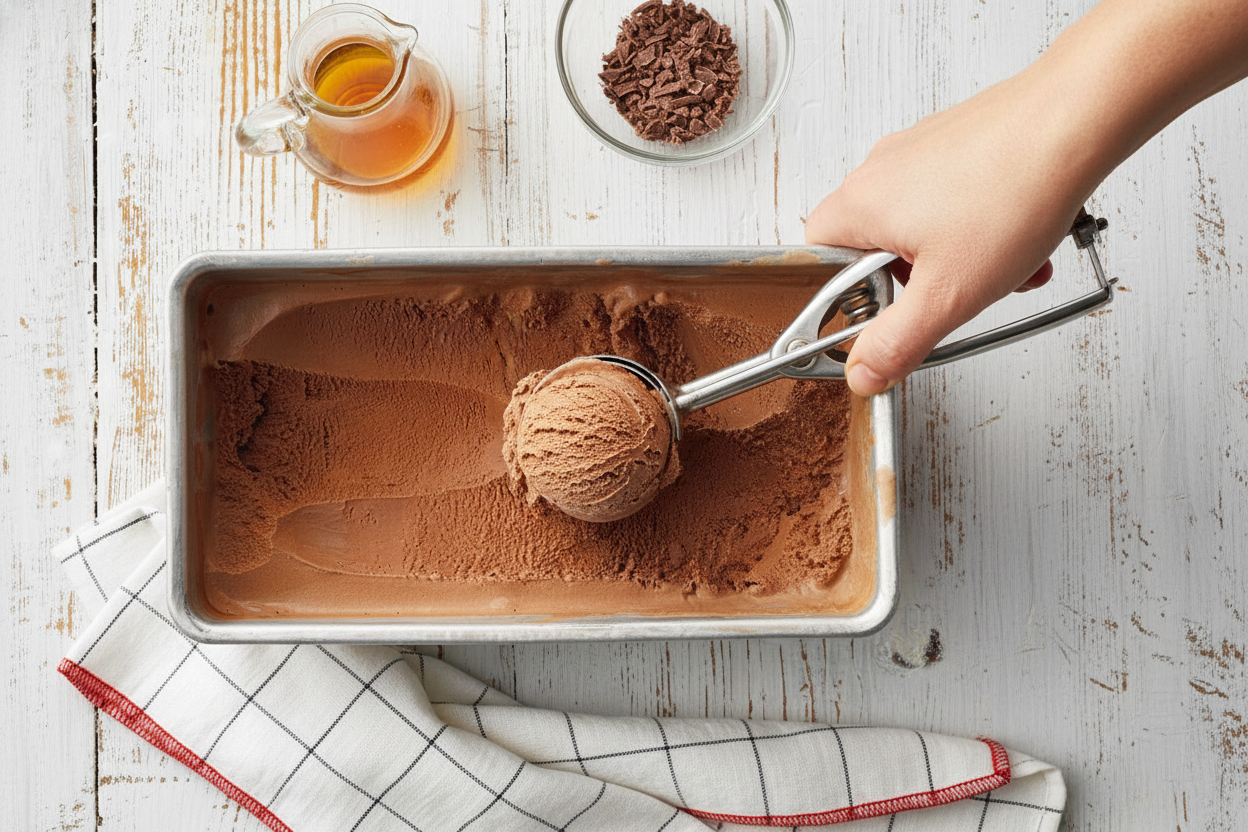
- Freeze: Once your ice cream mix is completely cooled, pour it into your ice cream maker’s cylinder until its two-thirds the way full. Freeze according to your machine’s instructions. When the ice cream has frozen, put it in a freezer-safe container and freeze for 2-4 hours.
- Scoop and serve: After the ice cream has solidified, pull it out of the freezer and get scooping! Serve the ice cream with some fresh fruit, roasted peanuts or other sugar-free toppings.
Notes
- Full nutrition information is not provided in the text.


Leave a Reply