

A Cake That Tells a Story
My grandson calls this my “magic trick” cake. It starts with sticky dates. You pour hot water and milk over them. They get all soft and sweet. I still laugh at that. It looks like a bowl of mush! But trust me, that mush is the secret.
It makes the cake so moist you won’t believe it. This matters because the best cakes aren’t just sweet. They feel like a hug from the inside. What’s a dessert that feels like a hug to you? Tell me in the comments.
Mixing Up the Magic
Now you blend those dates into a paste. Doesn’t that smell amazing? It’s like caramel. You mix it with butter, sugar, and eggs. Then you fold in the dry stuff. Be gentle here. Just until you can’t see flour anymore.
Over-mixing makes a tough cake. We don’t want that! Pour the batter into your pan. The oven does the rest. Your kitchen will smell wonderful. Fun fact: The baking soda with the hot dates helps make the cake super tender and dark.
The Sauce That Steals the Show
While the cake bakes, make the sauce. This is my favorite part. You put everything in one pot. Butter, sugar, cream, and chocolate. Let it all melt together on low heat. Stir until it’s smooth and shiny.
This sauce is why it’s called “sticky toffee.” It’s rich and gooey. I always sneak a tiny spoonful. For quality control, of course! Do you prefer your desserts super gooey or more cakey? I’m team gooey all the way.
The Big Soak
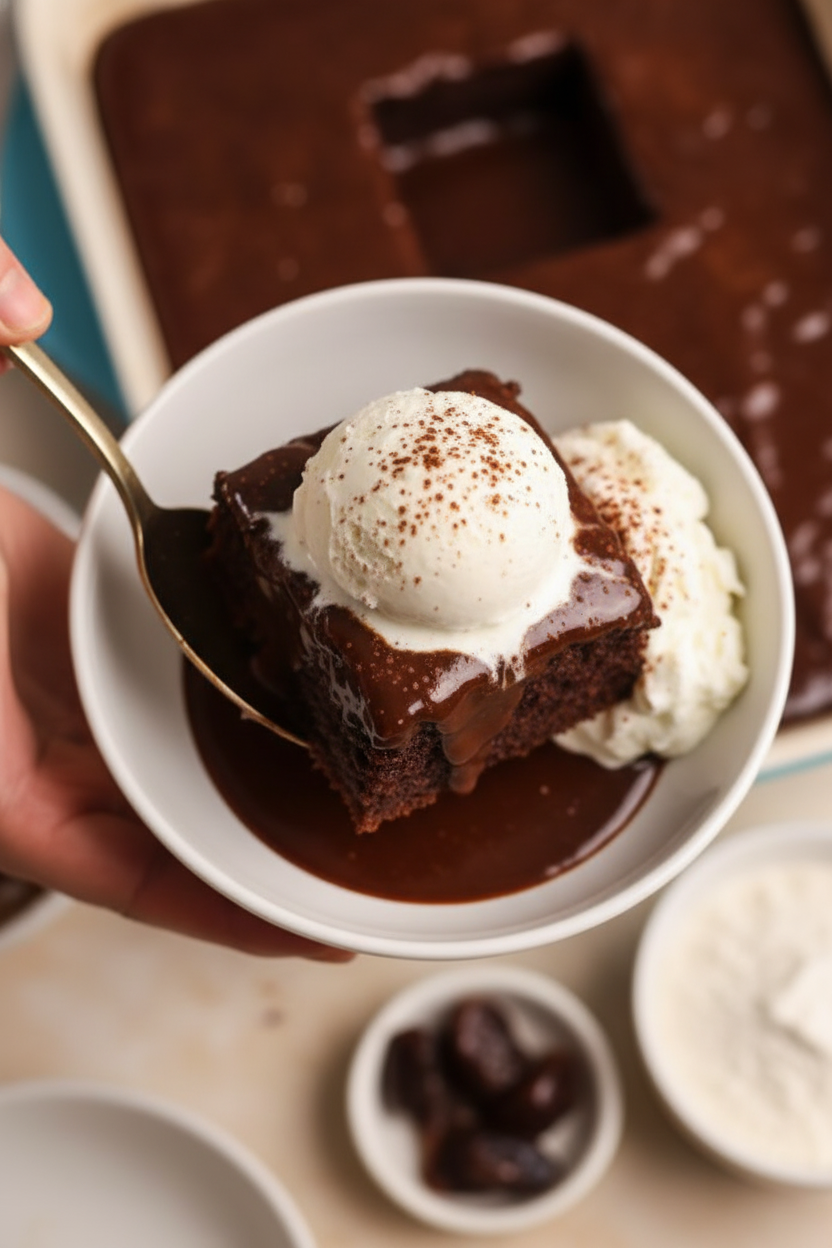
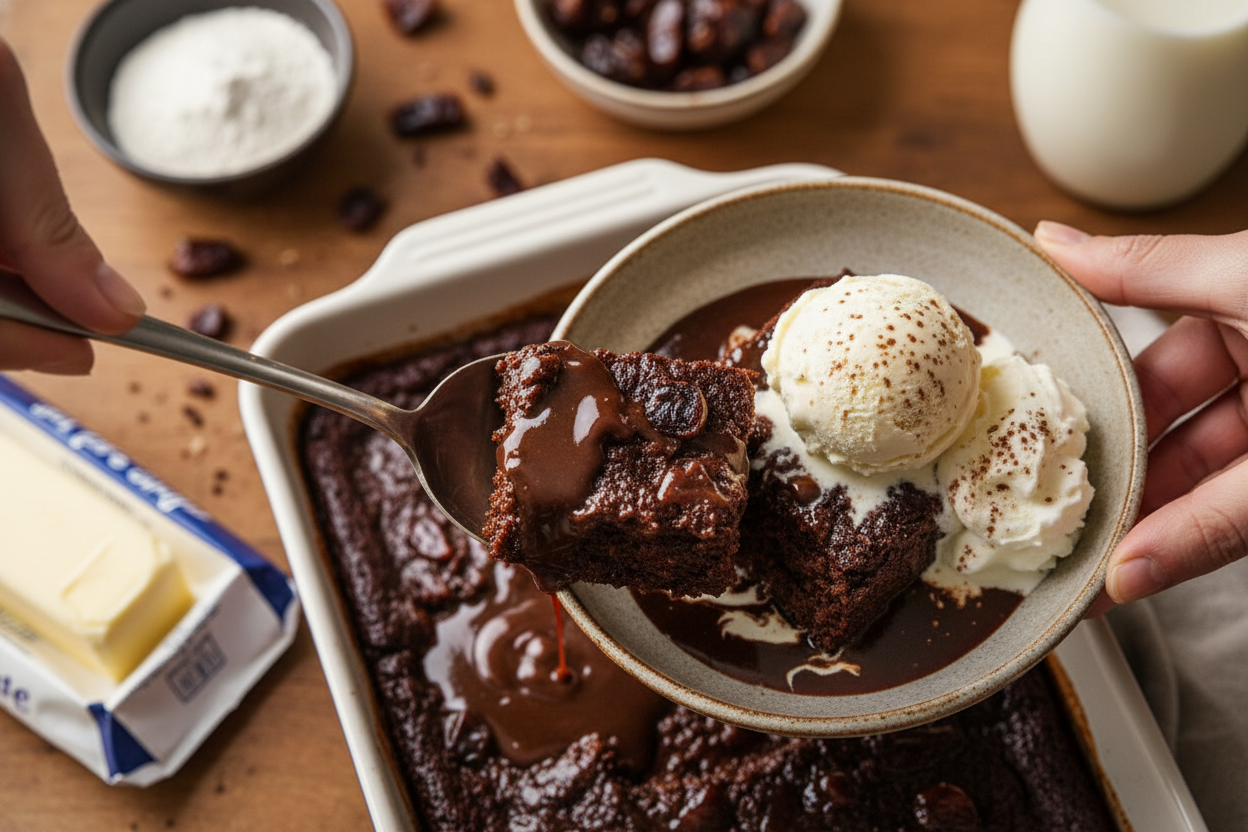
Here comes the fun. Poke holes all over your warm cake. Use a fork or a skewer. Then, pour most of that warm sauce right on top. Listen. You’ll hear a little sigh as the cake drinks it all in.
Let it sit for a bit. This wait is important. This matters because the soak makes every single bite perfect. No dry spots! The cake becomes one with the sauce. It’s a beautiful thing.
Time to Share
Slice the cake while it’s still a little warm. Add a dollop of cold whipped cream. Or a scoop of vanilla ice cream. The hot and cold together is just right. Drizzle that last bit of saved sauce on top.
This is a dessert for sharing. It brings people to the table. My family always gets quiet for the first bite. Then the smiles come. What’s your favorite dessert to share with people you love? I’d love to hear your stories.
Ingredients:
| Ingredient | Amount | Notes |
|---|---|---|
| medjool dates | 8 oz (226g) | roughly chopped |
| boiling water | 1 cup (240g) | |
| boiling milk | ¾ cup (180g) | |
| baking soda | 1 tsp | |
| unsalted butter, softened | ½ cup (113g) | for cake |
| brown sugar | ½ cup (100g) | for cake |
| vanilla | 2 tsp | |
| large eggs | 3 | |
| all purpose flour | 1 ¼ cup (162g) | |
| dutch processed cocoa powder | ½ cup (50g) | |
| baking powder | 1 ½ tsp | |
| salt | 1 tsp | for cake |
| unsalted butter | 8 tbsp (113g) | for sauce |
| brown sugar | ¾ cup (150g) | for sauce |
| cream | 1 cup (240g) | |
| milk | 1 cup (240g) | for sauce |
| dark chocolate | 200g | 60-70% cocoa |
| salt | ½ tsp | for sauce |
| cocoa powder | 1-2 tbsp | optional, for sauce |
| Whipped cream or vanilla ice cream | optional, for serving |
My Chocolate Sticky Toffee Pudding, A Hug in a Bowl
Hello, my dear. Come sit. Let’s make my chocolate sticky toffee pudding. It’s pure comfort. I think of my grandson when I make it. He calls it “chocolate mud cake.” I still laugh at that. It’s rich, warm, and gooey. Doesn’t that sound wonderful? We’ll start with sweet dates. They make the cake so moist. You’ll see. It’s easier than it looks. I promise. Just follow along with me.
Step 1
First, warm up your oven to 350°F. Grease your baking pan with a little butter. Now, chop those lovely dates. They are nature’s candy. Pour the boiling water and milk right over them. Add the baking soda. It will fizz! That’s the magic starting. Cover the bowl and let it sit. This makes the dates super soft.
Step 2
In another bowl, whisk the soft butter and brown sugar. Do this for a few minutes. You want it light and fluffy. It looks like pale sand. Now add the eggs and vanilla. Whisk again. It might look a bit curdled. That’s perfectly okay. Don’t worry one bit.
Step 3
Your dates are ready. Pour the whole bowl into a blender. Blend it into a smooth, dark paste. Doesn’t that smell amazing? Now, mix this paste into your butter bowl. Stir it all together. It will be a beautiful, chocolatey color already.
Step 4
Sift in the flour, cocoa, baking powder, and salt. (My hard-learned tip: sifting stops lumps!) Fold gently with a spatula. Stop when you see no dry flour. Your batter is ready. Pour it into your waiting pan. Smooth the top. Now, into the oven it goes.
Step 5
Bake for about 25-28 minutes. A toothpick should come out with a few moist crumbs. Not wet batter, just crumbs. Let the cake cool in its pan. Now, the best part: the sauce! Put all sauce ingredients in a saucepan. Cook on medium-low. Stir until everything is melted and smooth. It will thicken slightly. Oh, it’s so silky. Do you like your desserts more chocolatey or more buttery? Share below!
Step 6
Poke holes all over the warm cake with a skewer. This is fun! Pour most of that gorgeous sauce right over the top. Watch it soak in. Let it sit for 10-20 minutes. This patience makes it extra sticky and good. Serve with the extra sauce and a dollop of cream. Pure happiness on a plate.
Cook Time: 30 minutes
Total Time: 1 hour
Yield: 9 servings
Category: Dessert, Baking
Three Fun Twists to Try
This recipe is like a favorite sweater. You can dress it up! Here are three cozy ideas. Try one next time. It makes baking an adventure.
Orange Zest Joy
Add the zest of one orange to the cake batter. It sings with the chocolate.
Salty Peanut Crunch
Sprinkle chopped salted peanuts on top with the sauce. Sweet and salty is the best.
Gingerbread Spice
Add a teaspoon of ginger and a pinch of cloves to the dry ingredients. Tastes like the holidays.
Which one would you try first? Comment below!
Serving It Up With Style
This pudding is a star all by itself. But a little extra love never hurts. For serving, I love a big scoop of vanilla ice cream. It melts into the warm sauce. You can also use softly whipped cream. A few fresh raspberries on the side look pretty. Their tartness is a nice break from the sweet.
What to drink? A cold glass of milk is my classic choice. It just works. For the grown-ups, a small glass of tawny port is lovely. It’s like a raisin in a glass. Sip it slowly. Which would you choose tonight?
Keeping Your Pudding Perfect
This cake loves a cozy spot on the counter. Cover it well for up to two days. For longer, the fridge is your friend. Wrap it tight and it will keep for five days.
You can freeze the unfrosted cake for a rainy day. I wrap slices individually. This way, I can thaw just one for myself. My first time, I froze the whole pan. It was too much for just me and Frank!
To reheat, a warm oven is best. A quick zap in the microwave works too. Just warm it until the sauce gets gooey again. This brings back that fresh-from-the-oven magic.
Batch cooking saves time and creates joy. Having dessert ready is a gift to your future self. It means you can share sweetness on a busy day. Have you ever tried storing it this way? Share below!
Simple Fixes for Common Hiccups
Is your cake too dry? You might have baked it a bit long. Check it a few minutes early next time. The toothpick should have moist crumbs, not be clean.
Is the sauce too thin or too thick? Heat controls everything. Too thin, cook it a minute longer. Too thick, stir in a splash of warm cream. I remember when my first sauce turned into a brick!
Are there lumps in your date paste? Just blend it a little longer. A smooth paste makes a smooth cake batter. This matters for a lovely, even texture in every bite.
Fixing small problems builds kitchen confidence. You learn what to look and feel for. This knowledge makes you a better, happier cook. Which of these problems have you run into before?
Your Quick Questions, Answered
Q: Can I make this gluten-free? A: Yes! Use a good gluten-free flour blend. It works just fine.
Q: Can I make it ahead? A: Absolutely. Make the cake and sauce a day early. Assemble it before serving.
Q: What if I don’t have dates? A: Prunes work in a pinch. The flavor will be a little different.
Q: Can I double the recipe? A: You can. Use a bigger pan. Just add a few more minutes to the bake time.
Q: Is the ice cream optional? A: Technically, yes. But the warm and cold together is magic. *Fun fact: This is called a “temperature contrast” and it makes flavors pop!* Which tip will you try first?
From My Kitchen to Yours
I hope this recipe becomes a favorite in your home. It holds many sweet memories in mine. Cooking is about sharing stories and creating new ones.
I would love to see your creation. Your version of this cozy chocolate pudding. Have you tried this recipe? Tag us on Pinterest! You can find me at @ChloesCozyKitchen.
Thank you for baking with me today. I am so glad you are here. Now, go enjoy a warm slice with someone you love.
Happy cooking!
—Chloe Hartwell.
Easy Chocolate Sticky Toffee Pudding
Description
The ultimate rich & gooey chocolate sticky toffee pudding! An easy, decadent dessert recipe perfect for any occasion. Serve warm with ice cream.
Ingredients
Chocolate Date Cake:
Chocolate Toffee Sauce:
For serving:
Instructions
- Chocolate Date Cake: Preheat your oven to 350F (conventional / no fan) and grease a 7×11 or 9×9 baking pan lightly with butter.
- Place the chopped dates in a bowl. Pour over the boiling water and milk and add the baking soda. Cover and set aside for 5-10 minutes while you work on the steps below.
- In a separate bowl, whisk the unsalted butter and brown sugar for 2-3 minutes until the mixture looks light and fluffy in texture.
- Add the eggs and vanilla, and whisk again until combined. It’s ok if the mixture looks somewhat separated.
- Once the dates have soaked, transfer the entire mixture to a blender and blend into a smooth paste. Whisk that into the butter, sugar and egg mixture until combined.
- Sift in the flour, cocoa powder, baking powder and salt. Gently fold until the dry ingredients are just combined and you have a smooth cake batter.
- Pour the batter into the prepared pan and bake for ~25-28 minutes until a toothpick inserted in the middle comes out with light, moist crumbs attached. Remove from the oven and let the cake cool at room temperature while you make the sauce.
- Chocolate Toffee Sauce: Add all the ingredients to a nonstick saucepan. Place on medium low heat and cook and stir for a few minutes until the butter and chocolate have melted and a smooth sauce forms. Remove from the heat as soon as the sauce starts to thicken up. Taste and adjust as needed (for example, I added a little bit of cocoa powder for a more chocolatey flavor).
- Once the cake has rested for 10 minutes, use a skewer to poke holes all over it (keeping it in the same pan).
- Pour over the chocolate toffee sauce so the cake can soak it up. You will use up about ¾ of the sauce and reserve ¼ for serving, but feel free to adjust based on your preference.
- Let the cake soak the sauce for ~10-20 minutes. Slice up, serve with whipped cream or vanilla ice cream and more sauce, and enjoy!


Leave a Reply