
My First Cheesecake Adventure
I made my first cheesecake when I was twelve. It was a mess. I got eggshell in the batter. I still laugh at that. But the taste was pure magic. That feeling never gets old.
These bites are that magic, made simple. No fancy springform pan needed. Just a muffin tin and your hands. This matters because cooking should be fun, not scary. Anyone can make something wonderful.
The Joy of a Good Crust
Let’s start with the base. Mix your crumbs, sugar, and melted butter. It should feel like sand at the beach. The kind that holds together for a perfect castle.
Press it firmly into the liners. A small glass helps. This step matters. A good crust holds everything up. It gives a nice little crunch. What’s your favorite part of a cheesecake, the crust or the filling?
The Swirl That Makes You Smile
Now for the fun part. Your creamy filling is smooth. Your berry puree is sweet and bright. Drop little dots of red onto the white. Then take a toothpick.
Swirl it gently. Don’t mix it all up. You want pretty ribbons. This is where you make them your own. *Fun fact: This marbling trick is centuries old. Bakers have been making food beautiful for a long, long time.
A Lesson in Patience
They bake quickly. The centers will still wiggle a bit. That’s perfect. They keep cooking as they cool. This is the hard part. You must let them cool completely.
Then, they go into the fridge. For at least two hours. Waiting is tough. But it makes them set just right. Trust me. Have you ever tried to eat a warm cheesecake? Was it a gooey mess?
Sharing the Sweetness
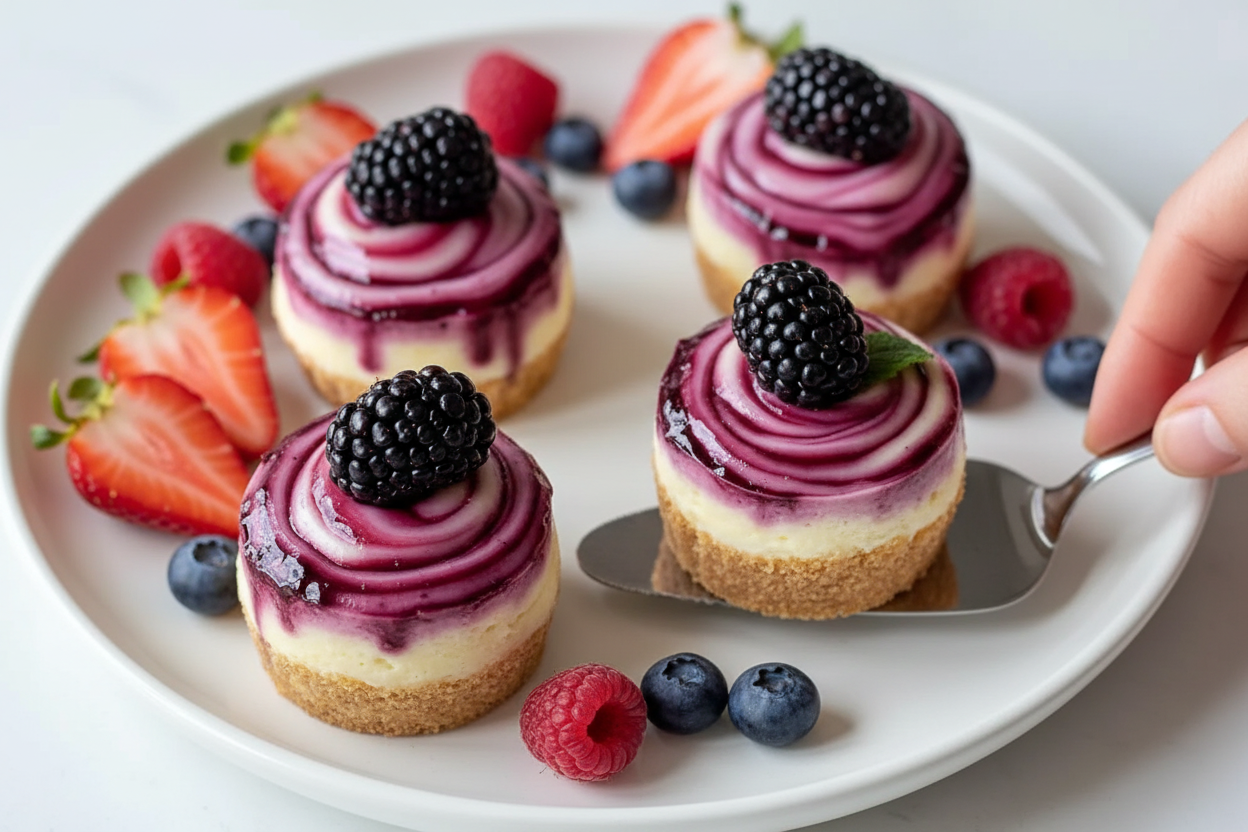
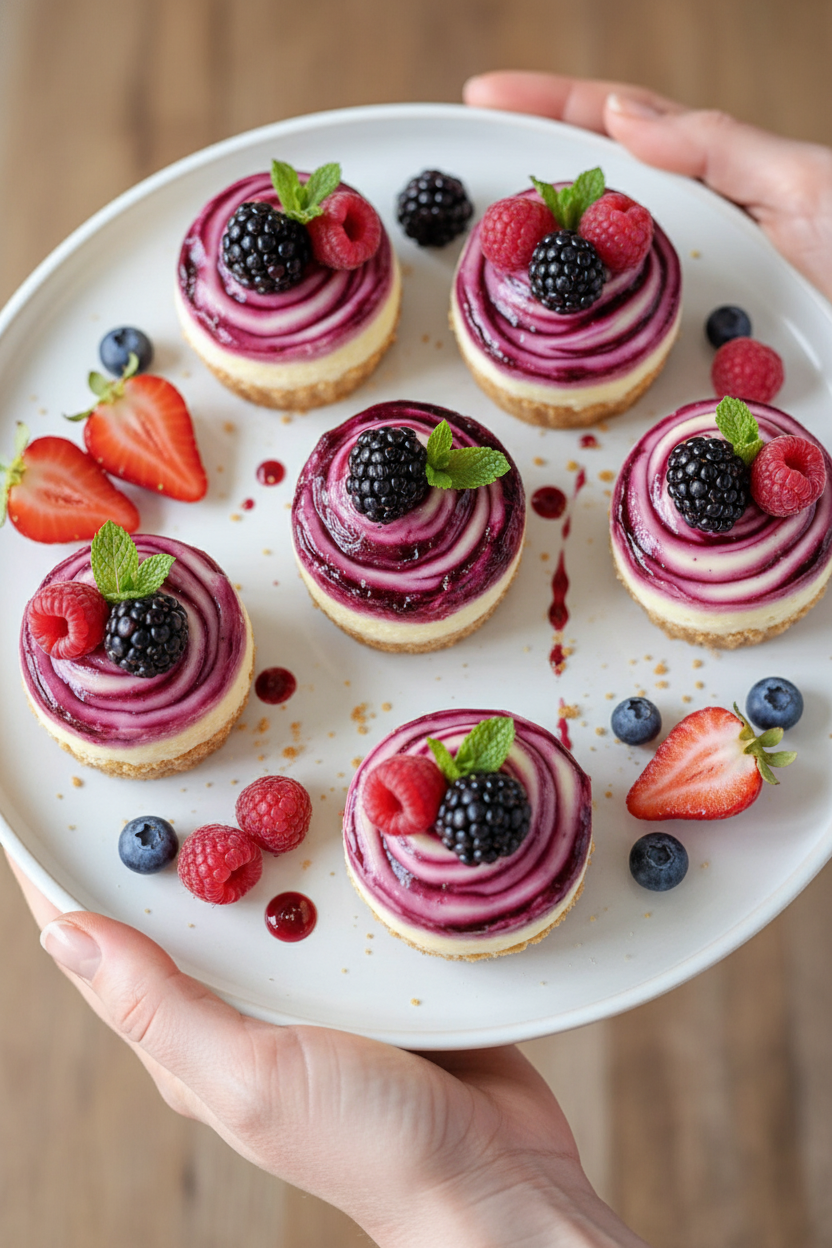
Finally, they are ready. Pop one out of the liner. See your beautiful swirl. Doesn’t that look amazing? These are perfect for sharing. Or for a secret treat just for you.
Food made with your hands feeds more than your belly. It feeds your heart. That’s the real secret ingredient. What’s a recipe that always makes you feel happy when you make it? I’d love to hear your stories.
Ingredients:
| Ingredient | Amount | Notes |
|---|---|---|
| graham cracker crumbs | 1 cup | |
| sugar | 2 tablespoons | for the crust |
| unsalted butter | 4 tablespoons | melted |
| cream cheese | 8 oz | softened |
| sugar | ⅓ cup | for the filling |
| vanilla extract | 1 teaspoon | |
| egg | 1 large | |
| berry puree | ¼ cup | strawberry, raspberry, or mixed berries |
| sugar | 1 tablespoon | for the berry swirl |
My Berry Swirl Cheesecake Bites
Hello, my dear! Come sit at the counter. I want to share my little cheesecake bites with you. They are perfect for small hands and big smiles. I first made these for my grandson’s birthday. He said they were like magic berries in clouds. I still laugh at that. Let’s make some magic together, shall we?
Step 1: First, let’s make our crust. Mix the graham crumbs, sugar, and melted butter in a bowl. It should look like wet sand from the beach. Press this sandy mix into your paper cups. I use a small glass to press it down flat. Bake it for just 5 minutes. This makes the crust nice and toasty.
Step 2: Now for the creamy part. Beat the soft cream cheese and sugar together. Doesn’t that smell amazing? Add the vanilla and one egg. Mix it until it’s smooth and dreamy. No lumps allowed! (A hard-learned tip: make sure your cream cheese is very soft. It stops those pesky lumps!)
Step 3: Let’s make our berry swirl. Stir your berry puree with a spoon of sugar. I love using raspberries. They make such a pretty pink color. If it’s too thick, add just a tiny splash of water. Now, spoon your creamy filling over the cooled crusts.
Step 4: Here comes the fun part. Drop little dots of your berry sauce on top. Take a toothpick and swirl it around. Make pretty patterns! It’s like painting. Do you like to make big swirls or little ones? Share below!
Step 5: Bake them for about 18 minutes. The edges will look set. The middle will have a little jiggle. That’s perfect. Let them cool on the counter. Then, the hardest part: wait. They need to chill in the fridge for two hours. It makes them set just right.
Cook Time: 25 minutes
Total Time: 2 hours 45 minutes (includes chilling)
Yield: 12 bites
Category: Dessert, Snack
Three Fun Twists to Try
Once you know the basic recipe, you can play! Here are my favorite little changes. They make each batch a new adventure.
Chocolate Chip Cookie Crust: Use crushed chocolate wafer cookies instead of graham crackers. It’s a chocolatey surprise at the bottom.
Lemon Berry Swirl: Add a teaspoon of lemon zest to the cheesecake filling. Use a lemon curd swirl with the berries. So bright and sunny!
Peanut Butter Swirl: Swirl in a spoonful of melted peanut butter instead of berry puree. Top with a mini chocolate chip. My grandson’s favorite.
Which one would you try first? Comment below!
Serving Them Up With Style
These bites are lovely all on their own. But sometimes, a little extra touch is nice. For a party, place each bite in a bright paper liner. Scatter a few fresh berries on the plate around them. A tiny mint leaf on top looks so fancy. It makes everyone feel special.
What to drink? A cold glass of milk is always my go-to. It’s the classic pair. For the grown-ups, a little glass of sweet dessert wine is lovely. It sips nicely with the berry flavor. Which would you choose tonight?
Keeping Your Cheesecake Bites Happy
These little bites are perfect for making ahead. They keep well in the fridge for four days. Just cover the tray tightly with plastic wrap.
You can freeze them, too! Place the chilled bites on a baking sheet. Freeze them solid for about two hours. Then pop them into a freezer bag.
They will keep for two months. Thaw them overnight in your fridge. I once forgot a batch in my freezer for weeks. They were still a delightful surprise!
Batch cooking like this saves so much time. It means you always have a sweet treat ready for guests. Or for a quiet Tuesday afternoon.
Have you ever tried storing it this way? Share below!
Little Fixes for Common Hiccups
Is your crust too crumbly? You need a bit more butter. The crumbs should stick together when you squeeze them. I remember when my first crust fell apart. A little more butter fixed it perfectly.
Is the filling lumpy? Your cream cheese must be very soft. Let it sit on the counter for an hour. This matters because smooth cheese makes a silky filling. Your bites will feel much more special.
Did your swirls disappear while baking? That is normal! The berry puree sinks in a little. It still gives a lovely flavor and a pink blush. *Fun fact: The berry swirl is like a secret message inside your cake!*
Getting past these small issues builds your kitchen confidence. You learn that most mistakes have a simple, tasty fix.
Which of these problems have you run into before?
Your Quick Questions, Answered
Q: Can I make these gluten-free? A: Yes! Use gluten-free graham crackers. Crush them into crumbs just the same.
Q: How far ahead can I make them? A: They are best made a day ahead. The fridge time lets the flavors get cozy.
Q: What can I use instead of berry puree? A: Try lemon curd or chocolate sauce. Just use the same amount.
Q: Can I make a bigger batch? A: Absolutely. Just double all the ingredients. Use two muffin tins.
Q: Any optional tips? A: A tiny sprinkle of salt on the crust is nice. It makes the sweet berries taste brighter.
Which tip will you try first?
From My Kitchen to Yours
I hope you love making these little bites. They always remind me of my granddaughter. She loves swirling the berry puree with a toothpick.
I would be so thrilled to see your creations. Sharing food is one of life’s great joys. Please show me your beautiful cheesecake bites.
Have you tried this recipe? Tag us on Pinterest! You can find me at @ChloesCozyKitchen. I cannot wait to see.
Happy cooking!
—Chloe Hartwell.

Berry Swirl Cheesecake Bites
Description
Easy no-bake mini cheesecakes with a vibrant berry swirl! Perfect for parties, these creamy bites are a stunning and delicious make-ahead dessert.
Ingredients
Instructions
- Preheat your oven to 325°F (165°C). Line a 12-cup muffin tin with paper liners.
- In a small bowl, mix the graham cracker crumbs, sugar, and melted butter until the texture resembles wet sand. Divide the mixture evenly among the muffin cups and press firmly to form a crust. Use the back of a spoon or the bottom of a glass to pack it down. Bake for 5 minutes, then set aside to cool.
- In a mixing bowl, beat the cream cheese and sugar with an electric mixer until smooth. Add the vanilla extract and egg, and mix until fully combined and creamy.
- In a small bowl, mix the berry puree with sugar. If the puree is too thick, add a teaspoon of water to thin it slightly.
- Spoon the cheesecake filling over the cooled crusts, filling each cup about 3/4 full.
- Drop small dots of berry puree onto the cheesecake filling and use a toothpick to swirl the dots into a marbled pattern.
- Bake the cheesecake bites for 15-18 minutes, or until the edges are set and the centers are slightly jiggly. Remove from the oven and let cool to room temperature.
- Refrigerate the cheesecake bites for at least 2 hours, or until fully set. Serve chilled, and enjoy!
Notes
- For a true no-bake version, omit the egg and use a stabilized whipped cream or additional cream cheese for the filling, setting in the refrigerator only.


Leave a Reply