
The Day I Burned Butter on Purpose
The first time I made brown butter, I thought I ruined everything. I stood over the skillet, watching the butter foam and turn dark. I remember saying, “Well, Chloe, you’ve done it now.” But then something magical happened. The kitchen filled with this warm, nutty smell. You know that cozy feeling when someone is making caramel popcorn? It was like that, only better. I still laugh at how worried I was. Doesn’t that smell amazing when you make it yourself? Have you ever tried browning butter before?Why This Cookie Is Special
This isn’t just any cookie recipe. It comes from Caroline Chambers, and she knows what she’s doing. You bake it right in a skillet, which means one less pan to wash. That matters to me because I hate doing dishes. But here’s why this really matters: when you brown the butter first, you unlock a flavor that feels like a hug. It turns a simple cookie into something people remember for years. I’ve watched grown adults close their eyes while eating this. What is your favorite thing about homemade cookies? Is it the smell or the first warm bite?The Toffee Trick You Need to Know
The recipe asks you to smash the toffee bars while they are still in their package. I love this part. You take a heavy bowl or a skillet and just whack it on the counter. It feels silly, but it works perfectly. You get these beautiful uneven chunks. Some are big, some are tiny. That makes every bite a little different. And the chocolate chips? Well, you know chocolate and toffee are best friends. Here is a *fun fact*: toffee is actually just butter and sugar cooked until it hardens. That means this cookie is double-buttery. Two kinds of butter goodness in one dessert.The Waiting Game
This is the hardest part of the recipe. You have to let the dough rest for at least 30 minutes before baking. I know, I know. You just want to eat it right now. But here is why this matters: resting lets the flour soak up all the liquid. That makes the cookie chewy instead of cakey. It also lets the brown butter flavor settle in and get friendly with the sugar. Trust me, the wait is worth it. While you wait, what do you like to do in the kitchen? Listen to music? Call a friend?How to Eat It (There Are Two Ways)
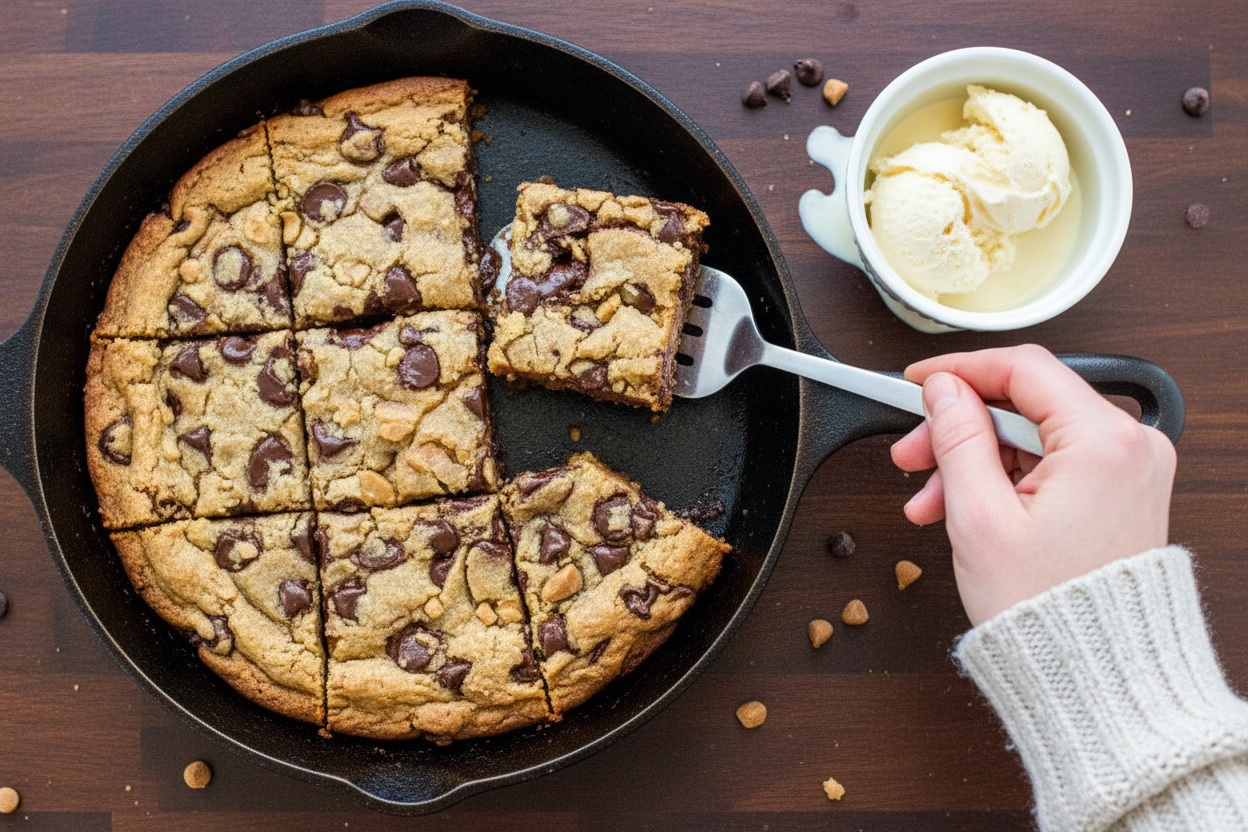
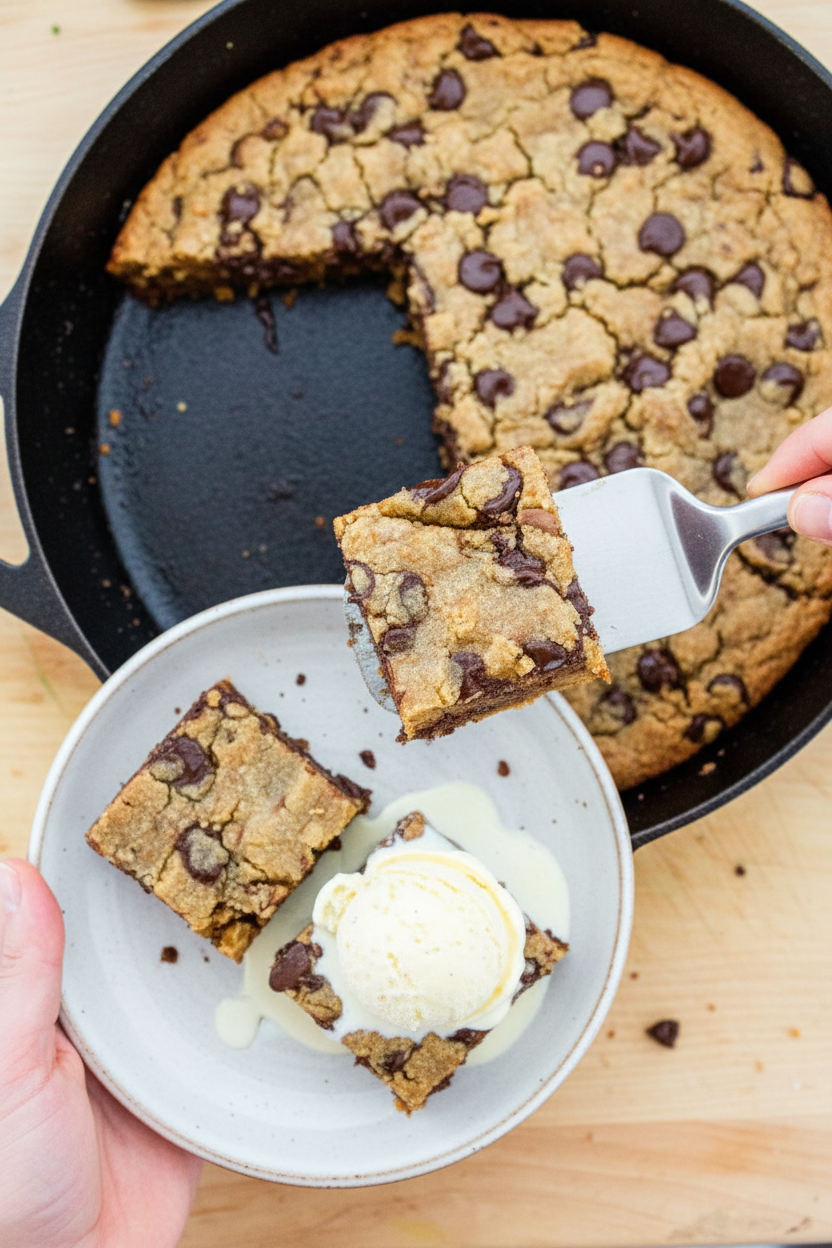
My grandkids always want it hot, straight from the oven. They scoop vanilla ice cream right on top and watch it melt into the nooks and crannies. The cold and warm together is something special. But I like the second way better. Let the cookie cool completely. Then carefully lift it out and cut it into bars. They hold together like a treat you can pack in a lunchbox or take to a friend’s house. Both ways are wonderful. Here is a mini story for you: One time I made this for a neighbor who was feeling sad. She said the cookie reminded her of her own grandmother’s kitchen. I almost cried right there on her porch.My Secret for the Perfect Center
When you bake this cookie, do not wait until the middle looks fully done. Take it out when the center is still soft and a little jiggly. It will keep cooking in the hot skillet on your counter. If you wait until it looks firm all the way through, you end up with a dry cookie. And nobody wants that. A soft, gooey middle is what makes this recipe famous. I learned this the hard way, trust me. Quick question for you: Do you like your cookies soft and chewy or crispy and crunchy? I am team soft all the way.One Last Cozy Thought
Cooking this cookie feels like coming home. The brown butter smell, the sound of chocolate chips hitting the skillet, the way the toffee crunches under your teeth. It is simple food that makes life feel a little sweeter. I hope you try making it soon. And I hope you share it with someone you love. That is what these recipes are really for. Who would you share a warm skillet cookie with right now? Tell me, I would love to know.Ingredients:
| Ingredient | Amount | Notes |
|---|---|---|
| Salted butter | 1 cup (2 sticks) | Used to brown in skillet |
| Dark brown sugar | 1 cup, lightly packed | — |
| White sugar | 1/3 cup | — |
| Large egg | 1 | — |
| Large egg yolk | 1 | — |
| Vanilla extract | 1 tablespoon | — |
| Almond extract | 1/4 teaspoon | Optional |
| All-purpose flour | 2 1/4 cups | — |
| Baking soda | 1 teaspoon | — |
| Chocolate chips | 1 cup | — |
| Chocolate toffee bars (Skor or Heath) | 2 (1.4 ounce each) | Crushed or chopped |
| Vanilla ice cream | For serving | Optional but highly recommended |
Why This Cookie Tastes Like a Warm Hug
I still remember the first time I made a cookie in a skillet. I was visiting my friend Martha, and she pulled this golden, gooey thing out of her oven. I nearly dropped my tea. It smelled like butter and toffee and every happy memory rolled into one. Doesn’t that sound amazing?
This recipe is special because the butter turns brown first. Browning butter is like giving it a little secret. It gets nutty and rich, and the whole kitchen fills with that cozy smell. I always save a little spoonful to taste, just to make sure it’s perfect. You should too.
The best part is eating it hot with ice cream. The ice cream melts into the cookie and makes puddles of sweet cream. My kids used to fight over who got the first scoop. I still laugh at that. It is the kind of dessert that makes everyone smile.
Let’s Bake It Together, Step by Step
Here is how we make this skillet cookie. I promise it is easy. Just follow along, and don’t rush the butter. That’s where the magic hides.
Step 1: Melt 1 cup of salted butter in your 10 or 12-inch ovenproof skillet over medium heat. Stir it often with a wooden spoon. Watch for foam, then little brown specks. This takes about 5 to 8 minutes. (Hard-learned tip: Do not walk away! Burnt butter smells sad and tastes bitter. Watch it like a hawk.)
Step 2: Take the skillet off the heat and let it cool for 10 minutes. I sometimes pop it in the fridge to speed things up. The butter must be cool before you add the eggs. Otherwise, you will get scrambled eggs in your cookie. Trust me, I learned that the hard way and my kitchen smelled like breakfast gone wrong.
Step 3: Stir in 1 cup of dark brown sugar and 1/3 cup of white sugar. Mix it quickly and really well. Then add 1 large egg, 1 large egg yolk, 1 tablespoon of vanilla, and 1/4 teaspoon of almond extract if you like. Stir until it looks smooth and shiny. My grandma used to say, “Stir until your arm gets tired, then stir one more time.”
Step 4: Pile 2 and 1/4 cups of flour and 1 teaspoon of baking soda on top of the butter mix. Use your fingers to sprinkle the baking soda into the flour. Then stir the flour into the butter. It will seem dry and stubborn at first. Just smash it down with your spoon until it all comes together like a happy family.
Step 5: Take your two toffee bars (still in their wrappers). Smash them with the bottom of a bowl or a skillet. It is very satisfying and a little bit loud. Or you can chop them with a knife, but smashing is more fun. Mix in 1 and 1/2 cups of chocolate chips and all the toffee pieces. Which do you like better: crunchy toffee or extra chocolate chips? Share below!
Step 6: If you can wait, let the dough rest for 30 minutes. This helps the flour soak up the butter. It makes the cookie chewier and softer. I know waiting is hard, but it is worth it. Use that time to lick the spoon clean.
Step 7: Bake at 325°F for 20 to 25 minutes. A 10-inch skillet needs about 25 minutes. A 12-inch skillet needs closer to 20 because the cookie is thinner. The cookie should be golden brown on the edges but still soft and puffy in the middle. Do not overbake it. You want it gooey.
Now, enjoy it two ways. Eat it hot with a big scoop of vanilla ice cream. Or let it cool, then run a spatula around the edges. Flip it out onto a cutting board and cut it into bars. Both ways are wonderful. I never choose. I just eat a little of each.
Cook Time: 25 minutes
Total Time: 1 hour 10 minutes (including cooling and resting)
Yield: 8 to 10 servings (or one very happy family)
Category: Dessert
Three Fun Twists to Try
Sometimes I like to mix things up. Here are three ways to make this cookie feel brand new. Each one is simple and delicious.
Peanut Butter Lover’s Twist: Swap 1/2 cup of the chocolate chips for the same amount of peanut butter chips. The salty peanut taste with the buttery toffee is a dream. My friend Judy says it is the best thing since sliced bread.
Sea Salt & Caramel Drizzle: Sprinkle a little flaky sea salt on top right when the cookie comes out of the oven. Then drizzle with warm caramel sauce. It adds a fancy feeling without any extra work. It tastes like a candy shop in a skillet.
Festive Berry Spark: Fold in 1/2 cup of dried tart cherries or chopped dried cranberries with the chips. The tart fruit cuts through all that sweet toffee. I made this once for Christmas and everyone asked for the recipe. Which one would you try first? Comment below!
How to Serve and What to Sip
This cookie is a star on its own, but a few little extras make it shine even brighter. Serve it warm with a tall scoop of vanilla bean ice cream. The hot and cold together is pure joy. Or, pile on some whipped cream and a few fresh raspberries for a pop of color. I love to drizzle a little honey over the top, too.
For a cold drink, pour a tall glass of cold milk. It washes down the buttery bite just right. For the grown-ups, a small glass of bourbon or dark rum is lovely. The warm, smoky flavor hugs the toffee in a cozy way. Which would you choose tonight?
Storing Your Skillet Cookie
This cookie is best the day you bake it. But leftovers are a happy thing. Let the cookie cool completely in the skillet first. Then cover it tightly with plastic wrap or foil. It will keep on the counter for two days.
For the fridge, wrap it well and eat within five days. I once tucked a slice in my lunchbox. My grandson found it and said it tasted even better cold. The toffee got chewy and rich.
To reheat, pop a slice in the microwave for 15 seconds. Or warm it in a 300°F oven for five minutes. This brings back the gooey center. Why does this matter? It saves you from wasting a single crumb. Batch cooking is like giving your future self a hug. Have you ever tried storing it this way? Share below!
Three Common Cookie Troubles (And Fixes)
First, the dough might seem too dry. Do not panic. Just smash it down with your spoon. The flour will soak up the butter over time. I remember my first time stirring this dough. I thought I had ruined it. But resting the dough for 30 minutes fixes everything.
Second, the butter might burn. This happens if you stop stirring. Keep moving it around the skillet. When it smells like toasted nuts, you are done. Why does this matter? Burnt butter tastes bitter. Brown butter tastes like magic.
Third, the cookie might be too soft in the middle. That is okay. It keeps baking as it cools. Let it sit for ten minutes before serving. Which of these problems have you run into before? Fixing these small issues builds your cooking confidence. You learn to trust your eyes and nose more than the clock.
Your Top Questions Answered
Q: Can I make this gluten-free?
A: Yes. Swap the flour for a 1-to-1 gluten-free blend. The cookie will be slightly more crumbly but still delicious.
Q: Can I make the dough ahead of time?
A: Absolutely. Cover the skillet and keep it in the fridge for up to two days. Let it sit on the counter for 20 minutes before baking.
Q: Can I swap the toffee bars?
A: Sure. Use chopped nuts, white chocolate chips, or even crushed pretzels for saltiness.
Q: Can I halve the recipe?
A: Yes. Use an 8-inch skillet and check for doneness at 15 minutes. Which tip will you try first?
Q: Do I have to use almond extract?
A: No. It adds a tiny nutty flavor, but the cookie is perfect without it.
From My Kitchen to Yours
I hope this recipe brings you warm, buttery smiles. The whole skillet feels like a hug on a plate. *Fun fact: This cookie was inspired by a farmhouse dessert my grandmother made on cold autumn nights.*
Share a photo when you bake yours. I would love to see your golden-brown creation. Have you tried this recipe? Tag us on Pinterest! Thank you for spending time in my kitchen. I will be right here pouring tea and waiting for your stories.
Happy cooking!
—Chloe Hartwell

One-Skillet Brown Butter Toffee Cookie | Caroline Chambers: One Skillet Brown Butter Toffee Cookie Recipe
Description
This one-skillet brown butter toffee cookie recipe is pure perfection. Get gooey, crispy edges with rich toffee bits in every bite.
Ingredients
Instructions
- Melt 1 cup butter in a 10 to 12 inch ovenproof skillet over medium heat, stirring often until it foams, then browns, 5 to 8 minutes. Remove skillet from heat and allow to cool for 10 minutes. You can even throw in the fridge for those 10 minutes – it has to be cool before we add the eggs! Otherwise they’ll scramble!
- Stir in 1 cup brown sugar and 1/3 cup white sugar really well, and quickly! Stir in 1 large egg, 1 large egg yolk, 1 tablespoon vanilla extract, and 1/4 teaspoon almond extract.
- Pile 2 1/4 cups all-purpose flour and 1 teaspoon baking soda on top of the butter mixture, and use your fingers to sift the baking soda into the flour. Stir the flour into the butter mixture. It might seem like it doesn’t want to combine, but smash the dough down with your spoon to combine the flour into the butter mixture.
- Smash 2 toffee bars (still in their package) with the bottom of a bowl or skillet into big rough pieces. Or, you can use a knife to chop them, but you don’t even have to dirty a cutting board if you go the smash route!
- Mix 1 1/2 cups chocolate chips and the toffee into the cookie dough.
- If you can stand to wait, let the dough rest at room temperature for at least 30 minutes to allow the flour to hydrate before baking.
- Bake at 325°F for 20 to 25 minutes, until golden brown but still very soft looking in the center. A 10 inch skillet will need closer to 25 minutes, whereas a 12 inch skillet will need closer to 20, since the cookie will be thinner.
- There are two ways to enjoy! 1) Hot, straight out of the oven. Top with ice cream and enjoy immediately. 2) As cookie bars! Allow to cool down completely, then run a silicone spatula around the edges to release the cookie from the skillet. Transfer it carefully to a cutting board, and cut into cookie bars.
Notes
- Nutrition information is not provided in the text.


Leave a Reply