
My First Thumbprint Cookie Lesson
The first time I made thumbprint cookies, I was ten years old. My grandmother let me push my thumb into each little dough ball. I pressed so hard the cookies came out looking like little bowls. We both laughed until our sides hurt. I still laugh at that memory every time I make them. These chocolate thumbprint cookies are extra special. The dough is soft and dark, like a rich chocolate cloud. You don’t need fancy tools. Just your thumb or the back of a spoon. What is your favorite cookie to bake with someone you love?Why The Chill Step Matters
I know it is tempting to skip the chilling time. Please don’t. When the dough rests in the fridge, the butter gets firm again. This keeps your cookies from spreading into flat pancakes in the oven. That is why we chill them for 30 minutes. This matters because warm butter makes cookies spread too much. You lose your pretty thumbprint shape. A cold cookie keeps its dent. Then you can fill it with shiny ganache later. Does that make sense? Try chilling the dough and see the difference yourself.The Little Trick With The Spoon
Here is a secret I learned after many messy batches. When the cookies come out of the oven, they puff up. Your thumbprint nearly disappears. So you need to press again right away, while they are still hot. Use a bigger spoon this time. Gently push down to remake the dent. I hold my breath during this part, hoping the cookie doesn’t crack. It usually doesn’t. Then I wait ten minutes before adding the ganache. The warm cookie will make the chocolate too runny if you rush. Patience is a cookie’s best friend. Have you ever baked something and learned a trick the hard way?How The Ganache Comes Together
The chocolate ganache is almost magic. You just heat some cream until it barely bubbles. Then pour it over chopped chocolate. Cover the bowl and wait five minutes. When you stir, it turns into the shiniest, smoothest chocolate sauce you have ever seen. I always let my kids watch this part. Their eyes get wide. It feels like a science experiment you can eat. *Fun fact: The word “ganache” comes from an old French word meaning “cheek” — maybe because it feels as soft as a baby’s cheek.* Why do you think chocolate makes everything better?Making The Cookies Your Own
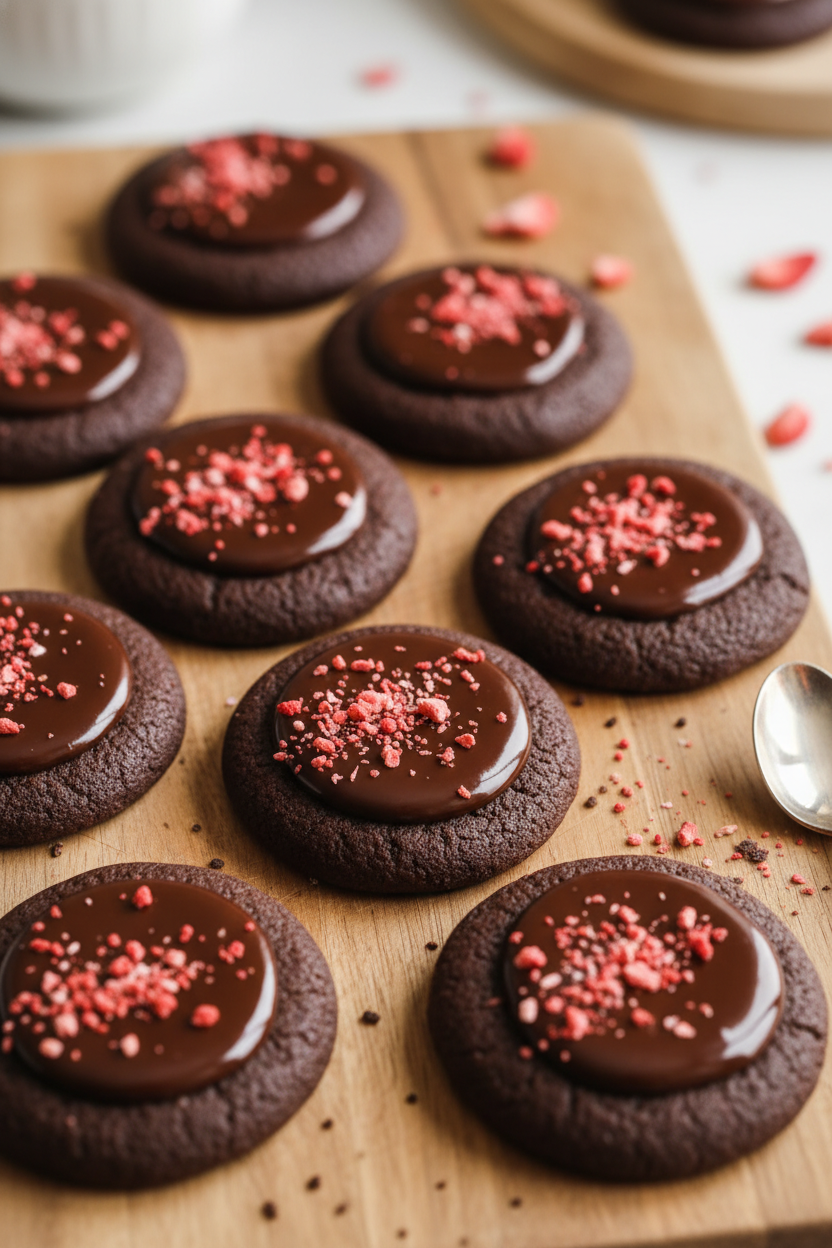
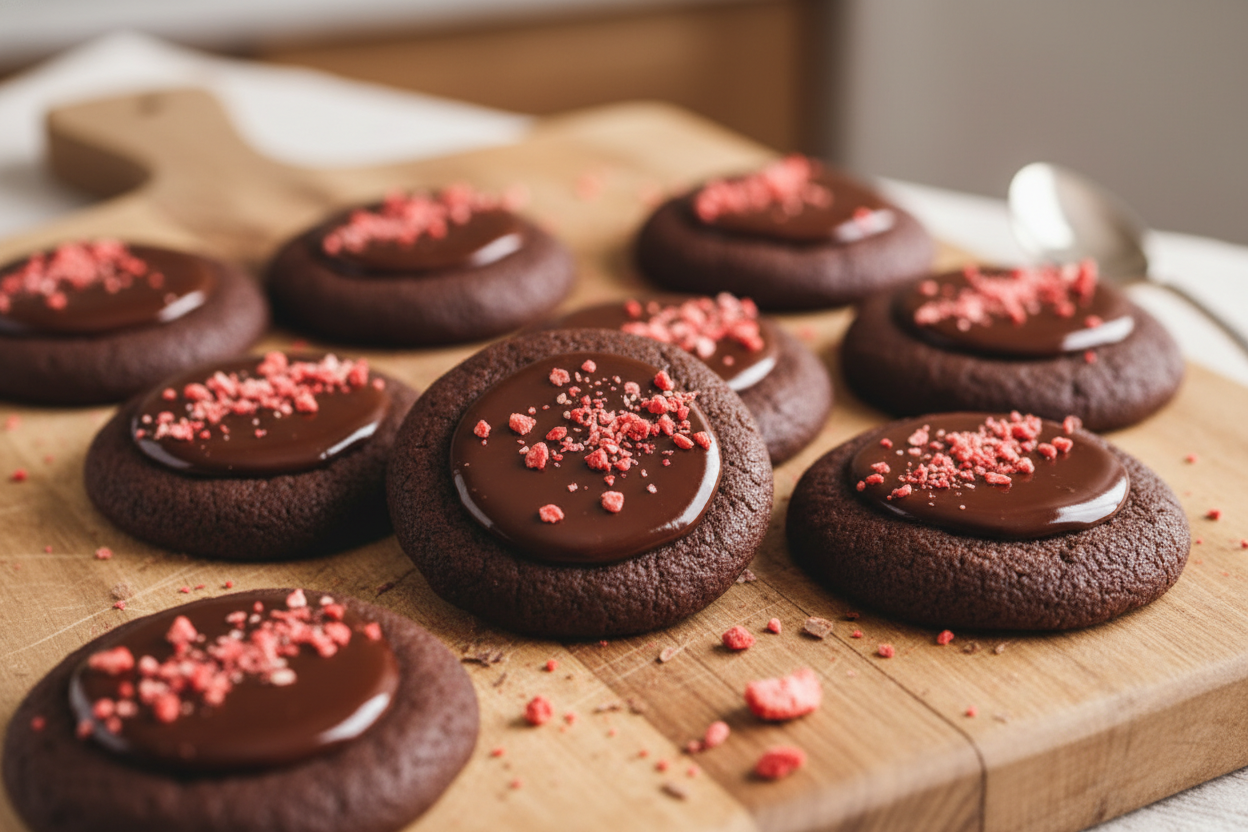
The recipe says you can decorate with crushed freeze-dried strawberries. I love that. The tiny red bits look like little jewels on top of the dark chocolate. But you can try other things too. Sprinkle sea salt for a salty-sweet treat. Or add crushed peppermint candy for wintertime. This matters because cooking should be about what you love. Recipes are just a starting point. You get to make them yours. My friend Linda uses crushed toffee on hers. I once tried crushed potato chips. Don’t laugh — it was actually delicious! What would you put on top of your cookie?Why We Share Cookies
Baking these cookies taught me something. The best part is not eating them. It is watching someone else take that first bite. When their face lights up, you feel warm inside. That is why I always bake extra. So I can give a few to a neighbor or a friend who needs a smile. This matters because food connects us. A simple cookie can say “I was thinking of you” without using any words. It is a small hug made of butter, sugar, and chocolate. Next time you bake, think about who you might share with. It makes the cookies taste even better.Ingredients:
| Ingredient | Amount | Notes |
|---|---|---|
| Unsalted butter | ¾ cup (170g or 12 tbsp) | Softened at room temp |
| Granulated sugar | 1 cup (200g) | |
| Large egg | 1 | |
| Egg yolk | 1 | |
| Vanilla extract | 1 tsp | |
| All purpose flour | 1 ½ cups (195g) | |
| Dutch processed cocoa powder | ½ cup (50g) | |
| Baking powder | ½ tsp | |
| Baking soda | ¼ tsp | |
| Salt | ½ tsp | |
| Semi-sweet chocolate | 150g | For ganache |
| Heavy cream | 75g (about ⅓ cup) | For ganache |
| Freeze dried strawberries | To taste | Crushed; optional for decoration |
The Sweetest Little Memory in Every Bite
When I was a girl, my grandma would make thumbprint cookies for every holiday. She’d press her thumb right into the dough, then fill it with jam. I still laugh at that memory because her prints looked a little like tiny bear paws.
These cookies are even better. They have a deep, rich chocolate dough and a silky chocolate ganache center. The dough is soft like playdough, but don’t play with it too long or it gets greasy. Trust me, I learned that the hard way.
You’ll need your hands for rolling the dough into little balls. Keep them cool and a little bit floured. Doesn’t that smell amazing once it hits the oven? Even before they bake, the cocoa smells like a warm hug.
This recipe makes about 26 cookies, which is just right for sharing. Or for hiding a few in the back of the fridge for yourself. I won’t tell a soul. What’s your favorite cookie memory? Share below!
Let’s Make Them, Step by Step
Step 1: In a big bowl, whisk the softened butter and sugar for 2-3 minutes. It should look light and fluffy, like whipped clouds. Scrape the bowl down twice so everything mixes evenly.
Step 2: Add the egg, egg yolk, and vanilla. Whisk again until it’s all combined. Scrape the bowl once more. (Here’s a hard-learned tip: if your eggs are cold, the butter might clump. Use room-temp eggs for a smooth dough.)
Step 3: In a separate bowl, sift the flour, cocoa powder, baking powder, baking soda, and salt together. Add the dry mix to the wet in 2-3 batches. Fold gently with a rubber spatula until just combined. Don’t overmix or the cookies will be tough.
Step 4: Scoop the dough into 25g balls, about 1 inch across. Roll them gently with your palms to smooth out cracks. Place them on a lined baking sheet, leaving 2 inches of space between each ball.
Step 5: Use the back of a 1/2 teaspoon measure to press a thumbprint into each ball. This also flattens them a little. It’s easier than using your thumb and makes all the cookies look the same size.
Step 6: Pop the sheet into the fridge for 30 minutes (or 15 in the freezer). While they chill, make the ganache. Preheat the oven to 375F when the timer has 15 minutes left. Which dessert always reminds you of your grandma? Share below!
Step 7: Bake the cookies for 9-11 minutes. I like 10 minutes for soft centers and crisp edges. When they come out hot, press the indentations again with a larger spoon to make room for the filling.
Step 8: Let the cookies cool on the sheet for 10 minutes. Meanwhile, heat the cream until it just simmers. Pour it over the chopped chocolate, cover, and wait 5 minutes. Stir until smooth and shiny.
Step 9: Once both the cookies and ganache are cool, spoon the ganache into each thumbprint. Let them sit for 30 minutes so the filling sets. Top with crushed freeze-dried strawberries if you like. Enjoy every bite.
Cook Time: 10 minutes
Total Time: 1 hour 40 minutes
Yield: 26 cookies
Category: Dessert, Cookies
Three Fun Twists to Try
Peppermint Dream: Add 1/2 teaspoon of peppermint extract to the dough. Top the ganache with crushed candy canes.
Sunny Citrus: Mix the zest of one orange into the sugar before creaming the butter. Fill with white chocolate ganache instead.
Spicy Kick: Stir 1/4 teaspoon of cayenne pepper into the dry ingredients. The heat sneaks up on you, in a good way. Which one would you try first? Comment below!
How to Serve and Sip
These cookies look beautiful on a simple white plate. Dust them with a little extra cocoa powder for a fancy touch. Serve them with a glass of cold milk for the kids, or a handful of fresh berries on the side.
For grown-ups, try pairing them with a small cup of strong coffee or espresso. The bitter coffee balances the sweet, rich chocolate perfectly. For a non-alcoholic treat, pour a tall glass of iced vanilla almond milk.
They’re also lovely packed in a little tin for a neighbor or teacher. Just layer them between sheets of wax paper so the ganache doesn’t smudge. Which would you choose tonight?
Storing Your Thumbprint Cookies
These cookies stay soft for days if you store them right. Put them in an airtight container at room temperature. Do not stack them until the ganache is fully set. That takes about an hour. I once stored a batch too early and ended up with chocolate smeared all over the tops. A gentle lesson learned. You can freeze the baked cookies without the ganache for up to three months. Just wrap them well in plastic and foil. When you want a treat, thaw them on the counter for twenty minutes. Then add fresh ganache. This is great for cookie swaps or holiday prep. Why does this matter? Batch cooking saves you time on busy days. You can have fresh cookies ready in minutes. Have you ever tried storing it this way? Share below!
Common Problems and Easy Fixes
First problem: the cookie dough is too sticky. This happens if your butter is too warm. Pop the bowl in the fridge for ten minutes. Then try again. I remember once I added extra flour to fix it. That made the cookies dry. Better to chill the dough. Second problem: the thumbprint puffs up in the oven. That is why you press it again right when the cookies come out. Use a larger spoon to get a good dent. Third problem: the ganache is too thin. You probably heated the cream too much. Let it cool at room temperature for a few minutes before pouring. You can also stir in a few extra chocolate chips to thicken it. Why does fixing these issues matter? It makes you a more confident baker. You learn to trust your eyes and hands. The cookies taste better, too. Which of these problems have you run into before?
Your Questions, Answered
Q: Can I make these gluten-free? A: Yes. Swap the flour for a 1:1 gluten-free baking blend. The texture will be slightly crumblier but still delicious.
Q: Can I make the dough ahead of time? A: Yes. Shape the balls, press the thumbprints, and freeze them on a tray. Then store in a bag for up to a month. Bake straight from frozen, adding 2 minutes to the time.
Q: What if I don’t have Dutch cocoa? A: Use regular unsweetened cocoa powder. The cookies will be a bit less deep in color but still tasty.
Q: Can I scale the recipe up or down? A: Yes. Just keep the ratios the same. Half the recipe makes about 13 cookies. Double it for 52.
Q: Any fun tips for the filling? A: Try white chocolate or peanut butter ganache. *Fun fact: Freeze-dried strawberries crush easily with your hands.* Which tip will you try first?
A Warm Farewell from Chloe
I hope these cookies bring a little sweetness to your day. They are perfect for after-school snacks or quiet afternoons with tea. The best part is the chocolate filling hiding inside. My own granddaughter loves to help press the thumbprints. Sometimes she presses too hard and the cookie splits. We just eat that one first. That is the joy of baking together. If you try this recipe, I would love to see your photos. Have you tried this recipe? Tag us on Pinterest! Happy cooking! —Chloe Hartwell.
Best Thumbprint Cookies With Chocolate Filling
Description
Indulge in the best thumbprint cookies with a rich chocolate filling. Easy, buttery, and perfect for holiday baking or dessert lovers.
Ingredients
Instructions
- Whisk the softened butter and sugar for 2-3 minutes until the mixture looks really light and fluffy, scraping the bowl at least twice in the middle
- Add the egg, egg yolk and vanilla, and whisk again until the ingredients are combined. Scrape the bowl again
- Sift and mix the dry ingredients in a separate bowl. Add the dry ingredients to the wet ingredients in 2-3 batches, folding gently with a rubber spatula. Try not to overmix the dough and stop as soon as the dry ingredients are combined. The result should be a soft but workable cookie dough
- Line 1-2 large baking sheets with parchment paper. Shape the cookie dough into 25g balls, about 1″ in diameter each. This should make about ~26 balls. Use minimal pressure to make the balls and remove any cracks from the surface, but don’t over work them as that will cause them to become greasy. Place the balls on the lined baking sheets, keeping about 2″ between each. Use the back of a ½ teaspoon measure (or something of similar size; it should be a round shape that is smaller than the size of the cookie ball) to press “thumbprints” into each cookie ball. This will also naturally flatten each ball slightly. You can use your thumbs but it is easier and more consistent with a spoon measure. Place the sheets in the fridge to chill for 30 minutes (or ~15 min in the freezer). In the meanwhile, work on the chocolate ganache (see below)
- In the last 15 minutes of chilling, pre-heat the oven to 375F (conventional, no fan). Once the cookie balls have chilled and oven has pre-heated, bake the cookies for ~9-11 minutes. 9 min will yield softer, chewier cookies while they will be firmer at 11 minutes. I baked mine for 10 minutes, and strongly recommend baking one cookie as a test first. As soon as the cookies are out of the oven and are still hot, use a larger spoon measure (like 1 tbsp) to press down gently on the cookies again. They puff up and partly lose the thumbprint in the oven, so this step helps bring it back. Let them cool at room temperature for 10 minutes
- Chocolate Ganache: Add the chopped chocolate / chips to a bowl. Heat the cream until it just starts to simmer. Pour over the chocolate, making sure the chocolate is covered in the cream. Cover and wait 5 minutes. Gently stir until the chocolate fully melts and a smooth, shiny chocolate ganache forms. Let it cool and thicken up at room temperature while you bake the cookies
- Assembly & serving: Once the cookies and ganache have both cooled down, fill each cookie generously with the ganache. I just do this with a spoon. Let them rest for ~30 or so minutes so the ganache can set more. Decorate however you like; I used crushed freeze dried strawberries. Serve & enjoy!
Notes
- For best results, chill the cookie dough thoroughly before baking. The ganache can be made ahead and stored in the fridge.


Leave a Reply