
Why I Love This Trick
The first time I made ice cream, I was twelve years old. My grandmother’s old wooden spoon was my only tool. I had no fancy machine, just a bowl and a lot of hope. That ice cream was lumpy, but it tasted like pure joy. I still laugh at how proud I felt.
This recipe brings back that feeling. It proves you don’t need special gadgets to make something wonderful. All you need is a cold pan and a little patience. Doesn’t that make you want to try it right now?
Why this matters: When you make food with your own hands, it tastes better. You put a piece of yourself into it. That’s a gift you can’t buy at the store.
The Simple Magic of Cream and Sugar
Let’s talk about the two cups of heavy cream and the two cups of half-and-half. That’s the heart of this recipe. When you whip them together with sugar, something amazing happens. The cream gets thick and dreamy, like a cloud you can eat.
The sugar melts completely if you stir long enough. That’s important. You don’t want crunchy ice cream. You want smooth, creamy sweetness that slides across your tongue. *Fun fact: Sugar helps keep ice cream from turning into a giant ice cube. It lowers the freezing point, so your dessert stays soft.
What flavor would you add? Vanilla is classic, but maybe you love chocolate or fresh strawberries. I’m curious—what’s your favorite?
Rewriting History in Your Kitchen
Long before freezers, people made ice cream using snow and salt. They packed bowls into buckets of ice and spun them by hand. It was hard work, but the reward was sweet. Back then, only rich folks could enjoy it. Now, you can make it in your own kitchen with basic tools.
This recipe is a shortcut, but it carries that old-fashioned spirit. Every time you pull that pan out to beat the mixture, you’re doing what cooks did a hundred years ago. That connection makes the ice cream taste even better.
Why this matters: Knowing where a food comes from makes it more special. It turns a simple dessert into a little story you can share. And stories, like ice cream, are best when passed around.
Beating the Cold—Step by Step
Here is where the fun really starts. After your mixture sits for twenty minutes, check the edges. They should look slushy and frozen. That’s your sign to grab the hand mixer and go to town. Beat it until it looks like thick soft-serve ice cream.
Then put it back. Wait half an hour. Beat it again. Do this four or five times. I know it sounds like a lot, but it’s worth every second. Each beating breaks up the ice crystals and makes the final scoop silky smooth. You cannot beat the mixture too much, so don’t worry.
Have you ever made something that needed lots of stirring? Share a memory with me—I’d love to hear about it.
A Little Lesson in Patience
One time, I got impatient and skipped a beating step. The ice cream turned out crunchy and icy. My kids ate it anyway, but they made funny faces. Lesson learned: patience is part of the recipe.
If your mixture gets too hard to beat, just set the pan on the counter for ten minutes. It will soften up, and then you can keep going. That little break saves your arm and your mixer.
Think about other times patience made something better. Maybe a cookie dough that chilled overnight. Or a soup that simmered all day. Doesn’t it feel good when you wait for the right moment?
Storing and Sharing the Sweetness
Once your ice cream is firm and creamy, scoop it into a covered container. A regular plastic tub works fine, or a glass bowl with a lid. It will keep for about two weeks in the freezer. But trust me, it will be gone before then.
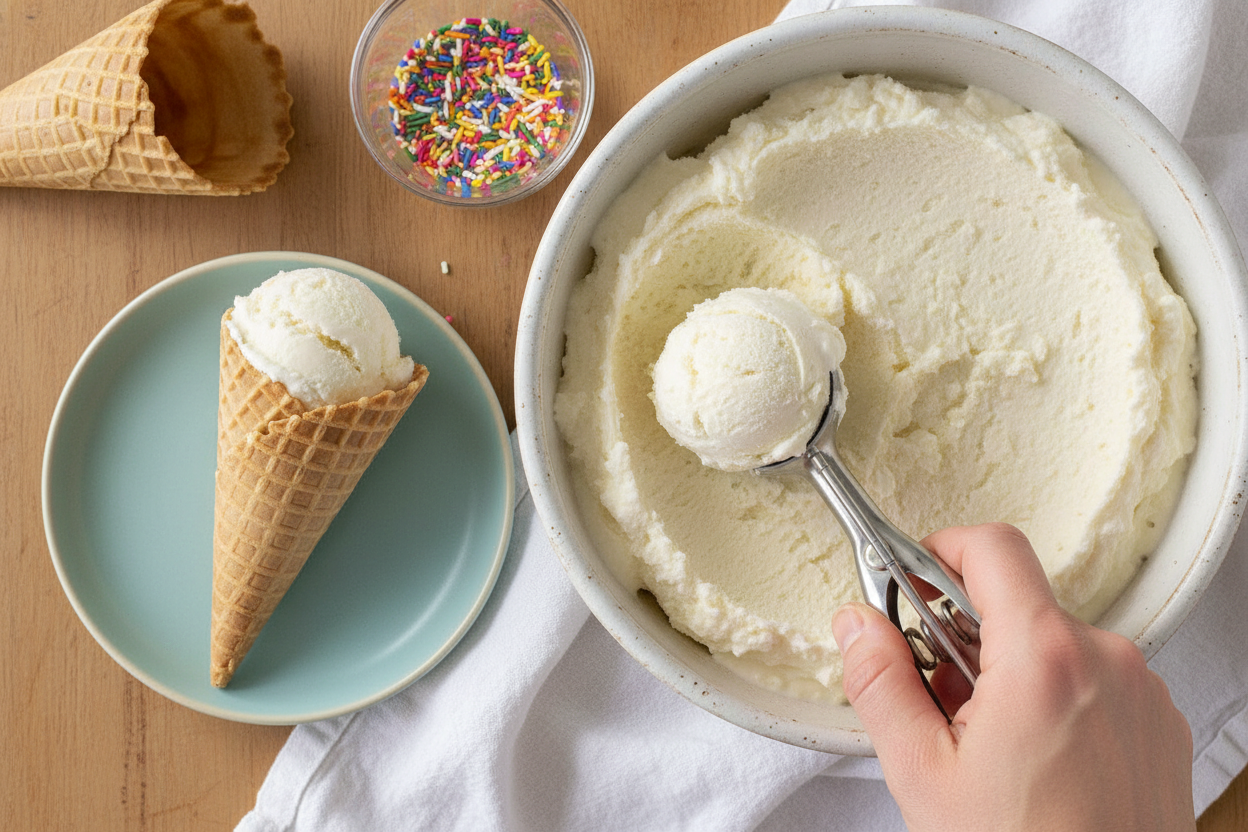
Serve it in bowls, cones, or over a warm slice of pie. The cold ice cream melting on warm pie is one of life’s simple joys. I still smile every time I watch the puddles form.
Quick poll: bowl, cone, or pie? I’m team bowl with sprinkles. What’s your favorite way to eat homemade ice cream?
Your Turn to Create
Now you have the secret. No machine, no fuss, just cold cream and your own two hands. This recipe is a invitation to play. Toss in some crushed cookies or a swirl of caramel. Make it yours.
When you take that first bite, close your eyes. Notice how the smoothness feels against your tongue. That’s your hard work paying off. You made that.
I would love to know how your batch turns out. Did you change the flavor? Did you get the perfect creamy texture? Drop a note in the comments so we can all learn together.
Ingredients:
| Ingredient | Amount | Notes |
|---|---|---|
| Heavy whipping cream | 2 cups | |
| Half-and-half cream | 2 cups | |
| Sugar | 1 cup | |
| Vanilla extract | 2 teaspoons |
Why I Love Making Ice Cream This Way
When I was a little girl, my grandma would whip up ice cream on hot summer days. She never owned one of those fancy machines. I remember standing on a stool, watching her stir the creamy mixture with a wooden spoon. The kitchen smelled like vanilla and happiness. Doesn’t that smell amazing?
This recipe takes me right back to her cozy kitchen. No special tools needed. Just a bowl, a pan, and a little patience. It is so simple that even a 12-year-old can do it alone. I still laugh at the time my brother tried to “help” and spilled sugar everywhere.
The secret is beating the ice cream as it freezes. That keeps it smooth, not icy. You cannot beat it too much, so do not worry. Here is a hard-learned tip: If your mixture gets too hard, just let it sit in the fridge for a few minutes. Then beat it again. It always works.
Step 1: First, grab a freezer-safe pan, like a 13×9-inch glass dish. Stick it in the freezer empty for about 20 minutes. This cold pan helps the ice cream freeze faster. My grandma used an old metal cake tin, and it worked perfectly.
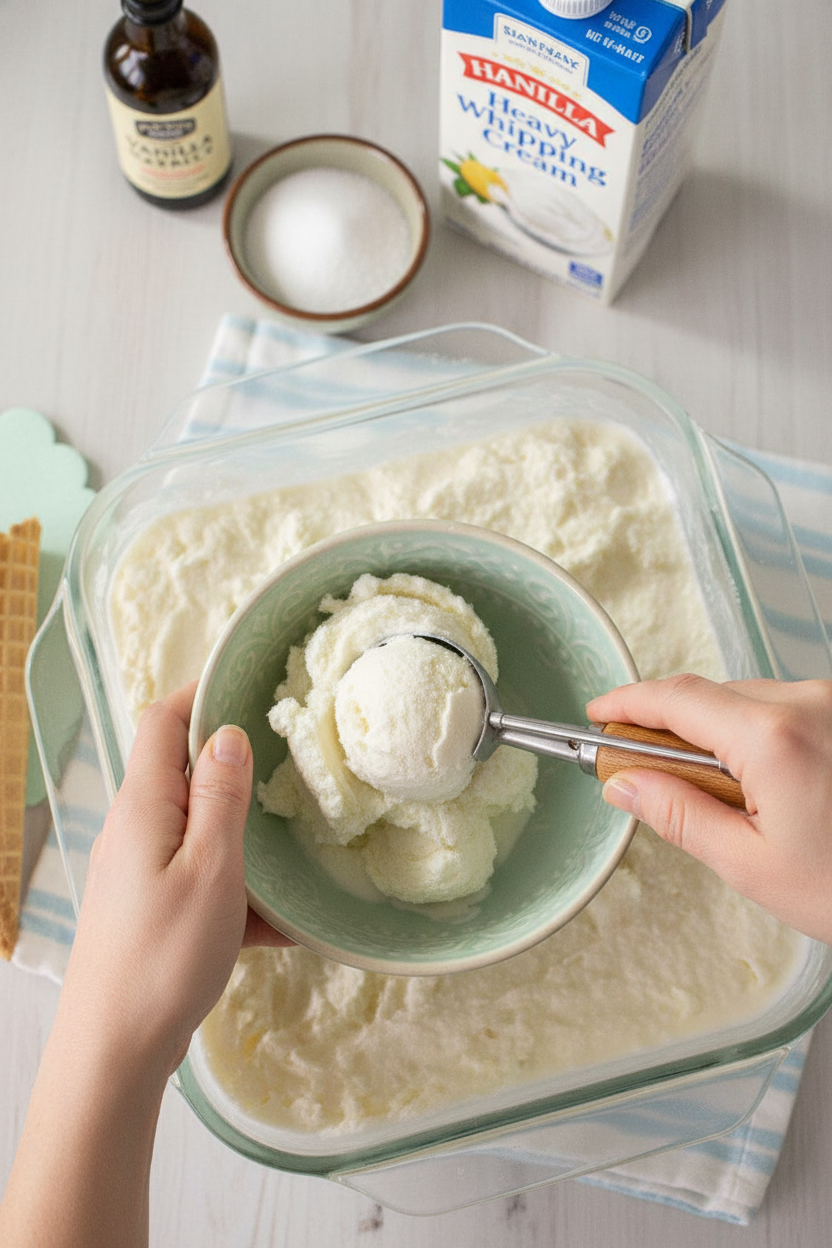
Step 2: In a big bowl, pour in the heavy cream, half-and-half, sugar, and vanilla. Stir it all together until the sugar disappears. It will look like sweet, rich milk. I like to let my kids taste a little spoonful at this point. It tastes like a milkshake already.
Step 3: Pour the mixture into the cold pan. Put it back in the freezer for 20 to 30 minutes. Check the edges. When they start looking frozen, pull it out. Beat the whole thing with a hand mixer until it is smooth. This breaking up of ice bits makes it creamy.
Step 4: Put the pan back in the freezer. Set a timer for 30 minutes. Every half hour, beat it again with the mixer. Do this about four or five times. After the last beating, let it freeze solid. Scoop it out, and you have homemade ice cream. Now tell me: What is your favorite flavor to add to vanilla? Share below!
Cook Time: 4–6 hours for freezing (including mixing sessions)
Total Time: 4 hours 15 minutes (active mixing)
Yield: 1-1/4 quarts (about 6 servings)
Category: Dessert
Three Fun Twists to Try
Once you master plain vanilla, you can make it new again. These twists are easy and fun. They use things you might already have in your pantry. Try one on a lazy Saturday afternoon.
Chocolate Chip Cookie Dough: Chop up some store-bought cookie dough into tiny bits. Fold them in during the last beating. You get little crunchy, sweet surprises in every bite.
Strawberry Swirl: Mash up some fresh strawberries with a little sugar. Let them sit for 10 minutes. Swirl the berry syrup into the ice cream before the final freeze. It looks so pretty and tastes like summer.
Mint Chocolate Chip: Add 1/2 teaspoon of mint extract instead of vanilla. Stir in a handful of mini chocolate chips. It is refreshing and cool. Perfect for hot afternoons. Which one would you try first? Comment below!
How to Serve Your Homemade Ice Cream
This ice cream is wonderful all by itself. But I like to dress it up sometimes. You can serve it in crispy waffle cones or a bowl with fresh berries on top. A drizzle of hot fudge or caramel sauce never hurts.
For a fun twist, make ice cream sandwiches. Scoop the frozen ice cream between two soft chocolate chip cookies. Roll the edges in sprinkles. Serve them right away, or wrap them for later.
For drinks, a tall glass of cold milk is perfect. It is how we always had it when I was young. Grown-ups might like a splash of amaretto or coffee liqueur poured over their scoop. Keep it simple and cozy. Which would you choose tonight?
Storing Your Homemade Ice Cream For Later
Once your ice cream is smooth and creamy, you need to store it right. Put it in a covered freezer container. This keeps it from getting icy or picking up funny flavors.
I remember the first time I made this. I just left it in the metal pan overnight. The next day, it had a hard, crunchy crust on top. We had to chip it out with a spoon.
To reheat, you don’t need a stove. Just let the container sit on the counter for ten minutes. It will soften up enough to scoop easily.
Why this matters: Good storage keeps your hard work from becoming a block of ice. It saves the creamy texture you beat into it.
Have you ever tried storing it this way? Share below!
Three Common Ice Cream Problems And Fixes
Sometimes the ice cream turns into a rock. This happens when you forget to beat it enough. The fix is easy. Just let it sit in the fridge until soft, then beat it again.
Another problem is icy crystals. This happens when the sugar isn’t fully dissolved. Stir your mixture until you can’t feel the sugar grains anymore. That one step makes a big difference.
I once tried skipping a beating session because I was tired. The ice cream came out grainy, like frozen sand. My grandson asked if I made snow cones by mistake.
Why this matters: Fixing these problems builds your cooking confidence. You learn that a little patience gives you perfect, creamy ice cream every time.
Which of these problems have you run into before?
Your Ice Cream Questions Answered
Q: Can I make this gluten-free? A: Yes, all the ingredients are naturally gluten-free. You are safe to enjoy it.
Q: Can I make it ahead of time? A: Yes, you can make it up to two weeks early. Keep it tightly covered in the freezer.
Q: Can I swap the heavy cream? A: You can use all half-and-half, but it will be less rich and creamy.
Q: How do I double the recipe? A: Just double every ingredient. Use a bigger pan so it freezes evenly.
Q: Any flavor tips? A: Add a pinch of salt or swap vanilla for almond extract for a nutty taste.
Which tip will you try first?
A Sweet Goodbye From My Kitchen To Yours
I hope this simple recipe fills your home with happy memories. Making ice cream by hand takes a little time, but it is worth every stir.
Fun fact: This method was used long before electric mixers were invented. Grandmas used a fork to break up the ice cream.
I would love to see your scoop. Take a photo of your finished ice cream and share it.
Have you tried this recipe? Tag us on Pinterest! Happy cooking!
—Chloe Hartwell


Leave a Reply