

My First Mini Bundt Cake Adventure
I still remember the first time I made mini Bundt cakes. I was nervous because my grandma always said Bundt pans are tricky. She was right, but now I laugh at how worried I was. These little cakes look like tiny castles for dessert. They are perfect for sharing because everyone gets their own pretty cake. Doesn’t that sound fun? Have you ever baked something that looked too fancy to be easy? Let me tell you, this recipe is simpler than it looks.Why Butter and Sugar Need a Hug
The first step is creaming the butter and sugar together for five to seven minutes. That sounds like a long time, but trust me, it matters. When you beat them until light and fluffy, you trap tiny air bubbles inside. Those air bubbles make your cakes soft and tender. This is why we call it “creaming” — you are actually making the butter and sugar become creamy friends. Doesn’t that smell amazing? *Fun fact: Creaming butter and sugar was first written down in a cookbook over 150 years ago. Grandma’s tricks never get old.*The Secret to Taking Turns
Now comes the part that might feel strange. You add the flour mixture and the buttermilk in turns. First some flour, then some buttermilk, then more flour, then the rest of the milk, then the last flour. This back-and-forth helps everything mix evenly without making the batter tough. If you dump everything in at once, your cake might get heavy and sad. We want happy, light cakes. Why does this matter? Because even mixing means every bite tastes perfect. No dry spots or soggy surprises. That is the kind of baking I love. Do you have a trick for mixing batters without making a mess? I always tap my spoon on the bowl edge.Don’t Skip the Grease Dance
Greasing a mini Bundt pan is like giving it a little dance. You take a paper towel, dip it in shortening, and rub it into every curve and corner. Then you sprinkle flour all over and tap out the extra. I once forgot to flour the pan and my cakes crumbled into pieces. I still laugh at that disaster. My dog enjoyed the crumbs though. This step matters because those fancy ridges make the cake easy to break. A well-greased pan lets the cake slide out smooth and beautiful. It only takes two extra minutes. What is the worst kitchen mess you ever made? I bet it was still tasty.Patience is the Best Ingredient
Your mini cakes bake for about 20 to 25 minutes. When they turn golden and a toothpick comes out clean, they are done. But do not rush to take them out. Let them rest in the pan for 15 whole minutes. This is the hardest part because your kitchen will smell like a bakery. Waiting helps the cakes settle and hold their shape when you flip them. Why does this matter? Hot cake is fragile cake. Cooling gives it strength. Think of it as a tiny nap for your dessert. What is your favorite smell when something is baking? For me, it is vanilla mixed with butter.A Dusting of Love
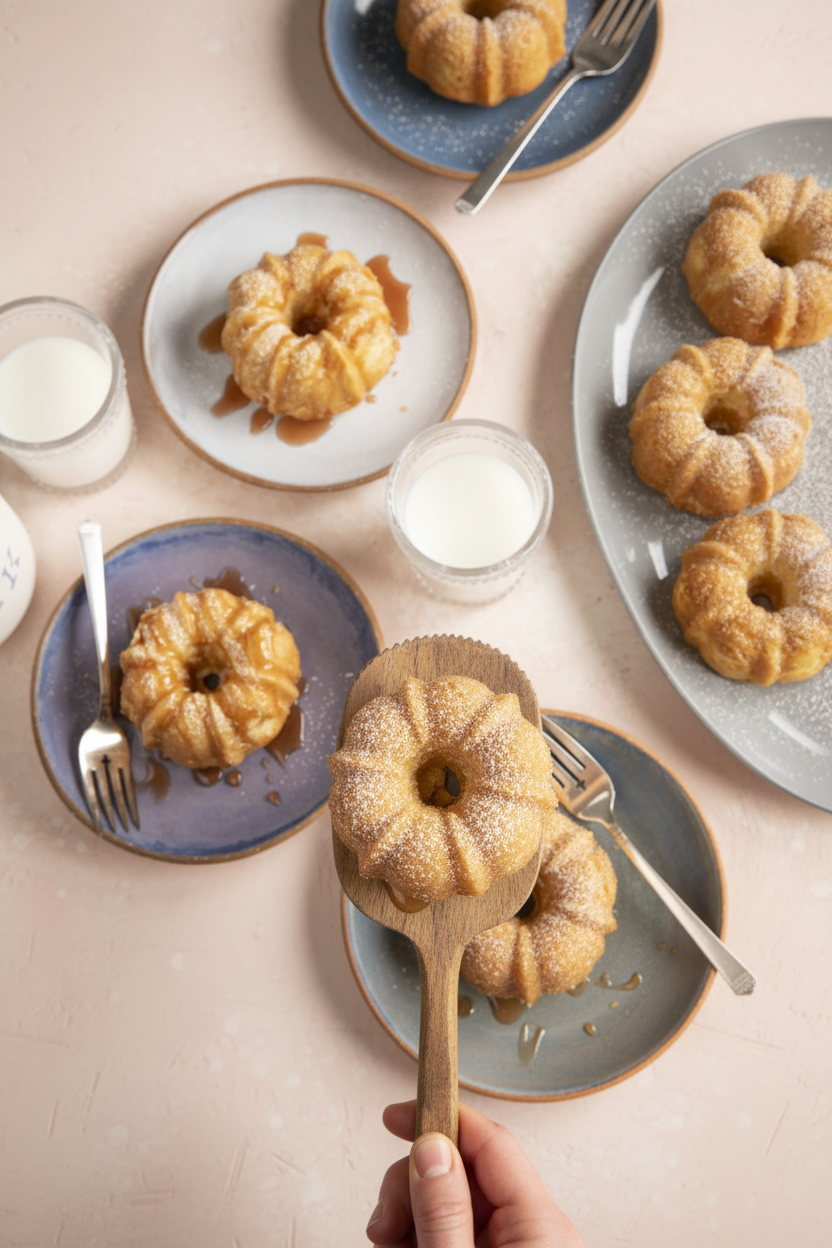
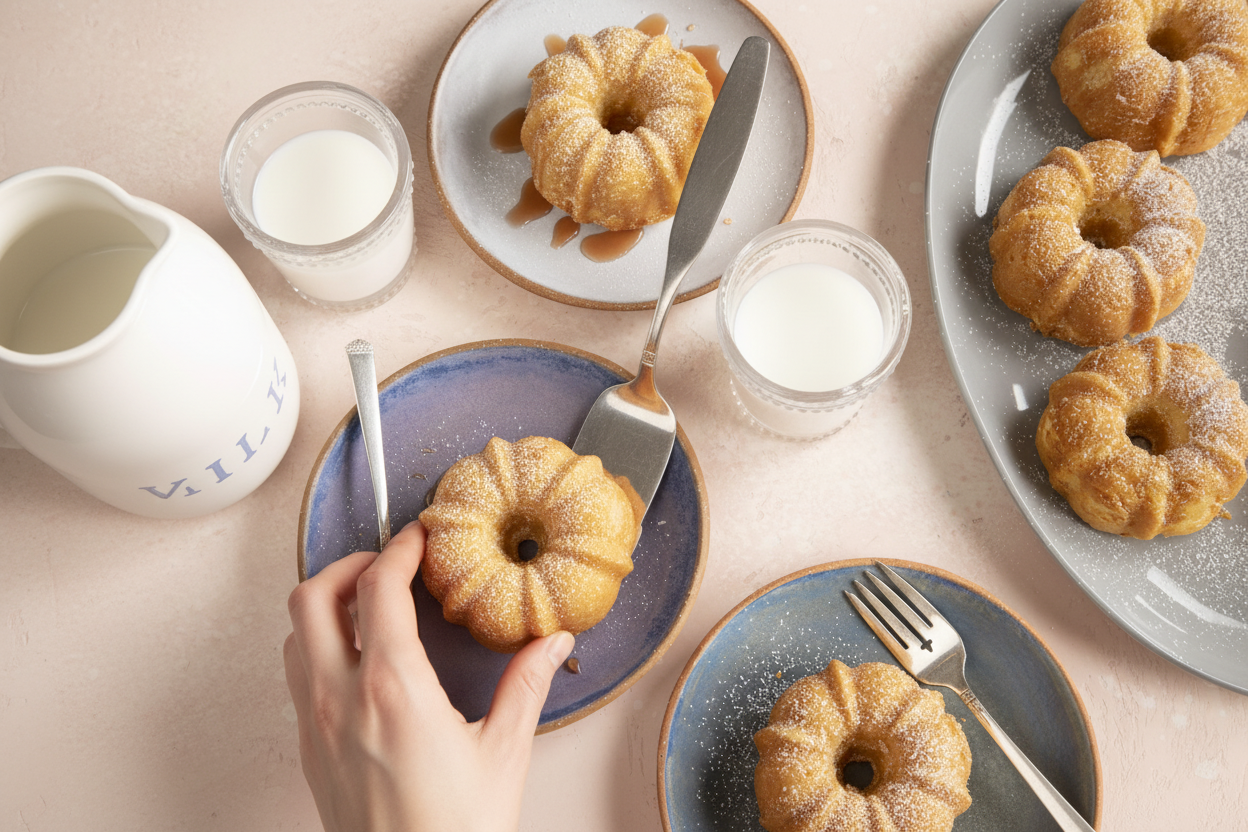
Once your cakes are cool, gently pop them out of the pan. They will look like little golden flowers. All they need is a dusting of confectioners’ sugar to make them sparkle. You can sift the sugar through a small strainer so it falls like snow. That simple white cloud makes these cakes look like they came from a fancy bakery. But you made them in your own kitchen. I like to stack them on a pretty plate and watch everyone’s eyes get wide. That warm feeling is why I love sharing recipes.Share Your Tiny Cake Story
These mini Bundt cakes are perfect for birthdays, tea parties, or just a Tuesday. They make you feel like a hero without much work. Now I have a question for you. Who would you give the very first mini cake to? Maybe your mom, a friend, or just yourself. And here is one last thought. Baking is about making little moments special. These tiny cakes hold big love in every bite.Ingredients:
| Ingredient | Amount | Notes |
|---|---|---|
| Butter | 1 cup | softened |
| Sugar | 2-1/2 cups | |
| Large eggs | 4 | room temperature |
| Vanilla extract | 1 teaspoon | |
| All-purpose flour | 3 cups | |
| Baking soda | 1/4 teaspoon | |
| Buttermilk | 1 cup | |
| Confectioners’ sugar | optional | for dusting |
Why I Love Making Mini Bundt Cakes
I still remember the first time I pulled a tray of mini Bundt cakes from the oven. They looked like tiny, golden castle turrets. My granddaughter squealed, “Grandma, they’re so cute!” That moment made me smile for days. Doesn’t the smell of butter and vanilla just make everything feel cozy?
These little cakes are perfect for when you want dessert but not a huge one. They bake fast, and each person gets their own pretty cake. No fighting over the last slice, which is a win in my book. Plus, dusting them with powdered sugar feels like sprinkling snow on a winter roof.
The secret is all in the pan preparation. I learned that the hard way when my first batch crumbled into sad little lumps. (A hard-learned tip: never skip greasing every tiny groove in the pan, or your cake will stick and break your heart!) Always use shortening, not butter, for the best release.
Alright, let’s get our hands a little floury! Here is how you make these adorable bites of heaven. What is your favorite kind of cake to bake? Chocolate, vanilla, or something fruity? Share below!
Let’s Bake These Little Cuties
Step 1: First, preheat your oven to 350°F. In a big bowl, beat the butter and sugar together for about 5 to 7 minutes. You want it light and fluffy, like soft clouds. I always hum a little tune while I do this step.
Step 2: Now, crack your eggs one at a time into the bowl. Beat well after each egg goes in. Then, stir in the vanilla extract. I love how the vanilla makes the kitchen smell like a bakery!
Step 3: In a separate bowl, whisk together the flour and baking soda. This is your dry team. (My grandson calls it the “white snow” mix.) Set it aside for now, because we need a rhythm for the next part.
Step 4: This is the tricky part, so listen close. Add your flour mix and buttermilk in turns. Start with one-third of the flour, then half the buttermilk, then another third of flour, the rest of the buttermilk, and finally the last of the flour. Beat a little after each addition, but don’t overwork it or your cakes will be tough.
Step 5: Grease your mini Bundt pan very, very well. Use a paper towel dipped in shortening and get into every nook and cranny. Then dust with flour and tap out the extra. This is the most important step—trust me on this one!
Step 6: Scoop about half a cup of batter into each mold. A little rubber spatula helps you get every last drop. Fill them about three-quarters full so they have room to rise into little domes.
Step 7: Bake for 20 to 25 minutes, until they are golden brown. Stick a toothpick in the middle; if it comes out clean, they are done. Let them rest in the pan for 15 minutes before you turn them out onto a wire rack.
Step 8: Once they are completely cool, dust them with confectioners’ sugar. See how lovely they look? They are so pretty they hardly need any extra frosting. Perfect for a tea party or a school bake sale!
Cook Time: 20-25 minutes
Total Time: 45 minutes
Yield: 6 mini Bundt cakes
Category: Dessert, Snack
Three Fun Twists on This Recipe
Lemon Poppy Seed: Add the zest of one lemon and two tablespoons of poppy seeds to the batter. It tastes like sunshine in a cake!
Chocolate Swirl: Melt half a cup of chocolate chips and swirl it into the batter with a knife before baking. It looks so fancy, no one will believe you made it.
Cinnamon Apple: Fold in one diced apple and a teaspoon of cinnamon. It makes the house smell like fall, even in July.
Which one would you try first? Comment below!
How to Serve and Sip
These mini cakes are lovely on a simple plate with a few fresh berries. I like to dust them with sugar, then add a tiny mint leaf on top. For a fun party treat, serve them with a small dollop of whipped cream on the side.
Pair them with a tall, cold glass of milk for the kids. For the grown-ups, a warm cup of Earl Grey tea is just perfect. The gentle flavor of the tea doesn’t overpower the sweet cake.
You could also serve them with a scoop of vanilla ice cream for a real treat. My husband always says, “Everything is better with ice cream.” And he is usually right. Which would you choose tonight?
How to Store Your Mini Bundt Cakes So They Stay Fresh
These little cakes are perfect for making ahead. I once baked a batch for a Sunday picnic and forgot about them until Tuesday. They were still so soft and buttery.
Let the cakes cool completely first. Then wrap each one tightly in plastic wrap. Pop them in an airtight container, and they will stay fresh on the counter for up to three days. If you want to keep them longer, put the wrapped cakes in a freezer bag. They freeze well for up to two months.
To reheat, just unwrap a cake and warm it in a 300°F oven for five minutes. This brings back that just-baked tenderness. Batch cooking like this saves time and gives you a sweet treat ready whenever you need it. That is why having a few in the freezer feels like a little secret treasure.
Have you ever tried storing it this way? Share below!
Three Common Problems and How to Fix Them
Sometimes mini cakes stick to the pan. I remember my first time—half the cake stayed in the mold. That broke my heart. The fix is to grease every nook and cranny with shortening, then dust with flour. Do not skip the flour.
Another problem is dry cakes. This happens when you overmix the batter. Mix just until the flour disappears. That keeps the crumb soft and tender. Why does this matter? Overmixing develops too much gluten, which makes cakes tough. You want them light, not chewy.
The third issue is uneven baking. Fill each mold with the same amount of batter. I use a 1/2-cup measure to keep it even. This matters because even baking gives you consistent texture in every single cake. It builds your confidence in the kitchen.
Which of these problems have you run into before?
Your Top 5 Questions Answered
Q: Can I make these gluten-free?
A: Yes. Swap the all-purpose flour for a 1-to-1 gluten-free baking blend. The texture will be slightly different but still tasty.
Q: Can I make the batter a day ahead?
A: It is best to bake right away. The baking soda loses its power if the batter sits too long.
Q: Can I swap buttermilk for something else?
A: Yes. Add one tablespoon of lemon juice or vinegar to a cup of milk. Let it sit for five minutes.
Q: Can I double the recipe?
A: Absolutely. Just use two pans or bake in batches. The timing stays the same.
Q: Can I add chocolate chips or nuts?
A: Fold in a half cup of mini chocolate chips or chopped pecans at the end. It adds a nice surprise.
Which tip will you try first?
A Sweet Goodbye from My Kitchen to Yours
I hope these little cakes bring you as much joy as they brought me. There is something special about a tiny dessert that feels like a big hug. You can dress them up with a dusting of sugar or leave them plain. They are adorable either way.
I would love to see your baking adventures. Snap a photo of your mini bundts and share them with the world. Have you tried this recipe? Tag us on Pinterest! My handle is ChloeHartwellBakes. Let’s keep making sweet memories together.
*Fun fact: The word “bundt” comes from a German word for a gathering of people. So you are baking a little party in every cake.*
Happy cooking!
—Chloe Hartwell.

Mini Bundt Cakes Recipe for Adorable Desserts
Description
Discover how to make adorable mini Bundt cakes with this easy recipe. Perfect for parties, holidays, and gifts.
Ingredients
Instructions
- Preheat the oven to 350°F. Then, in a large bowl, cream the butter and sugar until light and fluffy, about 5 to 7 minutes.
- Add the eggs, one at a time, beating well after each addition. Once all the eggs are mixed in, add the vanilla.
- Combine the flour and baking soda in a large mixing bowl.
- Take turns adding the buttermilk and flour mixture into the Bundt cake batter. It’s important that you don’t add everything at once here. If you want some more guidance, try adding 1/3 of the flour mixture, then 1/2 of the buttermilk, another 1/3 of the flour mixture, the rest of the buttermilk, and finally the rest of the flour mixture, beating well after each addition without overmixing.
- Greasing the mini Bundt cake molds is one of the most important parts of making mini Bundt cakes. It’s the key to helping the cakes release from the molds without cracking or crumbling later on. Fold a sheet of paper towel, dip it in the vegetable shortening, and spread it around each of the mini Bundt cake molds, making sure it gets into every nook and cranny. Then, dust each mold with flour. Pick up the pan, and tap and rotate it to make sure the flour is coated evenly. When you’ve floured each mold, hold the mini Bundt cake pan over the sink and turn it upside down and tap the bottom to get rid of any excess flour.
- Use a measuring cup to measure about 1/2 cup of batter for each mold. A small rubber spatula is the easiest tool to help get the batter in each one evenly.
- After you finish filling each mold, the mini Bundt cakes should take about 20 to 25 minutes to bake. They should be golden when they’re ready to come out of the oven, but you can test them with the cake doneness test to see if a toothpick comes out clean, too. Let them cool in the pan for 15 minutes before moving to a wire rack to cool completely.
- After you pop the mini Bundt cakes out of the molds, dust them with confectioners’ sugar before serving. They’re beautiful enough where they don’t need much more for decoration!
Notes
- Nutrition information is not provided in the text.


Leave a Reply