
My First Fruit Tart Memory
The first time I made a fruit tart, I was a mess. Flour was everywhere, even in my hair. I forgot to chill the dough. It turned into a sticky blob that looked like a pancake. My grandma just laughed and handed me a fresh stick of butter. “Try again, sweet pea,” she said. I still laugh at that memory every time I pull out my tart pan. It reminds me that mistakes are just part of the story. Doesn’t that smell amazing when butter and sugar start working together? This tart taught me something. Simple things, like fruit on a creamy bed, can feel fancy. It is a dessert that looks like a party. But it is made with love, not stress. *Fun fact: The fancy word for this shiny fruit glaze is “nappage.” All it means is melted jam brushed on top.*The Crust: Where the Crunch Lives
The crust is the sturdy home for all the soft stuff. It has to be both tender and strong. You take cold butter, flour, and a little sugar. Then you rub them together with your fingers until they look like small peas. This is the part where you get your hands messy. I always let my grandkids do this step. Why does it matter? Because the cold butter makes the crust flaky, not hard. Warm butter makes it tough. After you add the egg yolk, the dough feels like soft play clay. You chill it so it rests. I think of this as the dough taking a nap. A happy dough makes a happy tart. Here is a question for you: Do you prefer a thick crust or a thin one in your pies and tarts?Blind Baking: A Funny Name for a Smart Trick
The recipe says to line the crust with parchment and add beans. This is called “blind baking.” You aren’t blind, and neither is the crust. You just bake it without any filling inside. The beans or pie weights hold the crust down so it doesn’t puff up like a balloon. I once used dry rice instead of beans. It worked perfectly. My grandma used old coins in a cloth bag. Why does this matter? If you skip this step, your tart shell might get soggy. No one wants a sad, wet crust. Taking this extra time makes the difference between a good tart and a great one. I want to know: Have you ever tried blind baking before? What did you use for weights?Pastry Cream: The Silky Heart
Pastry cream is like a thick, dreamy pudding. It is the soft yellow cloud that holds the fruit. You warm milk on the stove while you whisk egg yolks and sugar in a bowl. Then you play a little game. You pour a tiny bit of hot milk into the eggs while whisking fast. This is called “tempering.” It keeps the eggs from scrambling into a sweet, lumpy mess. I learned this the hard way. When the mixture goes back on the stove, you stir and stir. Suddenly it gets thick like magic. You will feel your arm get tired. That is a good sign. It means you are doing it right. The vanilla and butter go in last. The smell is like a warm hug in a bowl.Picking the Fruit: A Rainbow on a Plate
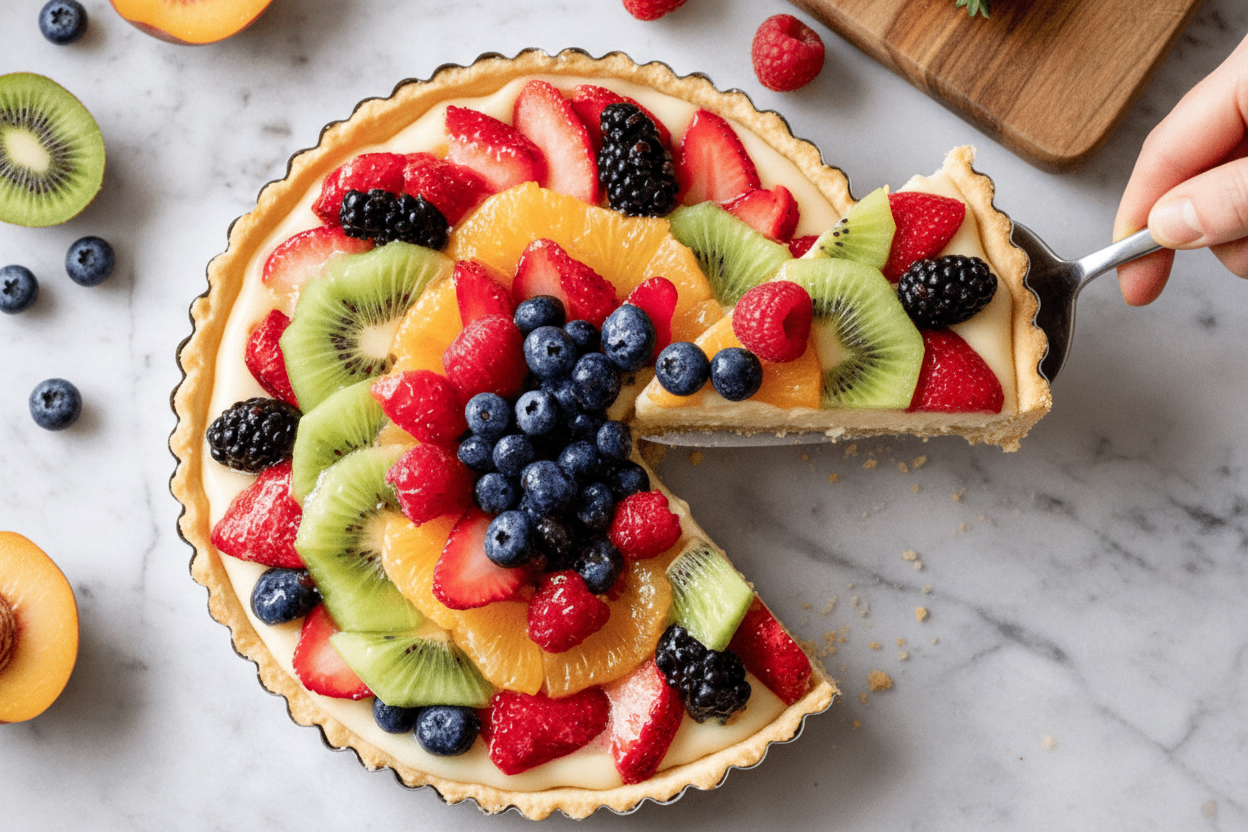
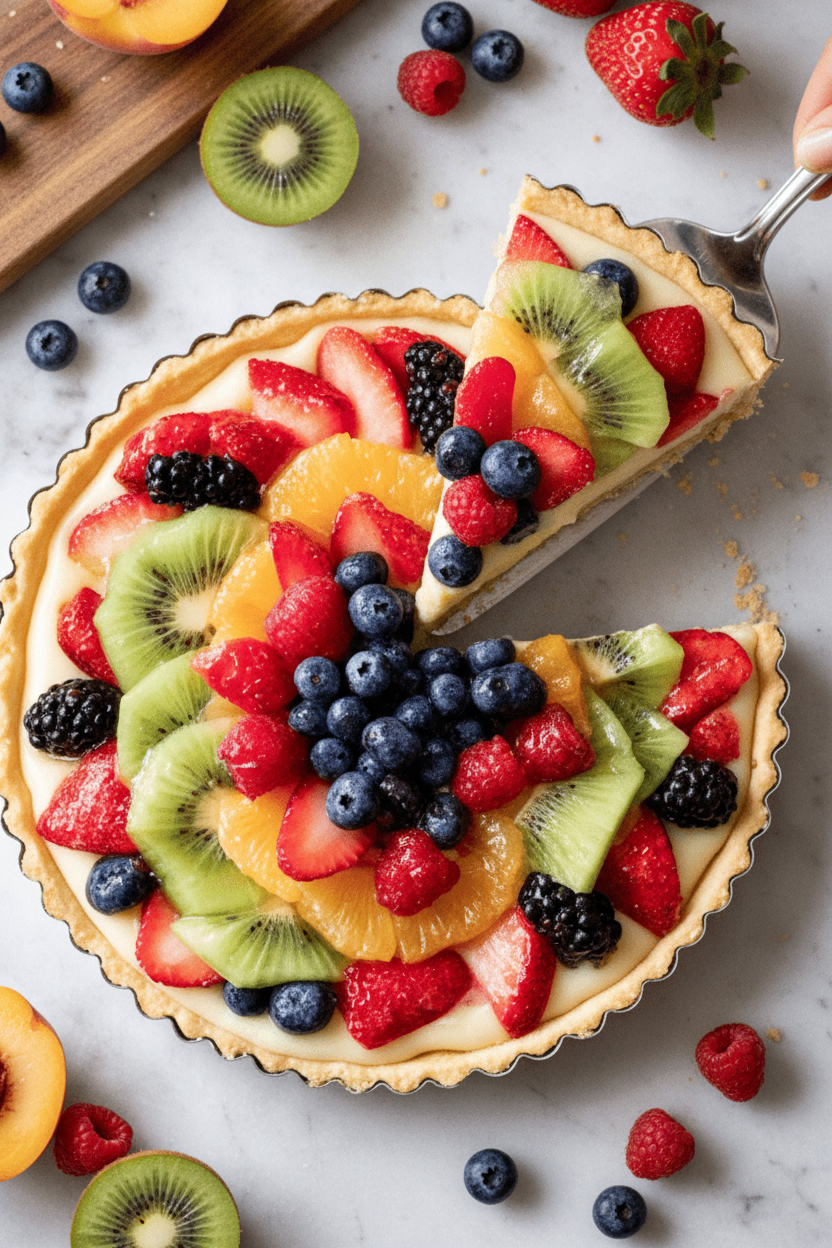
Now comes the best part. You get to decorate like an artist, but everything is edible. Use strawberries, kiwi, blueberries, raspberries, or peaches. Pick what looks brightest at the store. I like to make circles of fruit. Strawberries around the edge, then kiwi slices, then blueberries in the middle. My little neighbor once arranged the fruit to look like a happy face. It was the best tart ever. Why does fruit choice matter? Different fruits add different juices and sweetness. Firm fruits like strawberries hold their shape. Soft fruits like raspberries add little bursts of flavor. Here is a quick poll for you: Which fruit is the prettiest on a tart, red berries or yellow peaches?That Shiny Glaze: The Final Touch
You can leave the tart plain, which looks lovely and natural. Or you can add a glaze. Warm up apricot jam in a small pan. Then brush it gently over the fruit with a pastry brush. It makes the fruit shine like polished gems. It also adds a little sweetness and keeps the fruit from drying out. I always lick the extra jam off the brush. Don’t tell anyone. A glazed tart looks like something from a fancy bakery window. But you made it in your own kitchen. That feeling is better than any store-bought dessert. You did this with your own two hands. I am wondering: Do you think you would try the glaze, or leave it plain and simple?Why We Make Tarts Together
Making a fruit tart takes time. You chill, bake, cool, and wait. But that waiting is part of the fun. It gives you time to tell stories, wash dishes with someone, or watch the clouds move outside. This recipe is not just about food. It is about slowing down and making something beautiful. Every slice you serve says, “I cared enough to take my time for you.” I hope you try this recipe. Even if the crust cracks or the fruit slides, it will taste wonderful. Because the real secret ingredient is the memories you make while doing it. I would love to hear your tart story. Will you make one for someone you love this week?Ingredients:
| Ingredient | Amount | Notes |
|---|---|---|
| All-purpose flour | 1 1/4 cups | |
| Powdered sugar | 1/4 cup | |
| Unsalted butter (cold and cubed) | 1/2 cup | |
| Salt | 1/4 teaspoon | |
| Large egg yolk | 1 | |
| Ice water | 2 tablespoons | As needed |
| Whole milk | 2 cups | |
| Granulated sugar | 1/2 cup | |
| Cornstarch | 1/4 cup | |
| Large egg yolks | 4 | |
| Vanilla extract | 1 teaspoon | |
| Unsalted butter | 2 tablespoons | |
| Assorted fresh fruits (strawberries, kiwi, blueberries, raspberries, peaches) | As needed | For topping |
| Apricot jam | 1/4 cup | Optional, for glaze |
The First Time I Made a Fruit Tart
I remember the first fruit tart I ever baked. I was twelve, just like you might be. My grandma stood right beside me, holding a wooden spoon. I dropped an egg yolk on the floor and we both laughed until we cried. Doesn’t that smell amazing when it bakes? That memory still makes me smile.
Now I make this tart for all my grandkids’ birthdays. They love picking out the fruit at the store. Strawberries, kiwis, blueberries, maybe a peach. It feels like painting a pretty picture with food. The best part is watching their faces light up when they see it.
Let’s Make It Together, Step by Step
Step 1: Start with the crust. Mix the flour, powdered sugar, and salt in a bowl. Add cold butter cubes and rub them into the flour with your fingers. (Here’s a hard-learned tip: cold butter is a must. Warm butter makes a soggy crust.) Stir in the egg yolk, then add ice water a spoonful at a time until the dough holds together. Shape it into a flat disk, wrap it up, and pop it in the fridge for 30 minutes. I always chill mine while I clean up the kitchen.
Step 2: Bake the tart shell. Preheat the oven to 350°F. Roll the dough out on a floured surface and press it into a 9-inch tart pan. Trim the edges neatly. Line it with parchment paper and fill it with dried beans or pie weights. Bake for 15–20 minutes until golden, then remove the weights and bake 5 more minutes to crisp the bottom. Let it cool all the way. I once tried to rush this step and the crust fell apart. Learn from my mistake!
Step 3: Make the pastry cream. Heat the milk and half the sugar in a saucepan until it steams. In a bowl, whisk the egg yolks, cornstarch, and remaining sugar until smooth. Slowly pour the hot milk into the egg mixture while whisking like crazy. This keeps the eggs from scrambling. Return everything to the pan and cook, whisking, until it thickens into a pudding. Stir in vanilla and butter. Cover with plastic wrap right on the surface so a skin doesn’t form. Let it cool completely. Which fruit would you put on top? Strawberries or kiwis? Share below!
Step 4: Assemble the tart. Pour the cooled pastry cream into the tart shell. Smooth it out with a spatula. Now comes the fun part—arrange your fresh fruit on top in any pattern you like. I love making stripes with strawberries and kiwis. Sometimes I make a spiral of blueberries. There’s no wrong way to do it.
Step 5: Add a shiny glaze (optional). Heat apricot jam in a small pan until it melts. Strain out any big fruit pieces. Brush the jam gently over the fruit with a pastry brush. This gives the tart a glossy, bakery-style look. My neighbor once skipped this step and said it still tasted great. But I love that shiny finish.
Step 6: Time to serve. Pop the tart in the fridge for at least 1 hour. This helps it set and makes slicing easy. Then cut it into wedges and enjoy every bite. Cook Time: 45 minutes Total Time: 2 hours (includes chilling) Yield: 8 servings Category: Dessert
Three Fun Twists to Try
Chocolate Dream Twist: Melt 1/4 cup of dark chocolate and spread it on the bottom of the crust before adding the pastry cream. It tastes like a chocolate-covered fruit bar. So rich and yummy.
Lemon Sunshine Twist: Add the zest of one lemon to the pastry cream while it cooks. It gives the whole tart a bright, tangy pop. Perfect for springtime picnics.
Coconut Tropical Twist: Sprinkle toasted coconut flakes over the fruit before glazing. Use mango and pineapple slices instead of strawberries. It feels like a vacation on a plate. Which one would you try first? Comment below!
How to Serve and What to Drink
Serve this tart with a dollop of whipped cream on the side. A handful of fresh mint leaves on top adds a pretty green touch. For a fancier look, dust the plate with a little powdered sugar before setting the slice down.
Pair it with a tall glass of cold milk for a cozy afternoon treat. For grown-ups, a cup of black tea or a light white wine works beautifully. Which would you choose tonight?
How to Store Your Fruit Tart (and Why It Matters)
This fruit tart stays fresh in the fridge for up to two days. Just cover it loosely with plastic wrap. Do not freeze it once it is assembled. The fruit gets watery and the pastry cream turns grainy. I learned this the hard way. I once made a beautiful tart for my neighbor. I popped it in the freezer thinking I was being smart. When I thawed it, the crust was soggy and the berries had leaked all over. What a mess! If you want to batch cook, make the crust and pastry cream ahead. Store them separately in the fridge for up to three days. Then assemble the tart fresh on the day you serve it. This saves time without ruining the texture. Have you ever tried storing it this way? Share below! Storing things properly matters because it keeps your hard work from going to waste. A good tart is like a little gift. You want it to stay pretty and tasty.
Three Common Fruit Tart Problems and Easy Fixes
Problem one: the crust crumbles when you cut it. This happens when the dough is too dry. Next time, add a little more ice water, one teaspoon at a time. The dough should hold together like soft play clay. Problem two: the pastry cream has lumps. I remember when my first batch looked like scrambled eggs. The trick is to whisk constantly while you pour the hot milk into the eggs. And never stop stirring while it cooks on the stove. Problem three: the fruit slides off the tart. This happens when the pastry cream is too warm. Let it cool completely before you add the fruit. Why does this matter? Because fixing these little problems makes you feel like a pro in your own kitchen. It also makes the tart taste and look exactly how you imagined. Which of these problems have you run into before? I bet many of you have dealt with the lumpy cream. It is so common, but now you know the fix.
Your Top 5 Questions Answered
Q: Can I make this gluten-free? A: Yes. Swap the all-purpose flour for a 1-to-1 gluten-free baking blend. The crust will be slightly more tender.
Q: Can I make it ahead of time? A: Absolutely. Bake the crust and make the cream a day early. Assemble the tart no more than a few hours before serving.
Q: Can I use different fruits? A: Of course! Try mango, grapes, or mandarin oranges. Just avoid very watery fruits like melon.
Q: Can I halve this recipe? A: Yes. It scales down easily. Use a smaller tart pan or make mini tarts in a muffin tin.
Q: Do I need the apricot glaze? A: No, it is optional. The glaze adds shine and helps keep fruit from drying out. Which tip will you try first?
A Warm Goodbye from Chloe
I hope this fruit tart brings you as much joy as it brings my family. There is something special about slicing into a pretty tart and seeing all those colorful fruits. It feels like a little celebration. *Fun fact: My grandmother always said a fruit tart is a happy accident waiting to happen.* She was right. You can mix and match fruits and it always looks lovely. I would love to see your creations. Have you tried this recipe? Tag us on Pinterest so we can admire your work. Remember, every tart tells a story. Now go make yours. Happy cooking! —Chloe Hartwell.
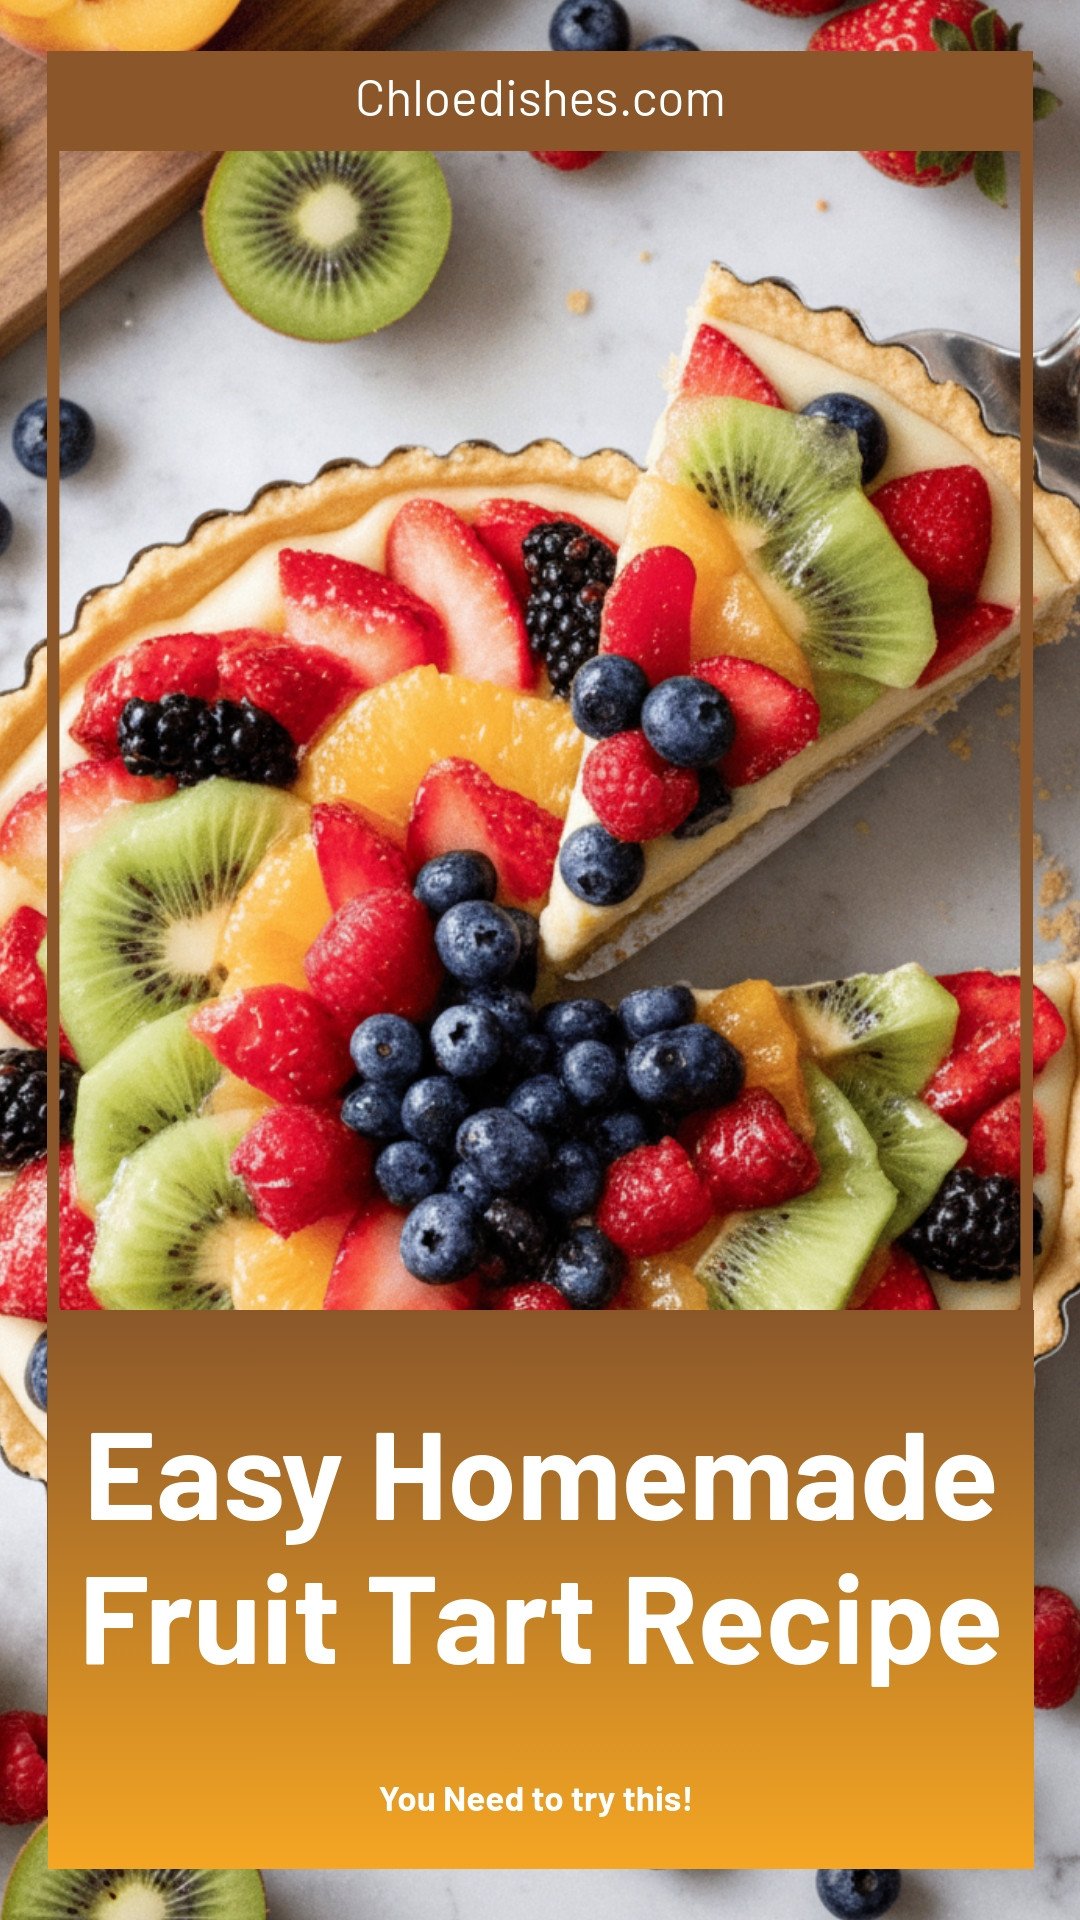

Easy Homemade Fruit Tart Recipe
Description
Make this easy homemade fruit tart recipe for a stunning dessert! Buttery crust, creamy filling, fresh fruit. Perfect for summer parties.
Ingredients
Instructions
- In a mixing bowl, combine the flour, powdered sugar, and salt. Add the cold, cubed butter and use a pastry cutter or your fingers to mix until the mixture resembles coarse crumbs. Stir in the egg yolk until combined. If the dough is too crumbly, add ice water one tablespoon at a time until it comes together. Shape the dough into a disk, wrap it in plastic wrap, and refrigerate for at least 30 minutes.
- Preheat your oven to 350°F (175°C). On a lightly floured surface, roll out the chilled dough to fit a 9-inch tart pan. Press the dough into the pan, trimming any excess. Line the crust with parchment paper and fill with pie weights or dried beans. Bake for 15–20 minutes until lightly golden. Remove the weights and parchment, then bake for an additional 5 minutes to crisp the bottom. Let it cool completely.
- In a saucepan, heat the milk and half of the sugar over medium heat until it begins to steam but does not boil. In a separate bowl, whisk together the egg yolks, cornstarch, and remaining sugar until smooth. Slowly pour the hot milk into the egg mixture while whisking constantly to temper the eggs. Return the mixture to the saucepan and cook over medium heat, whisking constantly until it thickens and bubbles. Remove from heat and stir in the vanilla extract and butter. Transfer the pastry cream to a bowl, cover with plastic wrap pressed directly onto the surface, and let it cool completely.
- Once the tart shell and pastry cream are cool, pour the pastry cream into the tart shell and smooth the top. Arrange the assorted fresh fruits on top of the pastry cream in a decorative pattern.
- If using, heat the apricot jam in a small saucepan until melted, then strain to remove any fruit pieces. Brush the melted apricot jam over the fruit to give it a shiny finish.Refrigerate the tart for at least 1 hour before serving, then slice and enjoy.


Leave a Reply