
Why This Cheesecake Reminds Me of My First Kitchen
The first time I made a salted caramel cheesecake, I was scared. My kitchen was tiny and hot. The sugar looked like a lumpy mess. I almost gave up. But I kept stirring, and something magical happened. That deep golden color appeared. I still laugh at how worried I was. This recipe is special because it teaches patience. You cannot rush good things, and that is a lesson for life, not just baking. Why does this matter? Because learning to wait makes everything taste sweeter. When you watch sugar slowly turn into caramel, you see how small steps create big results. Have you ever made something that took longer than you expected? I bet it was worth it in the end.The Crust That Makes You Smile
We use Biscoff cookies for the crust. These are those little spiced cookies you find on airplanes. They crumble like sand. When you mix them with melted butter, they smell like cinnamon and cozy houses. Press them down tight. Use the back of a measuring cup. My granddaughter likes to pat the crust with her tiny hands. She always sneaks a bite of raw crumbs. Here is a little secret. You can push some crust up the sides of the pan. It makes the cheesecake look fancy. But if you keep it all on the bottom, you get a thick, crunchy layer. Either way works. Which do you prefer—all bottom crust or some up the sides? I like both, but the thick bottom wins for me.A Cool Trick About Cream Cheese
Room temperature cream cheese is very important. Cold cream cheese makes lumps. Nobody wants lumpy cheesecake. Take your blocks out of the fridge two hours before baking. Let them sit on the counter like lazy cats. When you beat them with sugar, they become fluffy and smooth. Doesnt that sound nice? *Fun fact: Cream cheese was invented by accident in 1872. A dairy farmer in New York tried to make French cheese, but something went wrong. He ended up with a soft, spreadable cheese instead. I think happy accidents taste the best.* Why does this matter? Because small details change everything. Using room temperature ingredients means your cheesecake bakes evenly. No cracks. No sadness. Just creamy perfection. Think about other times you rushed something. Did it turn out as good as when you took your time?My Biggest Mistake (and What I Learned)
Years ago, I skipped the water bath. I thought it was too much trouble. The cheesecake cracked right down the middle. It looked like a sad map. I cried a little. My husband ate it anyway and said it tasted fine. But I knew better. The water bath keeps the cheesecake gentle. It bakes slowly like a warm hug. Now I never skip it. You wrap the pan in foil first. Then pour hot water into a big tray. The steam surrounds the cheesecake like a blanket. It makes the center soft and creamy. Please do not open the oven door early. Let it bake for 75 to 80 minutes. The edges will look firm, but the middle will jiggle like jelly. That is exactly what you want.The Caramel Sauce That Fights Back
Making caramel can feel like wrestling a wild animal. The sugar gets clumpy. It looks ruined. You might panic. But do not give up. Keep stirring gently. The heat will win. When you add butter, it looks scary and separated. Then comes the warm cream. Everything bubbles and steams. Stir hard. Suddenly, it turns into liquid gold. I love adding a teaspoon of salt. Salt and sweet are best friends. The salty crunch on top makes your tongue dance. Have you ever tried flakey sea salt on dessert? It tastes like grown-up magic. If you want, you can add extra salt to the caramel sauce too. Taste it and see.Waiting Overnight Is the Hardest Part
After baking, the cheesecake needs to rest. Two hours on the counter. Then a whole night in the fridge. Do not touch it. Do not peek. I know it is hard. The smell fills your kitchen. You want a slice right away. But patience pays off. The flavors settle. The texture becomes perfect. Why does this matter? Because some things need time to become their best self. Like people. Like friendships. Like a good song that grows on you. When you finally take that first bite after waiting, it tastes extra special. Tell me about something you waited for. Was the wait worth it?How to Serve It Like a Pro
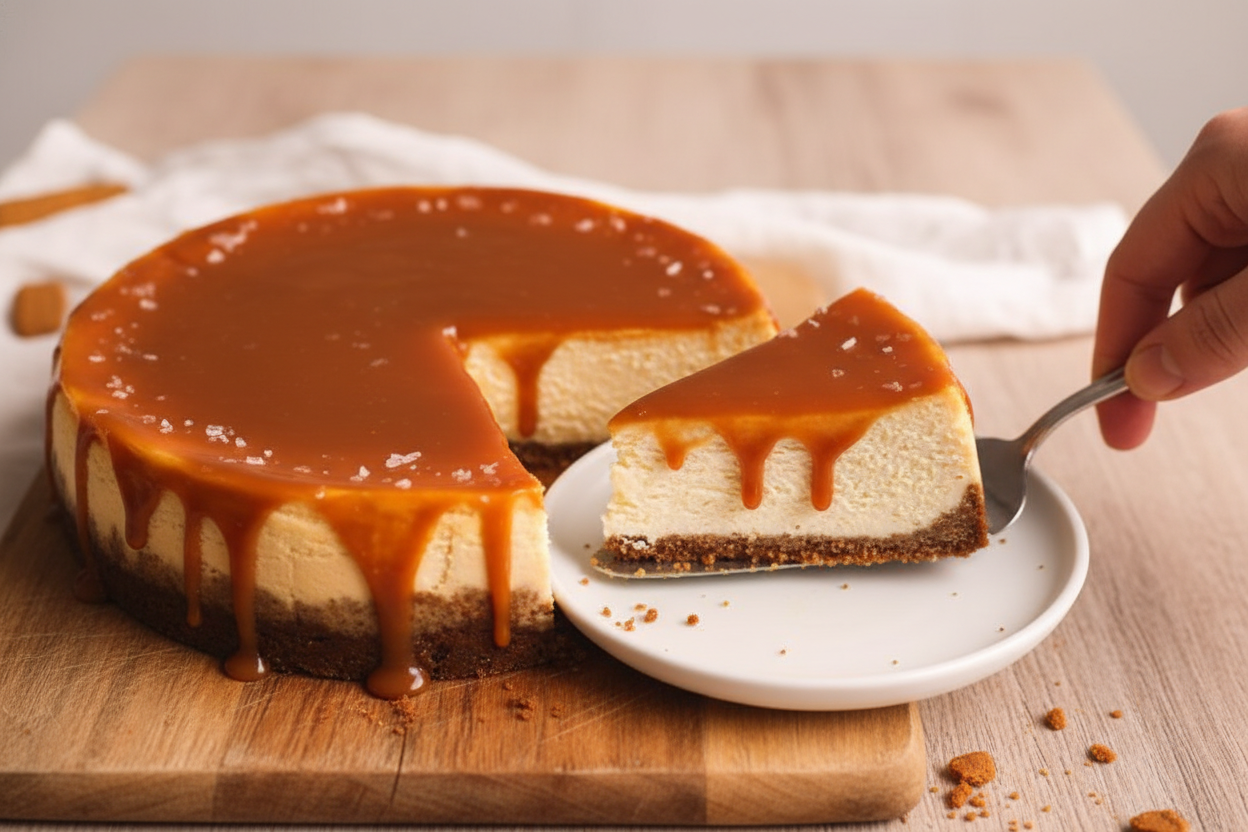
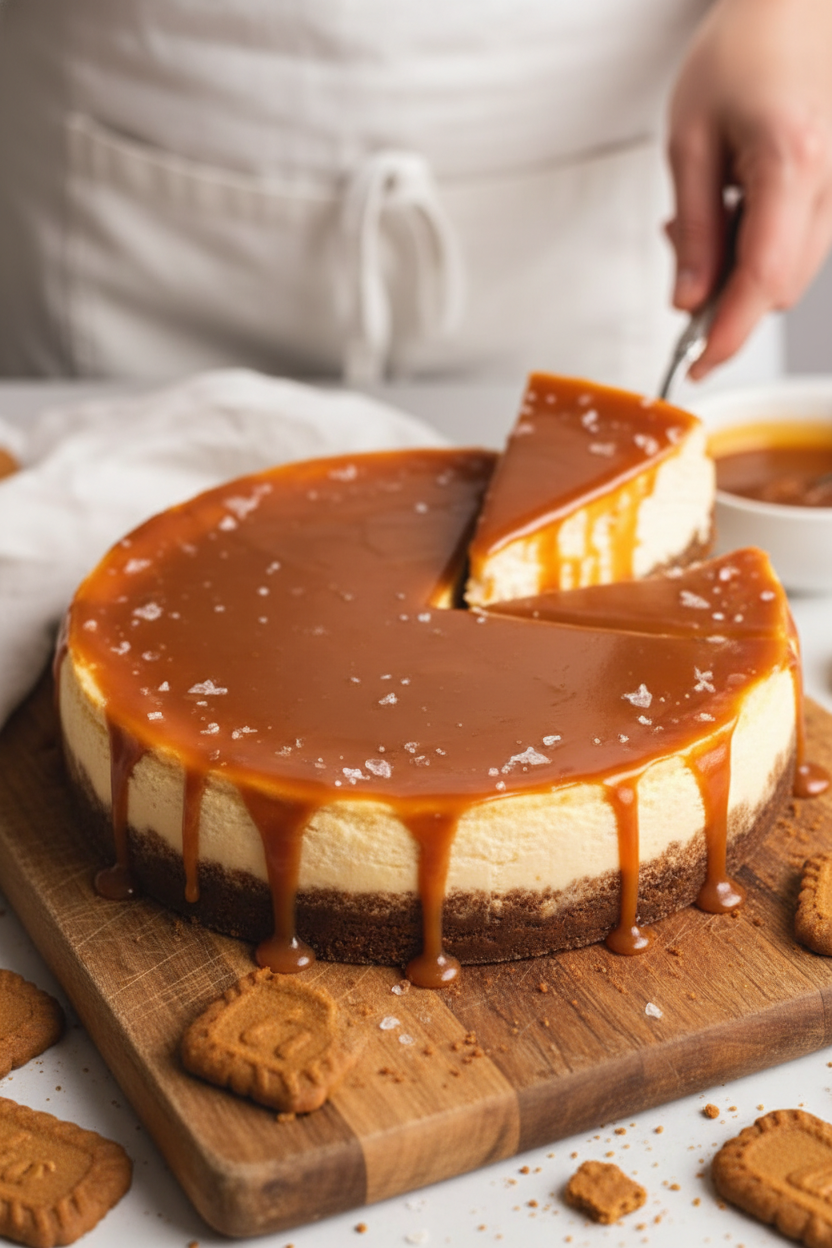
The next day, remove the pan carefully. Run a knife around the edge. Lift the cheesecake onto a pretty plate. Warm up your leftover caramel sauce. Drizzle it on top. Use a spatula to spread it like a shiny blanket. Add a pinch of flakey sea salt. Slice with a sharp knife. Wipe the knife between cuts for clean slices. I like to serve it with cold milk or hot coffee. The saltiness makes you take another bite. Then another. Soon the whole slice is gone. And you smile. That is the best part of cooking—sharing something delicious with people you love. What is your favorite thing to drink with cheesecake? I love hearing what others enjoy.Ingredients:
| Ingredient | Amount | Notes |
|---|---|---|
| Granulated sugar | 1 cup (200g) | For salted caramel sauce |
| Unsalted butter | 5 tbsp (70g) | Room temp, sliced; for sauce |
| Heavy cream | ½ cup (120g) | Warmed up; for sauce |
| Vanilla extract | 1 tsp | For sauce |
| Salt | 1 tsp | For sauce |
| Biscoff cookies | 200g (about 26 cookies) | For crust |
| Unsalted butter | 6 tbsp (85g) | Melted; for crust |
| Full-fat cream cheese | 32 oz (4 blocks / 907g) | Room temp |
| Granulated sugar | 1 cup (200g) | For cheesecake filling |
| Vanilla extract | 2 tsp | For cheesecake filling |
| Large eggs | 4 | Room temp |
| Heavy cream | ⅓ cup (80g) | Room temp |
| Sour cream | ½ cup (120g) | Room temp |
| Cornstarch | 1 tbsp | |
| Caramel sauce (from above) | ⅔ cup | For swirling into cheesecake |
| Remaining salted caramel sauce | As needed | For serving |
| Flakey sea salt | Optional | For garnish |
Why This Cheesecake Feels Like a Hug
I still remember the first time I made a salted caramel cheesecake. I was nervous, honestly. The sugar seemed to take forever to melt. But when I tasted that first bite, I knew it was worth every patient minute. The buttery Biscoff crust, the creamy filling, and the salty-sweet caramel are pure magic together. This isn’t just a recipe; it’s a little piece of my heart I’m sharing with you.
Let me walk you through it step by step. Don’t rush. Just enjoy the process. And doesn’t that caramel smell amazing as it cooks?
Step 1: Start with the salted caramel sauce. Spread one cup of granulated sugar in a wide, light-colored pan. Turn the heat to the lowest flame. Watch the sugar slowly melt. It might look clumpy at first, but that’s normal. Be patient—this takes about 20 minutes. (Hard-learned tip: If your pan is too dark, you won’t see the sugar burn. Use a light-colored pan to stay safe.)
Step 2: Once the sugar turns a deep golden color, turn off the heat. Add five tablespoons of room temperature butter, sliced. Whisk gently—it will look separated. Don’t worry. Next, pour in half a cup of warmed heavy cream. Whisk fast. The caramel will bubble up but smooth out quickly. Stir in one teaspoon of vanilla and one teaspoon of salt.
Step 3: Let the caramel cool completely. While it cools, make the crust. Blitz 200 grams of Biscoff cookies in a food processor until fine. Add six tablespoons of melted butter and blitz again. Press the mixture into a 9-inch springform pan lined with parchment. Use a measuring cup to pack it tightly. Bake at 350°F for just 8 minutes, then turn the oven down to 325°F.
Step 4: Now the cheesecake filling. Make sure everything is at room temperature—this is important. Beat 32 ounces of cream cheese with one cup of sugar and two teaspoons of vanilla for 2 to 3 minutes. Scrape the bowl. In a separate bowl, whisk four eggs lightly. Pour them into the batter slowly while mixing on low speed. Stop as soon as they’re combined.
Step 5: Add one-third cup of heavy cream, half a cup of sour cream, and one tablespoon of sifted cornstarch. Mix on low just until combined. Fold in two-thirds cup of your cooled salted caramel. Taste the batter. Does it need a pinch more salt? Trust your taste buds. What’s your favorite thing to add to cheesecake batter? Share below!
Step 6: Wrap the outside of your springform pan with two layers of aluminum foil. Pour the batter into the baked crust. Tap the pan on the counter 20 to 30 times to release air bubbles. Place the pan inside a larger tray. Pour an inch of boiling water into the tray. Bake at 325°F for 75 to 80 minutes. Don’t open the oven early!
Step 7: When the edges are firm and the center still jiggles, turn off the oven. Let the cheesecake cool on the counter for two hours. Then chill it in the fridge overnight—at least 12 hours. The next day, remove it from the pan. Warm the leftover caramel and pour it on top. Add flakey sea salt if you like. Slice and enjoy every creamy bite.
Cook Time: 80 minutes
Total Time: About 14 hours (including chilling)
Yield: 12 servings
Category: Dessert
Three Fun Twists to Try
Sometimes I like to change things up. Here are three fun ways to make this cheesecake feel brand new. Which one would you try first? Comment below!
Chocolate Lover’s Dream: Stir half a cup of melted dark chocolate into the cheesecake batter before adding the caramel. It gives a rich, fudgy swirl that pairs perfectly with the salt.
Berry Swirl Surprise: Warm up one cup of mixed berries with a tablespoon of sugar until soft. Swirl it into the top of the batter before baking. The tart fruit cuts through the sweetness.
Spiced Autumn Version: Add one teaspoon of cinnamon and half a teaspoon of nutmeg to the crust mixture. It gives the whole cheesecake a cozy, holiday feel.
How to Serve and Sip
This cheesecake is already perfect on its own. But a few little extras make it even better. Serve it with a dollop of whipped cream and a sprinkle of extra sea salt. Or add a handful of toasted pecans for crunch. Sliced fresh pears on the side are lovely too.
For drinks, try a tall glass of cold milk. It balances the rich caramel beautifully. If you’re serving grown-ups, a small glass of bourbon or dark rum pairs wonderfully with the toasty notes. A warm cup of chai tea works for any age. Which would you choose tonight?
How to Store Your Salted Caramel Cheesecake
This cheesecake tastes even better the next day. I once kept a slice in the fridge for a week and it was still creamy. Just cover it tight with plastic wrap or keep it in a cake carrier. It stays fresh in the fridge for up to five days.
You can also freeze it for later. Wrap each slice in plastic wrap, then foil. I learned this trick when I made two cheesecakes for a holiday party. It froze perfectly for a month. When you want a slice, just thaw it in the fridge overnight.
For reheating caramel, warm it in the microwave for 15 seconds at a time. Stir between each zap. This keeps the sauce smooth and runny. Batch cooking matters because you can prep this dessert weeks ahead for busy weekends. Have you ever tried storing it this way? Share below!
Three Common Problems and Easy Fixes
Cheesecake cracks sometimes. I remember the first time I saw a crack—I almost cried. But here is the truth: it still tastes amazing. To avoid cracks, do not open the oven door until the very end. Also, let it cool slowly on the counter for two hours. This matters because a smooth top makes you feel like a real baker.
Your caramel might seize up into hard chunks. This happened to me once when I added cold cream. The fix is easy. Just turn the heat back on low and whisk gently until it melts again. Warm your cream before adding it. This matters because homemade caramel is the heart of this recipe.
The water bath can leak into the pan. Use two layers of heavy-duty foil wrapped tightly around the outside. I learned this the hard way when I found a soggy crust. Take your time pressing the foil down. Which of these problems have you run into before?
Your Questions Answered
Q: Can I make this gluten-free? A: Yes. Use gluten-free Biscoff cookies or any gluten-free graham crackers.
Q: Can I make this ahead of time? A: Absolutely. Bake it two days before and keep it chilled in the fridge.
Q: What if I don’t have Biscoff cookies? A: Swap them for graham crackers or shortbread cookies. They work just fine.
Q: Can I cut the recipe in half? A: Yes. Use a smaller pan, like a 6-inch springform, and reduce baking time by 10 minutes.
Q: Do I need to use a water bath? A: It helps the cheesecake bake evenly and stay creamy. Do not skip it.
Which tip will you try first?
A Sweet Send-Off from Chloe
Thank you for spending time in my little kitchen corner. I hope this cheesecake brings you the same joy it brings my family. *Fun fact: the salt in caramel comes from ancient sea beds in France.* Take your time with each step. Be patient, and taste as you go.
I would love to see your creation. Snap a photo of your salted caramel cheesecake and share it. Have you tried this recipe? Tag us on Pinterest! Your kitchen is a place for happy mistakes and sweet memories. Happy cooking!
—Chloe Hartwell

BEST Salted Caramel Cheesecake: Best Salted Caramel Cheesecake Recipe Ever
Description
Indulge in the best salted caramel cheesecake recipe ever. Creamy, rich, and perfectly sweet, this easy dessert will impress everyone.
Ingredients
Instructions
- Add the sugar to a dry, wide-bottomed pan (preferably a light color like stainless steel) and spread it out evenly. Place on the burner on the lowest flame, and cook until the sugar starts to melt.
- Once the sugar starts to melt, use a dry whisk or spatula to gently stir it and encourage all of it to melt evenly. The sugar will start to look clumpy or hard in places, but don’t worry and keep cooking and gently stirring. With time, all of the sugar will melt and there won’t be any clumps. Continue to cook for a couple more minutes on the lowest heat until the sugar reaches a deep golden color (take care not to burn it). This entire process can take ~20 minutes – be patient!
- Turn off the heat, and add the room temperature butter. Gently whisk it in; it won’t fully combine and may look separated from the caramel. That’s ok.
- Add the warm cream (I recommend microwaving for 30s) and whisk vigorously until the cream is fully combined. The caramel will bubble but will become creamy after a few seconds. If it starts to seize up, don’t worry and turn on the heat on low again to re-melt it.
- Lastly, stir in the salt and vanilla. Transfer to a bowl / jar and let cool completely at room temperature.
- Pre-heat oven to 350F (conventional / no fan) and prepare a 9″ springform pan with parchment paper on the bottom and sides (spray oil or butter and then apply parchment so it sticks).
- Blitz the Biscoff cookies in a food processor until they form a fine crumb. Add the melted butter and blitz until combined.
- Transfer to the pan and press down tightly into a crust using the back of a measuring cup. You can keep it all on the bottom for a thicker crust, or push some of it up the edges of the pan depending on your preference. Just make sure it is tightly packed.
- Bake at 350F for 7-8 minutes, then remove and reduce the oven temperature to 325F.
- Make sure all ingredients are at room temperature. Add the cream cheese, sugar and vanilla to the bowl of a stand mixer. Use the paddle attachment to whip for 2-3 minutes until the sugar feels mostly dissolved and the mixture looks creamy. Use a rubber spatula to scrape the bottom and edges of the bowl 2-3 times through this process.
- Break the eggs in a separate bowl and lightly whisk them to break down the yolks and whites. Slowly pour the eggs into the batter while whisking on medium-low speed, and stop whisking as soon as the eggs are combined. Scrape the bowl again.
- Add the heavy cream, sour cream and cornstarch (sifted) to the batter and whisk again on medium-low speed until just combined. Do not overmix. Scrape the bowl again.
- Lastly, add in the salted caramel sauce (it should be at room temperature) and whisk until combined. Scrape the bowl and taste the batter. Add a little more salt if needed.
- Cover the springform pan with the baked crust inside with 2 sheets of aluminum foil on the outside (covering the outside bottom and edges of the pan) to ensure water does not leak in from the water bath.
- Gently pour the cheesecake batter into the baked crust. Lightly shake the pan and gently tap it on your counter 20-30 times so little air bubbles can escape.
- Place a large tray in your oven (which should be at 325F) and pour 1-2″ of boiling water in it. Then carefully place the cheesecake pan inside the tray.
- Close the oven door and bake the cheesecake for 75-80 minutes. Do not open the oven door until at least 70 minutes have passed. Around 75-80 minutes, the cheesecake should look firm on the edges but still be quite jiggly in the center when the pan is gently shaked (I bake for 80 min for a slightly more firm but still creamy consistency).
- Remove the cheesecake pan from the oven and let it cool down at room temperature for 2 hours. Then transfer to the fridge and chill overnight (12 hours). Do not attempt to open the pan or remove the cheesecake from the pan before chilling overnight.
- The next day, carefully remove the cheesecake from the pan and transfer to a cake stand. Warm up the remaining salted caramel sauce in 15s increments in the microwave until it becomes runny (but not hot) and pour it on top of the cheesecake. Use a spatula to spread it out. Optionally, sprinkle over a little flakey sea salt. Slice up, serve & enjoy!
Notes
- Make sure all ingredients are at room temperature for best results. Do not open the oven door during the first 70 minutes of baking. Chill overnight before slicing.


Leave a Reply