
The Story Behind the Dream
My granddaughter, Lily, adores strawberry ice cream bars. You know, the ones with the crunchy pink coating. One day, she asked if we could turn that taste into a cheesecake. I still laugh at that. It was such a fun challenge.
So, we got to work in my kitchen. We tried a few things. This Berry Crunch Dream Dessert is what we created. It tastes just like her favorite treat, but even creamier. Why does this matter? Making a loved one’s idea come to life is a special kind of magic.
Getting Your Crust Just Right
The crust is the foundation. It holds everything together. You mix graham cracker crumbs, sugar, and melted butter. Press it firmly into the pan. A good, tight pack is the secret.
You bake it for a short time. This makes it sturdy. It keeps the crust from getting soggy later. Doesn’t that smell amazing? It smells like a warm hug. Let me ask you, do you like a thick or a thin crust on your cheesecake?
The Secret to a Silky Filling
Here is the most important step. All your ingredients must be at room temperature. I leave my cream cheese and eggs on the counter for a few hours. This makes the filling smooth, not lumpy.
Mix everything gently. Do not overmix it. Too much air makes bubbles. We want it silky. The water bath is its own little secret. It creates gentle steam in the oven. This keeps the cheesecake creamy and stops it from cracking.
The Fun Pink Topping
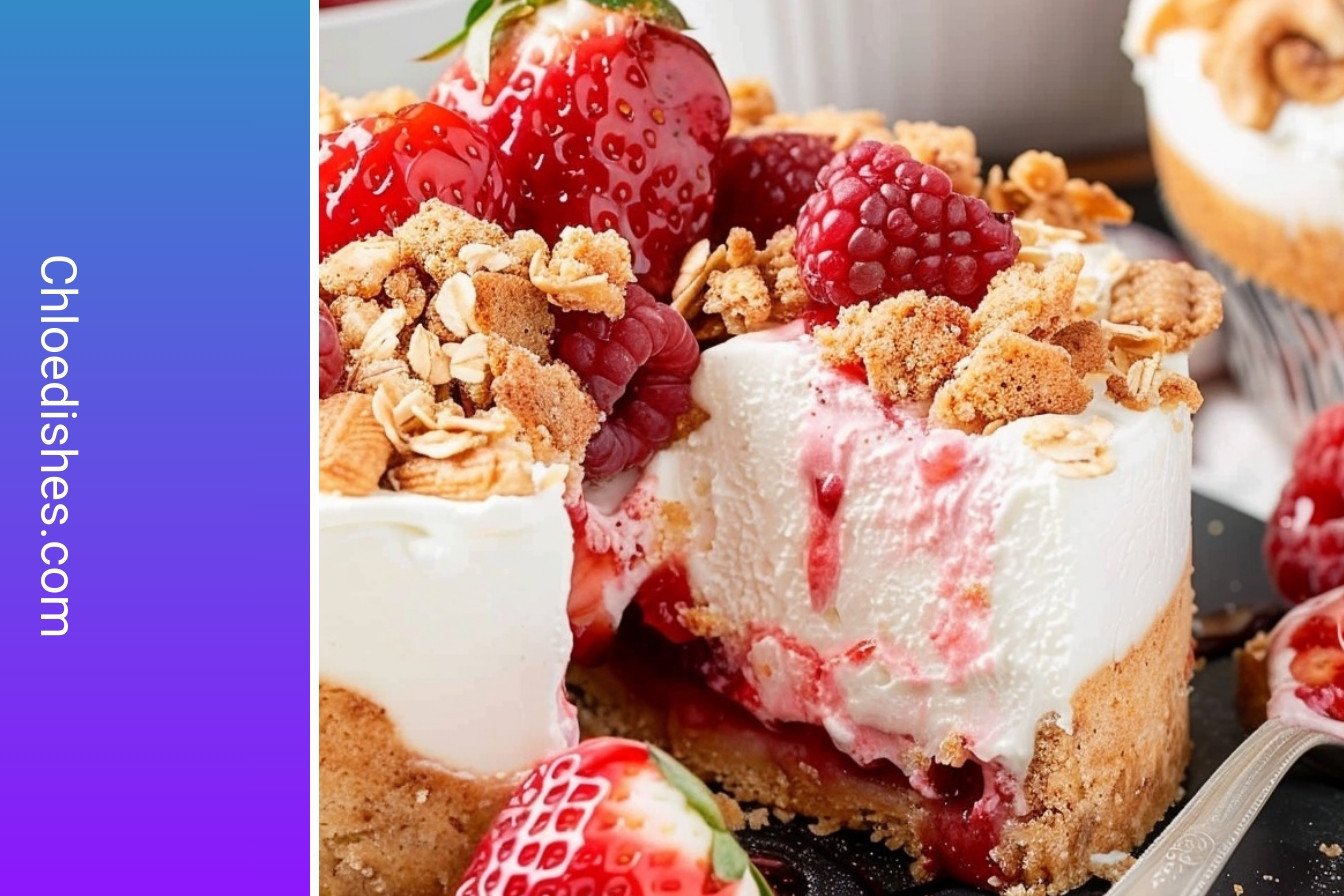
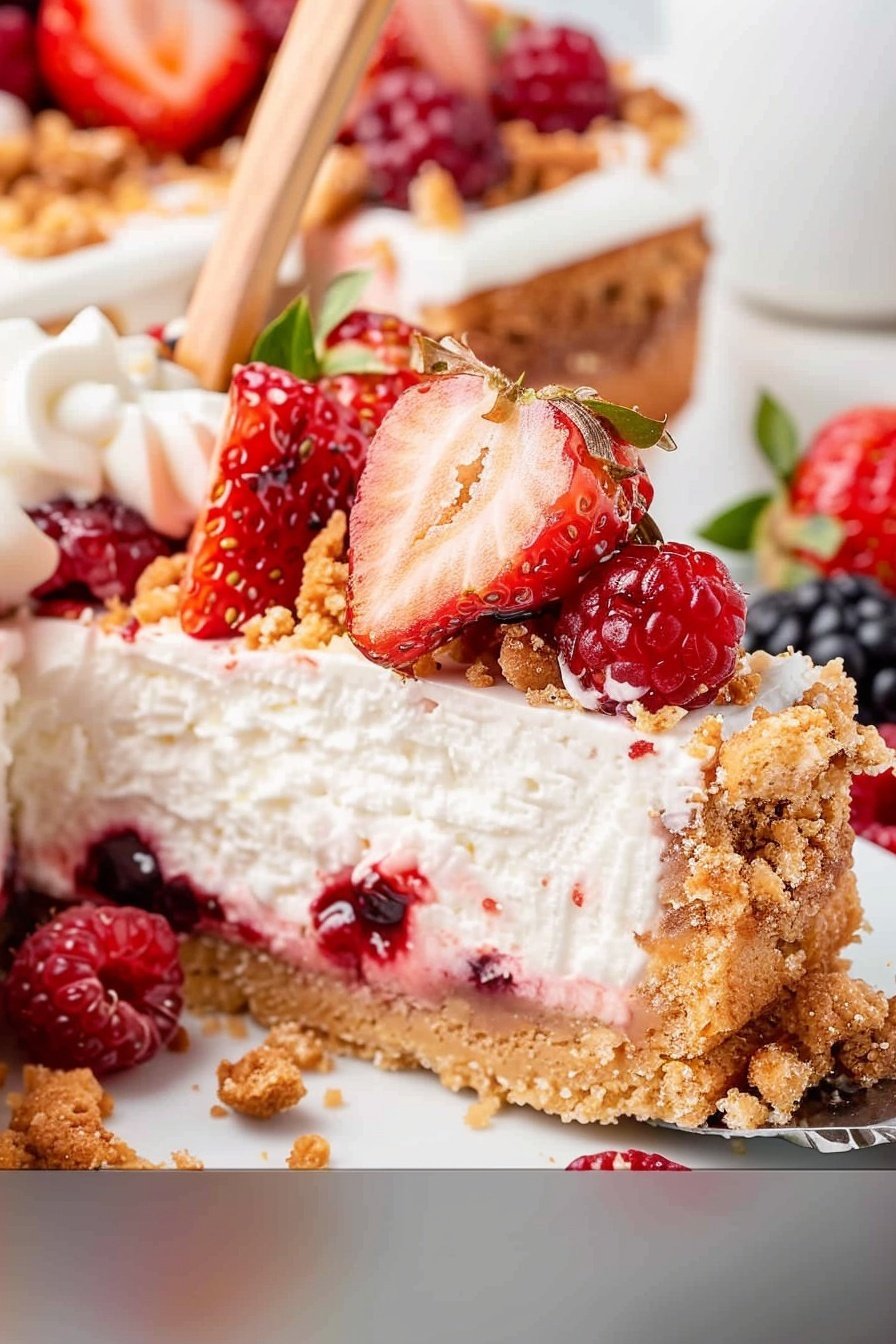
This is the part that reminds me of Lily. We crush golden Oreos. Then we mix them with melted butter and strawberry gelatin powder. It makes the most beautiful pink crumbs.
You bake the crumbs for a few minutes. This makes them extra crunchy. Fun fact: The golden Oreos give it a vanilla flavor that pairs perfectly with the strawberry. It is a wonderful mix of textures and tastes.
Putting It All Together
Patience is your best friend here. After baking, the cheesecake needs to cool slowly. Then it must chill in the fridge for many hours. This waiting is hard, but it is so worth it.
Once it is cold and set, you add the strawberry preserves. Then you pile on that beautiful pink crunch. A little whipped cream and a fresh strawberry on top make it perfect. Why does this matter? Good things take time. A dessert made with care always tastes better.
Your Turn in the Kitchen
This recipe has many steps. But do not let that scare you. Take your time with each one. It is a labor of love. The proud feeling you get at the end is the best part.
I would love to see your creations. What is your favorite berry to bake with? Tell me about a dessert that brings back a happy memory for you. Sharing our kitchen stories is how we connect.

Ingredients:
| Ingredient | Amount | Notes |
|---|---|---|
| graham cracker crumbs | 2 cups | from 15-16 full-sized graham crackers |
| granulated sugar | 4 tablespoons | |
| salted butter | 4 tablespoons | melted |
| boiling water | 4-6 cups | for water bath |
| full-fat cream cheese | 32 ounces (four 8-ounce blocks) | softened to room temperature |
| granulated sugar | 1 ½ cups | |
| vanilla extract | 3 teaspoons | |
| large eggs | 6 | at room temperature |
| full-fat sour cream | ½ cup | at room temperature |
| salted butter | 2 tablespoons | melted |
| strawberry gelatin powder | 1 ½ tablespoons | |
| golden Oreo cookies | 13 | crushed into coarse crumbs |
| strawberry preserves | ⅓ cup | I used Bonne Maman brand |
| whipped topping | 4 ounces | thawed |
| fresh strawberries | 5 whole | cut in half |
Berry Crunch Dream Dessert: Crispy Golden Perfection
Oh, this recipe brings back such sweet memories. My granddaughter Lily calls it her dream dessert. She loves the crunchy, golden top. It always makes her smile.
Making it is like a fun kitchen project. We get to build it in layers. The crust comes first, then the creamy filling, and finally that pretty strawberry crunch. Does not that sound like fun?
Let us get started, step by step. I will share my little stories with you.
Step 1
First, we get our pan ready. Wrap the springform pan tightly with foil. This keeps the water out during baking. I use two big pieces, just to be safe.
Step 2
Now, let us make the crust. Mix the graham crumbs, sugar, and melted butter. Press it firmly into the pan. A good, tight pack makes a sturdy base.
Step 3
Bake the crust for just ten minutes. Then let it cool completely. This is a good time to start boiling your water for the bath.
Step 4
For the filling, your cream cheese must be soft. Beat it with the sugar until it is smooth. I still laugh at the time I used cold cream cheese. What a lumpy mess! (Hard-learned tip: Room temperature ingredients are your best friend here).
Step 5
Add the eggs, one at a time. Then mix in the vanilla and sour cream. Be gentle and do not overmix. We want it creamy, not full of air.
Step 6
Pour the filling onto the cool crust. Give the pan a little tap on the counter. This helps any sneaky air bubbles escape.
Step 7
Now for the water bath. Place the pan in a bigger roasting pan. Carefully pour the hot water around it. This gentle heat makes the cheesecake so smooth.
Step 8
Baking takes patience. After it bakes, let it cool in the cracked-open oven. Then it needs a long, cozy nap in the fridge. This waiting is the hardest part! What is your favorite part of baking? Share below!
Step 9
Make the crunchy topping while you wait. Mix melted butter with strawberry powder. Toss it with crushed golden Oreos and bake. The smell is amazing.
Step 10
The final assembly is my favorite. Spread strawberry jam on the cold cheesecake. Then pile on that pink, crunchy topping. A little whipped cream and fresh berries make it perfect.
Cook Time: 1 hour 30 minutes
Total Time: About 12 hours (includes cooling)
Yield: 10 servings
Category: Dessert, Cheesecake
Make It Your Own Dream Dessert
This recipe is wonderful as it is. But you can also change it up. It is fun to get creative in the kitchen.
Here are a few twists I have tried over the years. They are all delicious in their own way.
Blueberry Bliss
Use blueberry jam and blueberry gelatin for the crunch. Top with fresh blueberries instead of strawberries.
Chocolate Orange Dream
Make a chocolate crust. Use orange extract in the filling. Top with chocolate cookie crunch.
Lemon Sunshine
Use lemon curd instead of strawberry jam. The crunch can be made with lemonade powder and vanilla cookies.
So many choices! Which one would you try first? Comment below!
Serving Your Sweet Masterpiece
This cheesecake is a star all on its own. But a few little touches make it extra special. I love making dessert feel like a celebration.
For serving, try a hot cup of coffee. It cuts through the sweetness so nicely. A cold glass of milk is always a classic choice, too.
For a fancy dinner, offer a sparkling rosé for the grown-ups. The kids would love some pink lemonade. It matches the strawberry theme perfectly. Which would you choose tonight?
Keeping Your Berry Crunch Dream Dessert Perfect
This dessert keeps beautifully in the fridge. Just cover it tightly with plastic wrap. It will stay fresh and delicious for up to five days. You can also freeze slices for a sweet treat later. Wrap each piece well in plastic and foil. It will be good in the freezer for about two months.
I once made a whole cheesecake for my grandson’s visit. He had to cancel at the last minute. I was so glad I could freeze it for later. Thaw it overnight in the refrigerator when you are ready. This matters because it means no sweet treat ever goes to waste.
This is a great dessert to make ahead for a party. You can make the whole thing a day or two early. This saves you so much time when guests arrive. Have you ever tried storing it this way? Share below!
Easy Fixes for Common Cheesecake Hiccups
Is your cheesecake filling lumpy? This happens if your cream cheese is too cold. Always let it sit out until it feels soft. I remember when I was in a hurry and skipped this step. My cheesecake had little white lumps all through it.
Is the top of your cheesecake covered in cracks? Do not worry. This often happens if you overmix the filling. Mix just until everything is combined. A smooth batter matters for a beautiful, crack-free top. It makes you feel so proud of your creation.
Is water leaking into your pan during the bath? Be sure to use heavy-duty foil. Wrap the pan twice, and make it very tight. This simple step protects your crispy crust. Getting this right builds your cooking confidence. Which of these problems have you run into before?
Your Berry Crunch Questions Answered
Q: Can I make this gluten-free? A: Yes. Use gluten-free graham crackers and cookies for the crust and topping.
Q: How far ahead can I make it? A: You can make the whole dessert two days before you need it.
Q: What if I do not have sour cream? A: You can use plain Greek yogurt instead. It works just as well.
Q: Can I make a smaller version? A: You can cut the recipe in half. Just use a smaller pan and bake it for less time.
Q: Is the water bath really necessary? A: It helps cook the cheesecake gently. This gives you that perfect creamy texture. Fun fact: The steam from the water bath creates a gentle, even heat. Which tip will you try first?
A Sweet Note From My Kitchen to Yours
I hope this recipe brings you as much joy as it brings me. There is nothing better than sharing a homemade dessert. Seeing everyone enjoy it is the best feeling. I love hearing about your own kitchen adventures.
Please tell me all about your Berry Crunch Dream Dessert. I would love to see a picture of your beautiful creation. Have you tried this recipe? Tag us on Pinterest! Happy cooking!
—Chloe Hartwell.

Berry Crunch Dream Dessert: Crispy golden perfection
Description
Indulge in layers of creamy goodness and vibrant berries with this easy no-bake Berry Crunch Dream Dessert. A stunning, make-ahead treat perfect for any occasion.
Ingredients
=== Crust ===
=== Cheesecake Filling ===
=== Strawberry Crunch Topping ===
=== Garnish ===
Instructions
- Preheat oven to 375°F. Spray the inside of the springform pan with baker’s spray and place a parchment round onto the bottom of the pan.
- Tear off two large pieces of heavy-duty aluminum foil. Using a 9-inch springform pan, set the pan on one of the pieces of foil and bring it up around the sides of the pan. Repeat with the second piece of foil. Be sure that the foil is tightly wrapped around the sides of the pan to ensure that none of the water from the water bath will leak into the pan while the cheesecake bakes.
- To make the crust, mix together, in a large bowl, the graham cracker crumbs, granulated sugar, and melted butter until fully combined. Press the crumbs into the bottom and halfway up the sides of the prepared springform pan. Be sure to tightly pack the crumbs to make a sturdy crust.
- Bake the crust on the middle rack of the oven for 10 minutes. Remove and set aside to cool completely. Reduce the oven temperature to 325°F.
- Start your water boiling by adding water to a 6-8 cup, microwave-safe spouted measuring cup. It typically takes 3-4 minutes (in an 1100-watt microwave) on high to boil the water. Alternatively, you can boil water on the stovetop in a kettle.
- To make the cheesecake filling, add the room-temperature cream cheese and granulated sugar to a large mixing bowl. Beat on medium speed for 1-2 minutes, using a handheld mixer, until smooth.
- With the mixer on low speed, add the vanilla extract and the eggs, one egg at a time, to the cream cheese mixture, being sure to fully incorporate each egg before adding the next. Be sure to scrape down the bottom and sides of the bowl as needed to ensure that all the ingredients get blended well, and your cream cheese is free of any lumps.
- Add the sour cream and mix just until fully incorporated. Be sure not to overmix this cheesecake filling, as you want as few air bubbles in the batter as possible.
- Slowly pour the cheesecake filling into the cooled graham cracker crust. Spread out the top surface into an even layer. Gently tap the pan on the counter 2-3 times to remove any air bubbles from the cheesecake filling.
- Place the cheesecake into a large roasting pan and place the roasting pan into the oven on the center rack. Very carefully pour the boiling water into the roasting pan, being sure not to get any of the water into the cheesecake, until it comes up about 1 inch on the side of the springform pan.
- Bake for 1 hour and 30 minutes or until the cheesecake is just barely set in the center (it will just barely wiggle) when the pan is lightly nudged. It will continue to bake as it cools. Turn off the oven, do not remove the cheesecake, and crack open the oven door about 1 inch. Allow the cheesecake to cool in the oven for 1 hour.
- Remove the roasting pan from the oven and remove the springform pan from the roasting pan. Take the aluminum foil off of the sides of the springform pan. Run a sharp knife along the edges of the cheesecake to make sure that as it cools, the cheesecake does not stick to the sides of the pan.
- Allow the cheesecake to cool on the counter for another hour, then place it into the refrigerator for a minimum of 8 hours, or up to overnight, to cool and set completely.
- While the cheesecake is cooling, preheat the oven to 350°F. Line a rimmed baking pan with a piece of parchment paper.
- In a small bowl, add the melted butter and strawberry gelatin powder. Stir to dissolve the strawberry powder.
- Add the crushed golden Oreo cookies and the strawberry-flavored butter to a medium mixing bowl. Stir to coat the cookie pieces. Note that not all the cookie crumbs will be coated in the strawberry butter. This is good as you want a contrast of color. Spread the strawberry crunch mixture into an even layer on the prepared baking pan.
- Bake the strawberry crunch topping for 8-10 minutes. Remove from the oven and allow it to cool completely. Once cooled, break up any large chunks on the strawberry crunch.
- Remove the outer ring of the springform pan from the chilled cheesecake. Spread the strawberry preserves in a thin layer on top of the chilled cheesecake. Be sure to leave about a half inch of space around the outer edge of the cheesecake.
- Add the strawberry crunch topping onto the top of the strawberry preserves to completely cover the preserves.
- Garnish the strawberry crunch cheesecake just before serving by adding the thawed whipped topping to a large piping bag fitted with a large piping tip, and pipe ten dollops of whipped topping around the outer edge of the cheesecake. Add one of the halved strawberries to the center of each whipped cream dollop. Slice and serve.
=== Cheesecake Filling ===
=== Strawberry Crunch Topping ===
Notes
- You will need approximately 4-6 cups of boiling water for a water bath to bake the cheesecake.


Leave a Reply