

My First Time With This Dough
I was so nervous the first time I made this bread. The dough was so wet and sticky. I almost added more flour. My friend Betty told me to trust the process. I’m glad I listened.
That wetness is the secret. It makes the big, beautiful holes inside. It also makes the crust so crisp. This matters because it gives you bakery-style bread at home. Have you ever been scared to try a wet dough like this?
Why We Let It Sleep So Long
This bread needs a long nap. You mix it up and walk away. Let it sit for 12 hours or so. The tiny bit of yeast works slowly all night.
This slow rise builds amazing flavor. It’s the difference between okay bread and great bread. That’s why it matters. *Fun fact: This “no-knead” method became famous about 20 years ago. It changed how many people bake at home!* Do you prefer recipes you can start and forget?
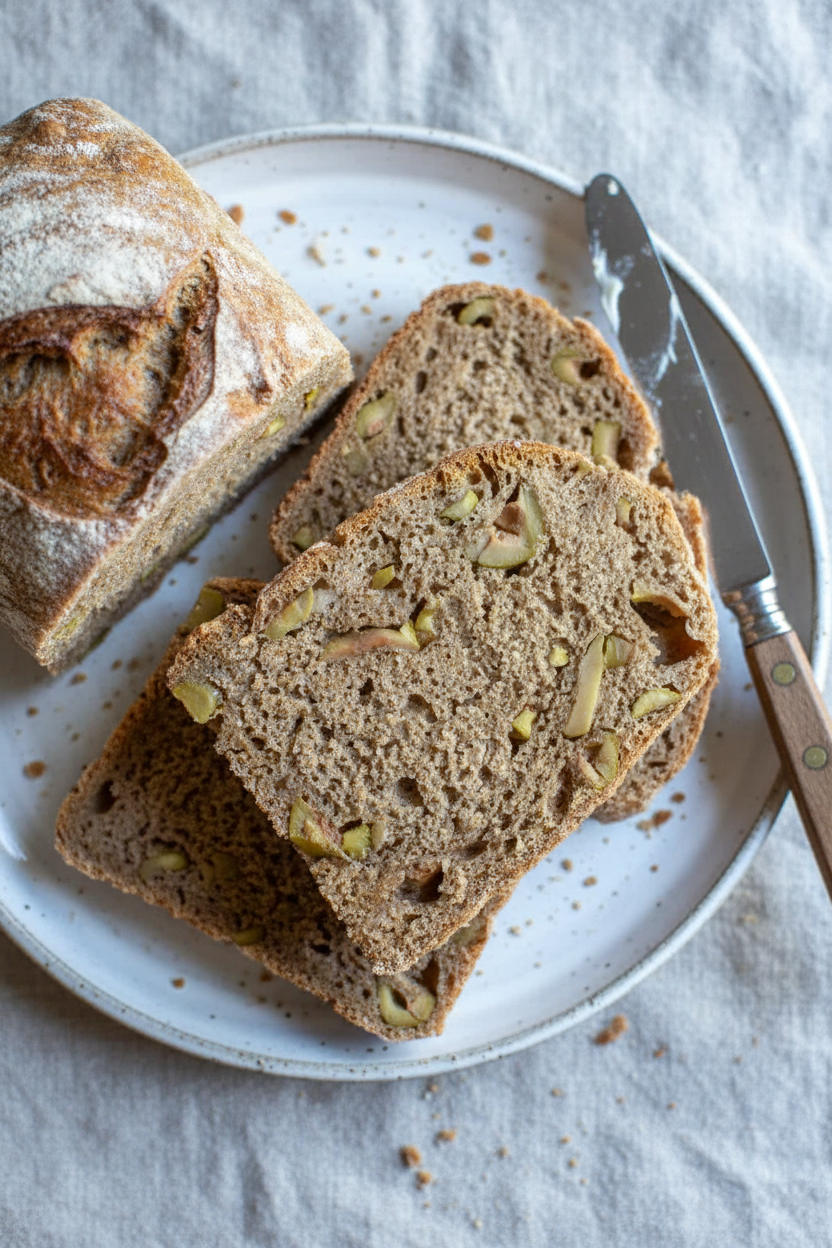
The Magic of the Olives
I love the salty little surprises in each bite. Green olives are my favorite here. They have a bright, tangy taste. Doesn’t that smell amazing when you open the jar?
They add moisture and flavor all through the loaf. You can use any olive you like, though. What is your favorite kind of olive? Tell me, I’d love to know.
The Hot Pot Trick
Heating the Dutch oven is a clever trick. You must let it get very hot for a full hour. This matters because it acts like a mini oven inside your oven.
The steam gets trapped under the lid. This gives the bread a fantastic rise and crust. I still laugh at that time I forgot my oven mitts. Be careful with that hot pot! What’s your most-used pot in your kitchen?
The Hardest Part
You must let the bread cool. I know, it’s so hard! The smell fills your whole house. You want to slice it right away.
But if you wait, the inside sets perfectly. It won’t be gummy. This patience makes all the difference for your slice. Trust your grandma on this one. Can you wait, or do you dig in while it’s warm?
Ingredients:
| Ingredient | Amount | Notes |
|---|---|---|
| Water | 2 cups | room temperature |
| Active dry yeast | 1/4 teaspoon | |
| Bread flour | 1 1/2 cups | plus more for shaping |
| Whole wheat flour | 1 1/2 cups | |
| Sliced pitted green olives | 2 cups (10-ounce jar) | |
| Kosher salt | 2 teaspoons |
My Favorite Lazy-Day Olive Bread
Hello, my dear! Come sit with me. I want to tell you about my favorite bread. It’s the easiest one I know. You just stir it and forget it. I call it my lazy-day bread. The secret is the wet, sticky dough. Doesn’t that sound funny? Trust me, it works. The olives make it so special. Every bite has a little salty surprise. I still laugh at the first time I made it. I was sure I had done it wrong! But it came out perfect. Let’s make some together.
Step 1: Grab your biggest bowl. Pour in two cups of water. Sprinkle in that tiny bit of yeast. Now add both flours, all the lovely olives, and the salt. Just mix it with your hand. It will feel like thick, sticky cake batter. (My hard-learned tip: Don’t add more flour! The wetness is the magic.)
Step 2: Cover the bowl with plastic wrap. Now walk away. Let it sit on your counter for about 12 hours. You’ll see bubbles form on top. The dough will smell yeasty and alive. It’s like the dough is taking a long, cozy nap. How do you know the dough is ready? Share below!
Step 3: Flour your counter well. Tip the dough right onto it. Let it sit for 15 minutes. It needs to wake up slowly. Then, with floured hands, gently shape it into a ball. Use a dough scraper if it sticks. I always have flour on my nose by this point!
Step 4: Place your dough ball on a floured towel. Wrap it up like a little present. Let it rest one more hour. Now, put your Dutch oven in the cold oven. Turn the heat to 425°F. Let the pot heat for a full hour. This makes the bread’s crust amazing.
Step 5: Carefully take the hot pot out. Unwrap your dough and plop it right in. Don’t worry if it looks messy. Cover it and bake for 30 minutes. Take the lid off and bake 10 more. You’ll know it’s done by that gorgeous brown color and incredible smell. Let it cool completely. This is the hardest part—waiting!
Cook Time: 40 minutes
Total Time: 12 hours 50 minutes
Yield: 1 loaf
Category: Bread, Baking
Three Tasty Twists to Try
This bread is like a blank canvas. You can add so many things to it. It’s fun to play with the flavors. Here are my three favorite ideas. They make the kitchen smell even better.
Sun-Dried Tomato & Herb: Swap the olives for chopped sun-dried tomatoes. Add a spoonful of dried Italian herbs. It tastes like a summer garden.
Everything Bagel Style: Skip the olives. After shaping the dough, roll the wet ball in everything bagel seasoning. You get that delicious crunch in every slice.
Cheesy Garlic: Fold in a cup of shredded cheddar cheese. Add two minced garlic cloves. It’s so warm and comforting on a chilly day.
Which one would you try first? Comment below!
Serving Your Masterpiece
Oh, slicing into a warm loaf is pure joy. The crust crackles. I love to serve thick slices with a big bowl of soup. Tomato soup is my favorite partner. You can also toast a slice for breakfast. Top it with creamy avocado and a sprinkle of salt. Doesn’t that sound amazing?
For a drink, I have two choices. A glass of crisp apple cider is lovely. It’s not too sweet. For the grown-ups, a dry white wine pairs beautifully. It cuts through the saltiness of the olives. Which would you choose tonight?
Keeping Your Olive Bread Fresh and Happy
This bread is best eaten the day you bake it. But I always make two loaves. To keep it fresh, let it cool completely first. Then wrap it tightly in plastic wrap. It will stay good on the counter for two days.
For longer storage, slice it first. Place the slices in a freezer bag. They will keep for a month. You can toast slices straight from the freezer. I once forgot a loaf on the counter for a week. It was as hard as a rock! Now I freeze it right away.
Batch cooking this bread saves so much time. Mix the dough in the evening. Let it rise overnight. In the morning, shape two loaves instead of one. Bake them one after the other. Having homemade bread ready is a wonderful feeling. Have you ever tried storing it this way? Share below!
Bread Troubles? Let’s Fix Them Together
Is your dough too sticky? Do not add more flour. A wet dough makes big air pockets. Just use plenty of flour on your hands. This keeps it from sticking to you. I remember my first loaf. I added too much flour. The bread was dense like a brick.
Did your bread not rise much? Your yeast might be old. Or your kitchen could be too cold. A warm spot helps the yeast wake up. Try placing the bowl in your oven with the light on. This small warmth makes a big difference.
Is the bottom of the loaf burning? Your pot might be too close to the oven’s bottom element. Always use the middle rack. Also, make sure your pot heats for the full hour. A properly hot pot gives you a perfect crust. Which of these problems have you run into before?
Your Quick Bread Questions Answered
Q: Can I make this gluten-free? A: I have not tried it. Gluten-free flours act very differently. A simple swap may not work well.
Q: Can I make the dough ahead? A: Yes! After the first rise, shape the dough. Wrap it tightly and refrigerate. Bake it within 24 hours.
Q: I don’t have green olives. A: Use black olives or sundried tomatoes. You could also add herbs. *Fun fact: The salt from the olives seasons the whole loaf!*
Q: Can I double the recipe? A: Absolutely. Just use a very large bowl. The dough will grow a lot overnight.
Q: Any optional tips? A: Brush the baked loaf with olive oil. This gives it a lovely shine and soft crust. Which tip will you try first?
From My Kitchen to Yours
I hope you love this simple, rustic bread. There is nothing like the smell of baking bread at home. It fills your kitchen with warmth and love. I would be so delighted to see your creation.
Please share a picture of your loaf. Show me your proud baking moment. Have you tried this recipe? Tag us on Pinterest! You can find me at @ChloesCozyKitchen. I can’t wait to see what you make.
Happy cooking!
—Chloe Hartwell.
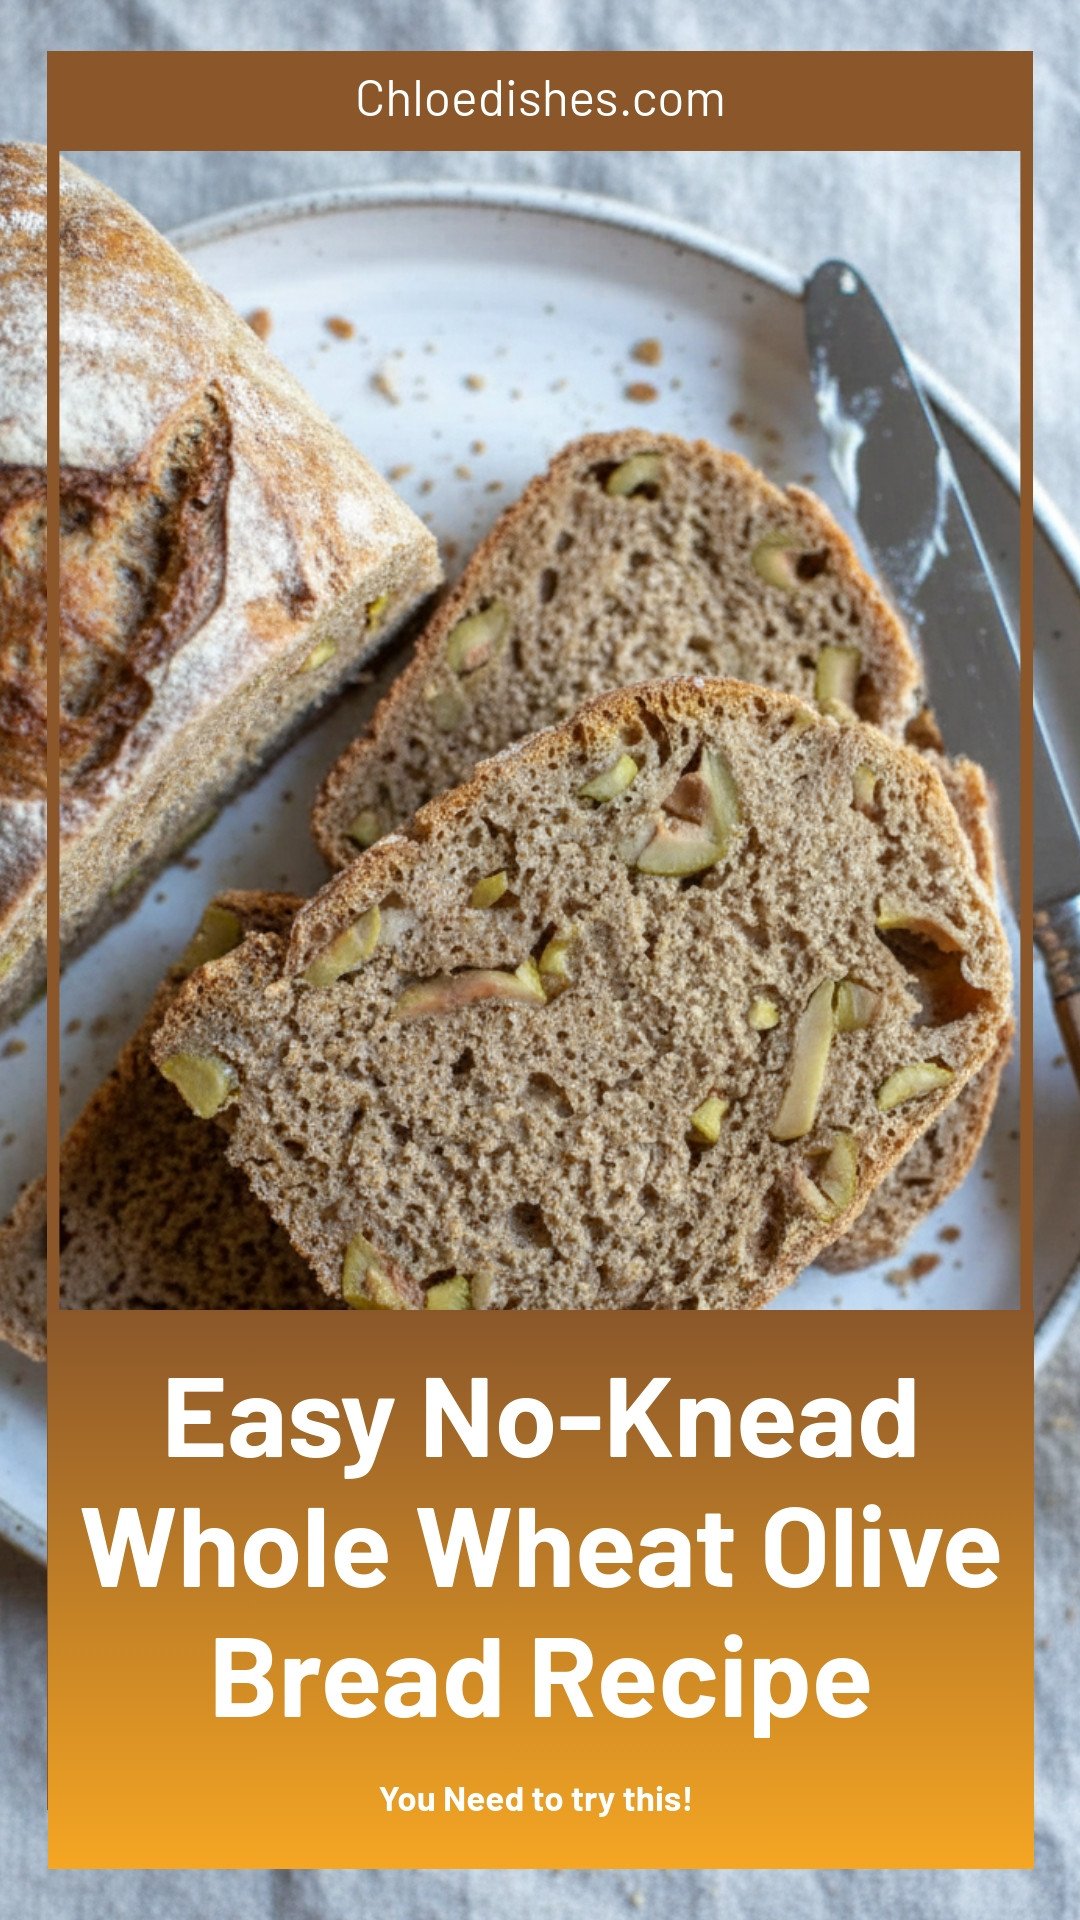

Easy No-Knead Whole Wheat Olive Bread Recipe
Description
Bake this rustic, no-knead whole wheat olive bread with ease. Perfectly crusty outside, soft inside, and packed with flavor. No special skills needed!
Ingredients
Instructions
- Add 2 cups water and 1/4 teaspoon yeast to a large bowl. Stir in 1 1/2 cups bread flour, 1 1/2 cups whole wheat flour, 2 cups chopped green olives and 2 teaspoons salt. Use your hand or a wood spoon to mix until combined. The dough will be sticky and soft like thick cake batter. Do not add more flour.
- Cover with plastic wrap and leave at room temperature for 8 to 18 hours (ideally 12 hours). The dough is ready when it has doubled in size, become airy, and its surface is dotted with bubbles.
- Generously flour a work surface. Flip the bowl upside down onto the flour to release the dough. Let it sit for 15 minutes to release itself from the bowl.
- Using enough flour to prevent sticking, gently form the dough into a ball. A dough scraper can help with sticky dough.
- Dust a clean towel generously with flour and place dough on it. Wrap the towel edges around the dough to cover. Let rise for 1 hour.
- After 30 minutes of the final rise, heat oven to 425°F. Place a 6 to 8 quart Dutch oven with lid on the middle rack to heat for 1 hour.
- Carefully remove the hot pot from the oven. Unwrap the dough and turn it over into the pot. It’s okay if it loses its shape.
- Cover and bake for 30 minutes. Remove lid and bake for 8 to 10 minutes more, or until browned. Remove bread from pot and let cool on a rack for at least 1 hour before slicing.
Notes
- Resist the temptation to add more flour during mixing; the wet dough is the secret to this bread’s texture. If dough sticks to the towel when transferring, use a bench scraper to help release it.


Leave a Reply