

My Kitchen Secret
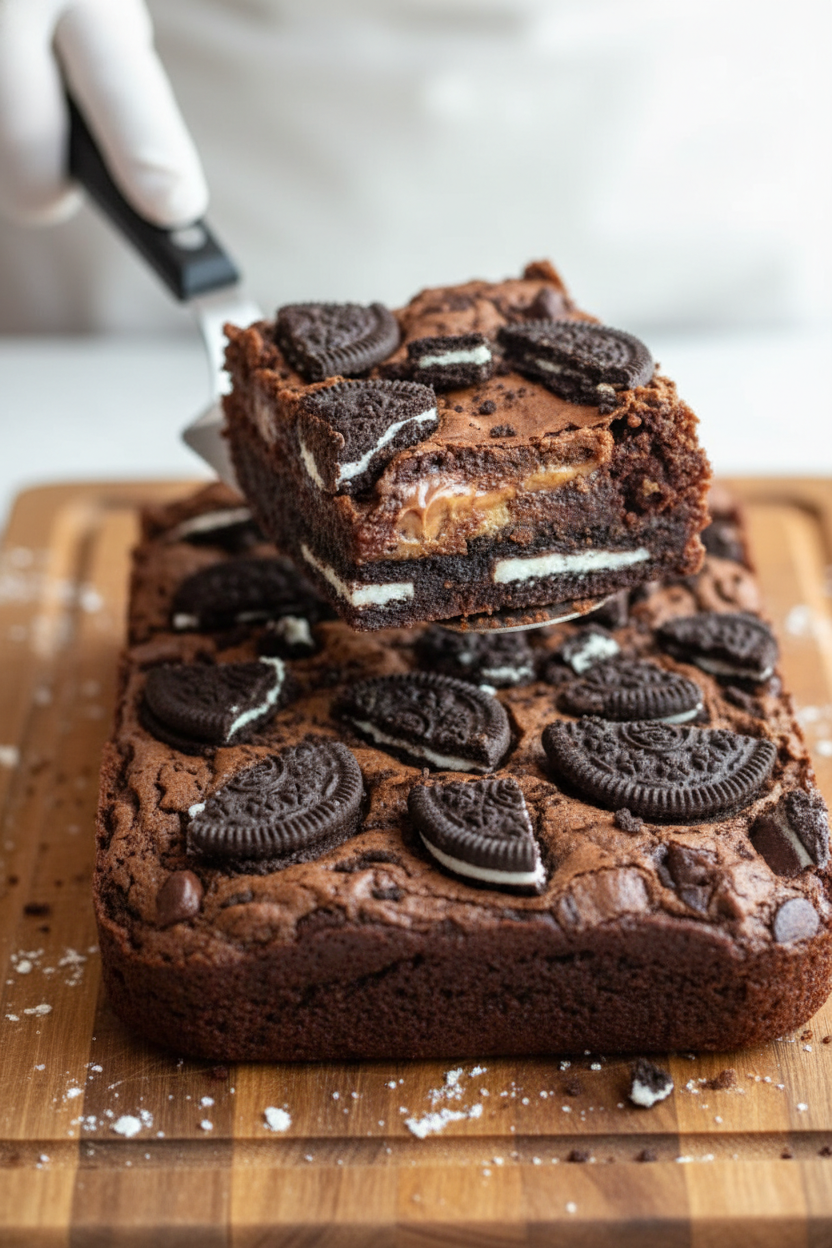
Let me tell you about my favorite brownies. I call them my “everything good” brownies. They have three layers of joy. First, a fudgy brownie. Then, a surprise inside. Finally, a cookie crunch. It’s like a party in a pan.
I use olive oil instead of butter here. I know, it sounds funny. But it makes the brownies so moist. It also gives a little fruity taste. Doesn’t that smell amazing when it melts with the chocolate? It matters because good food is about trying new things.
The Heart of the Recipe
You start by melting chocolate and oil together. Stir it slow and gentle. This is the base of your flavor. Then you mix your dry and wet stuff. The key is to not stir too much. Just until it comes together.
Now for the fun part. You layer it all. Cookie, batter, peanut butter cups, more batter. I still laugh at how messy my fingers get. Pressing those Reese’s down is the best job. What’s your favorite part of baking? Is it mixing, or is it tasting?
Why Layers Matter
This recipe is more than a list. It’s about texture. The soft brownie. The creamy peanut butter. The crunchy cookie. Each bite has a little of everything. That’s what makes it special.
Food should be a happy adventure. Mixing sweet and salty is one of my favorite tricks. It wakes up your whole mouth. *Fun fact: The first chocolate chip cookie was an accident!* Sometimes the best things happen by chance.
A Little Story for You
I first made these for my grandson’s birthday. He has friends who can’t eat gluten. I wanted everyone to have the same treat. Their faces lit up when they bit into them. That’s why this matters. Good food brings people together.
Seeing them all share the pan made my heart full. No one felt left out. Do you have a food that makes you think of a happy time? I’d love to hear about it.
Your Turn to Bake
When you bake them, watch for the top to crack. That’s your sign they’re almost done. The waiting is the hardest part. Let them cool completely. It makes them easier to cut.
Then, slice them up. Share them if you can. A treat tastes better with friends. What’s your go-to dessert to share with your crew? Is it cookies, or maybe something else?
Ingredients:
| Ingredient | Amount | Notes |
|---|---|---|
| Bob’s Red Mill 1:1 Gluten-Free Flour | 1 cup | |
| Semi-sweet chocolate | 1 cup | |
| Milk chocolate bar | 4 oz | crushed |
| Costabile butter olive oil | ½ cup | |
| OliveNation 22/24 fat Dutched cocoa powder | ¼ cup | |
| Eggs | 4 | room temperature |
| Sugar | 1 cup | |
| Brown sugar | ½ cup | |
| Salt | ½ teaspoon | |
| Singing Dog vanilla extract | 2 teaspoon | |
| Reese’s Cups | 16 | |
| Gluten-free Oreos | 16 |
My Granddaughter’s Favorite Slutty Brownies
Hello, my dears. It’s Chloe. Let’s bake something fun today. These brownies have three happy layers. They are a bit naughty, but so good. My granddaughter begged for them every Friday. I still laugh at that.
We call them “slutty” because they are so easy and mix everything together. Don’t let the name scare you. It’s just cookie, peanut butter cup, and brownie. Doesn’t that sound amazing? It fills the whole kitchen with a sweet smell. Let’s begin.
Step 1: First, warm your oven to 325 degrees. Line your square pan with parchment paper. This paper is a magic trick. It lets you lift the whole brownie block out later. (My hard-learned tip: let the paper hang over the sides. It makes handles!). Step 2: Melt the chocolate and olive oil in a small pot. Stir it until it’s smooth and shiny. Set it aside to cool a little. Now, whisk your flour, cocoa, and salt in a bowl. This gets out any little lumps. Step 3: In another bowl, beat the eggs and both sugars. Add the vanilla. It will smell like a bakery already. Pour in your melted chocolate mixture. Stir it all together gently. A rubber spatula is perfect for this. Step 4: Now, fold in the crushed chocolate bar. See those lovely chunks? They will be little melted pockets. Try not to stir too much. Overmixing makes tough brownies. True or false: Room temperature eggs mix better? Share below! Step 5: Time to build! Lay your gluten-free Oreos in the pan. They fit perfectly, like a puzzle. Pour half the brownie batter over them. Spread it gently to cover every cookie. Step 6: Unwrap your Reese’s Cups. Press them into the batter in rows. Just let their tops peek out. This is the secret peanut butter layer. My grandson always sneaks one here. Step 7: Pour the rest of the batter on top. Spread it carefully. Press a few more Oreo pieces on top for looks. Now it’s ready for the oven. The waiting is the hardest part. Step 8: Bake for 33 to 40 minutes. A toothpick should come out with just a few crumbs. The top will get crackly. Let them cool for a whole hour in the pan. I know, it’s a test of patience! Step 9: Use the parchment paper to lift them out. Cool completely on a rack. Then, slice into squares. Enjoy the messy, wonderful layers. I always have a glass of milk ready. Cook Time: 35–40 minutes Total Time: About 2 hours (with cooling) Yield: 16 rich brownies Category: Dessert, BakingThree Fun Twists to Try
This recipe is like a favorite story. You can tell it a little differently each time. Here are some ways my family likes to change it up. They are all simple and delicious.
Birthday Cookie Twist: Use birthday cake Oreos. It makes the whole pan feel like a party. Peppermint Patty Layer: Swap Reese’s for peppermint patties. Perfect for a chilly evening. Salted Caramel Dream: Drizzle caramel sauce over the Oreo layer. Sprinkle a little sea salt on top.Each version has its own charm. It’s fun to play with your food sometimes. Which one would you try first? Comment below!
Serving Them Up with Style
These brownies are a treat all by themselves. But why not make it special? For a real dessert plate, add a scoop of vanilla ice cream. The warm brownie melts it just right. A few berries on the side look pretty, too.
What to drink? For the grown-ups, a small glass of port wine is nice. It sips like liquid raisins. For everyone, a cold glass of milk is the classic choice. Or try a frothy homemade chai tea. Which would you choose tonight?
Keeping Your Brownies Happy
Let’s talk about storing these treats. Cool them completely first. Then, wrap the whole pan tightly. You can keep it on the counter for three days.
For longer storage, the freezer is your friend. I slice the brownies first. I wrap each piece in parchment paper. Then, I pop them all in a freezer bag.
I once forgot to wrap a batch. They tasted like my freezer smells! Now I never skip that step. To reheat, just microwave a slice for 15 seconds. It makes the chocolate gooey again.
Batch cooking matters for busy weeks. A ready-made dessert saves the day. It brings a sweet moment without the fuss. Have you ever tried storing it this way? Share below!
Fixing Common Brownie Bumps
Sometimes baking has little hiccups. Do not worry. We can fix them together. First, if your brownies are too cakey, you likely over-mixed the batter.
I remember when my grandson mixed batter like he was digging for treasure. Gentle folding is key. It keeps the texture dense and fudgy. This matters for that perfect, rich bite.
Second, if the top burns, your oven might run hot. Use an oven thermometer. It is a baker’s best friend. Third, if the middle is raw, your pan might be too small.
Using the right size pan ensures even cooking. This builds your confidence in the kitchen. You learn how your tools work. Which of these problems have you run into before?
Your Brownie Questions, Answered
Q: Can I make these ahead of time? A: Yes! They taste even better the next day. The flavors get to know each other.
Q: What if I don’t have gluten-free flour? A: Regular all-purpose flour works just fine. Use the same one-to-one amount.
Q: Can I use different candy? A: Of course. Try peanut butter cups or mint patties. *Fun fact: The name “slutty brownies” comes from their “naughty” mix of layers!*
Q: How do I double the recipe? A: Double all ingredients. Use a 9×13 inch pan. Bake for a few extra minutes.
Q: Any optional tips? A: A pinch of sea salt on top is lovely. It makes the chocolate taste deeper. Which tip will you try first?
From My Kitchen to Yours
I hope you love making these brownies. Baking should be fun and full of joy. I would love to see your creation.
Share a picture of your messy, wonderful kitchen. Show me your proud smile with the pan. Have you tried this recipe? Tag us on Pinterest!
Thank you for baking with me today. Remember, the best ingredient is always a little love. Happy cooking!
—Chloe Hartwell.

Easy Slutty Brownies Recipe with Three Layers
Description
The ultimate easy slutty brownies recipe! Three irresistible layers of cookie dough, Oreos, and fudgy brownie batter. A decadent, viral dessert everyone loves.
Ingredients
Instructions
- Preheat the oven to 325 degrees and line the bottom and sides of an 8×8 pan with parchment paper.
- Melt the semi-sweet chocolate and the olive oil in a small saucepan over medium low heat, stirring constantly until creamy. Set aside.
- Whisk the cocoa powder, flour, and salt in a medium bowl.
- Beat the eggs, brown sugar, white sugar, and vanilla until combined.
- Add the dry ingredients to the wet ingredients, including the melted chocolate, and mix with a rubber spatula until just combined. Do not overmix.
- Fold in the chopped chocolate bar until combined. Do not overmix.
- Line the bottom of the prepared pan with 16 Oreos.
- Pour half the batter into the pan and spread it evenly.
- Add 16 Reese’s Cups in a single layer to the batter, pressing them down until just the tops show.
- Pour the remaining batter into the pan and spread it evenly. Then, press more chopped Oreos into the top.
- Bake the brownies for 33 to 40 minutes or until a toothpick comes out mostly clean with just a few moist crumbs. At this point, the top will begin to crack.
- Cool the brownies in the pan for an hour. Then, transfer them to a wire cooling rack and cool completely.
- Slice the cooled brownies and enjoy.
Notes
- For best results, ensure all ingredients are at room temperature before mixing. Store leftovers in an airtight container at room temperature for up to 3 days.


Leave a Reply