
My Favorite Swirled Memory
I once made this cake for my grandson’s birthday. He wanted chocolate and vanilla. I thought, why not both? So I swirled them together in one pan. It was a happy mess. I still laugh at that.
This cake reminds me of that day. It is about bringing people together. Everyone gets their favorite flavor. That matters more than a perfect swirl. What is your favorite birthday cake memory? Tell me in the comments.
Why Room Temperature Matters
See where it says “room temperature” for the eggs and milk? This is a small step with a big job. Cold ingredients don’t like to mix with butter. They make the batter lumpy.
Letting them warm up makes everything friendly. Your cake will be smooth and rise high. This matters because little care makes big flavor. *Fun fact: Eggs at room temperature whip up much fluffier!*
The Pudding-Like Batter Secret
The vanilla batter will look very wet. It will seem like pudding. Do not worry! This is exactly right. Gluten-free flour needs more liquid. It makes the cake soft, not crumbly.
Trust the recipe. Pour that pudding batter into the pans. The oven works its magic. Doesn’t that smell amazing? Have you ever been surprised by how a batter looks? I was the first time.
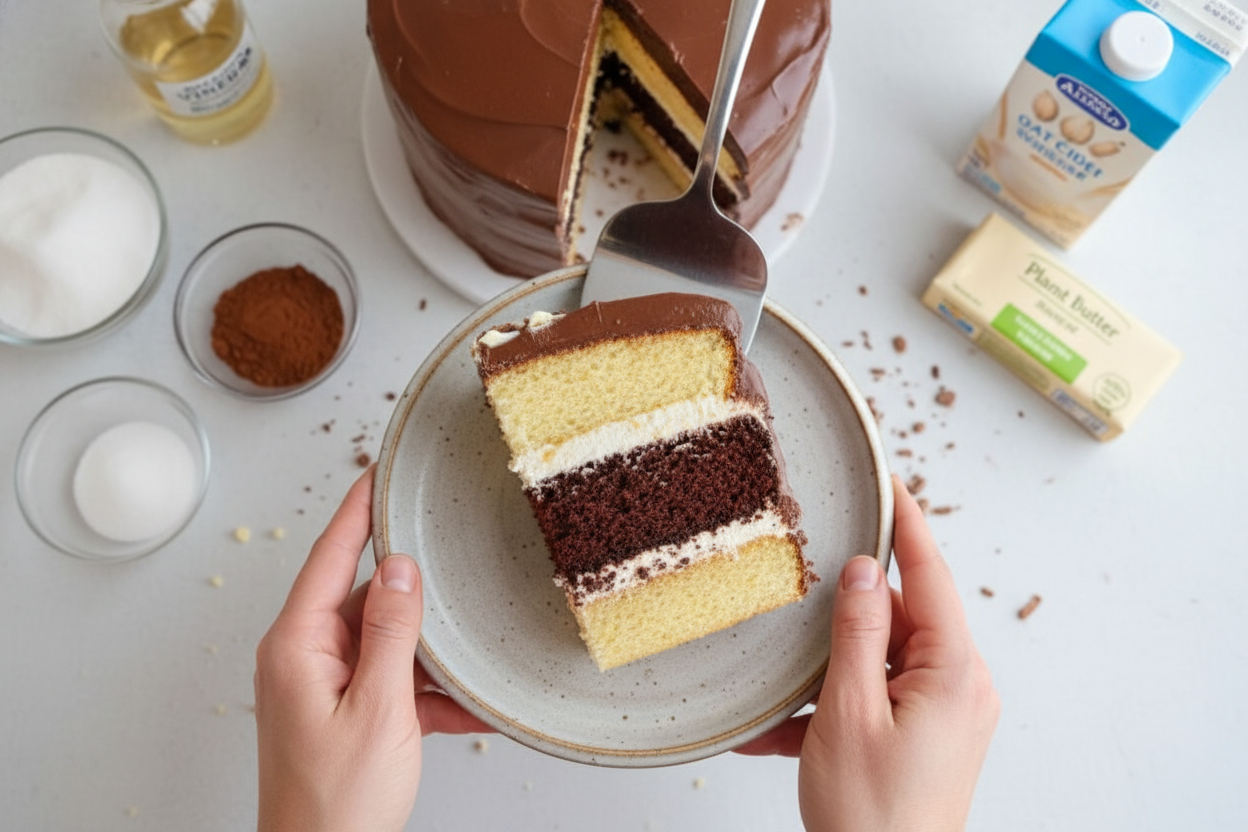
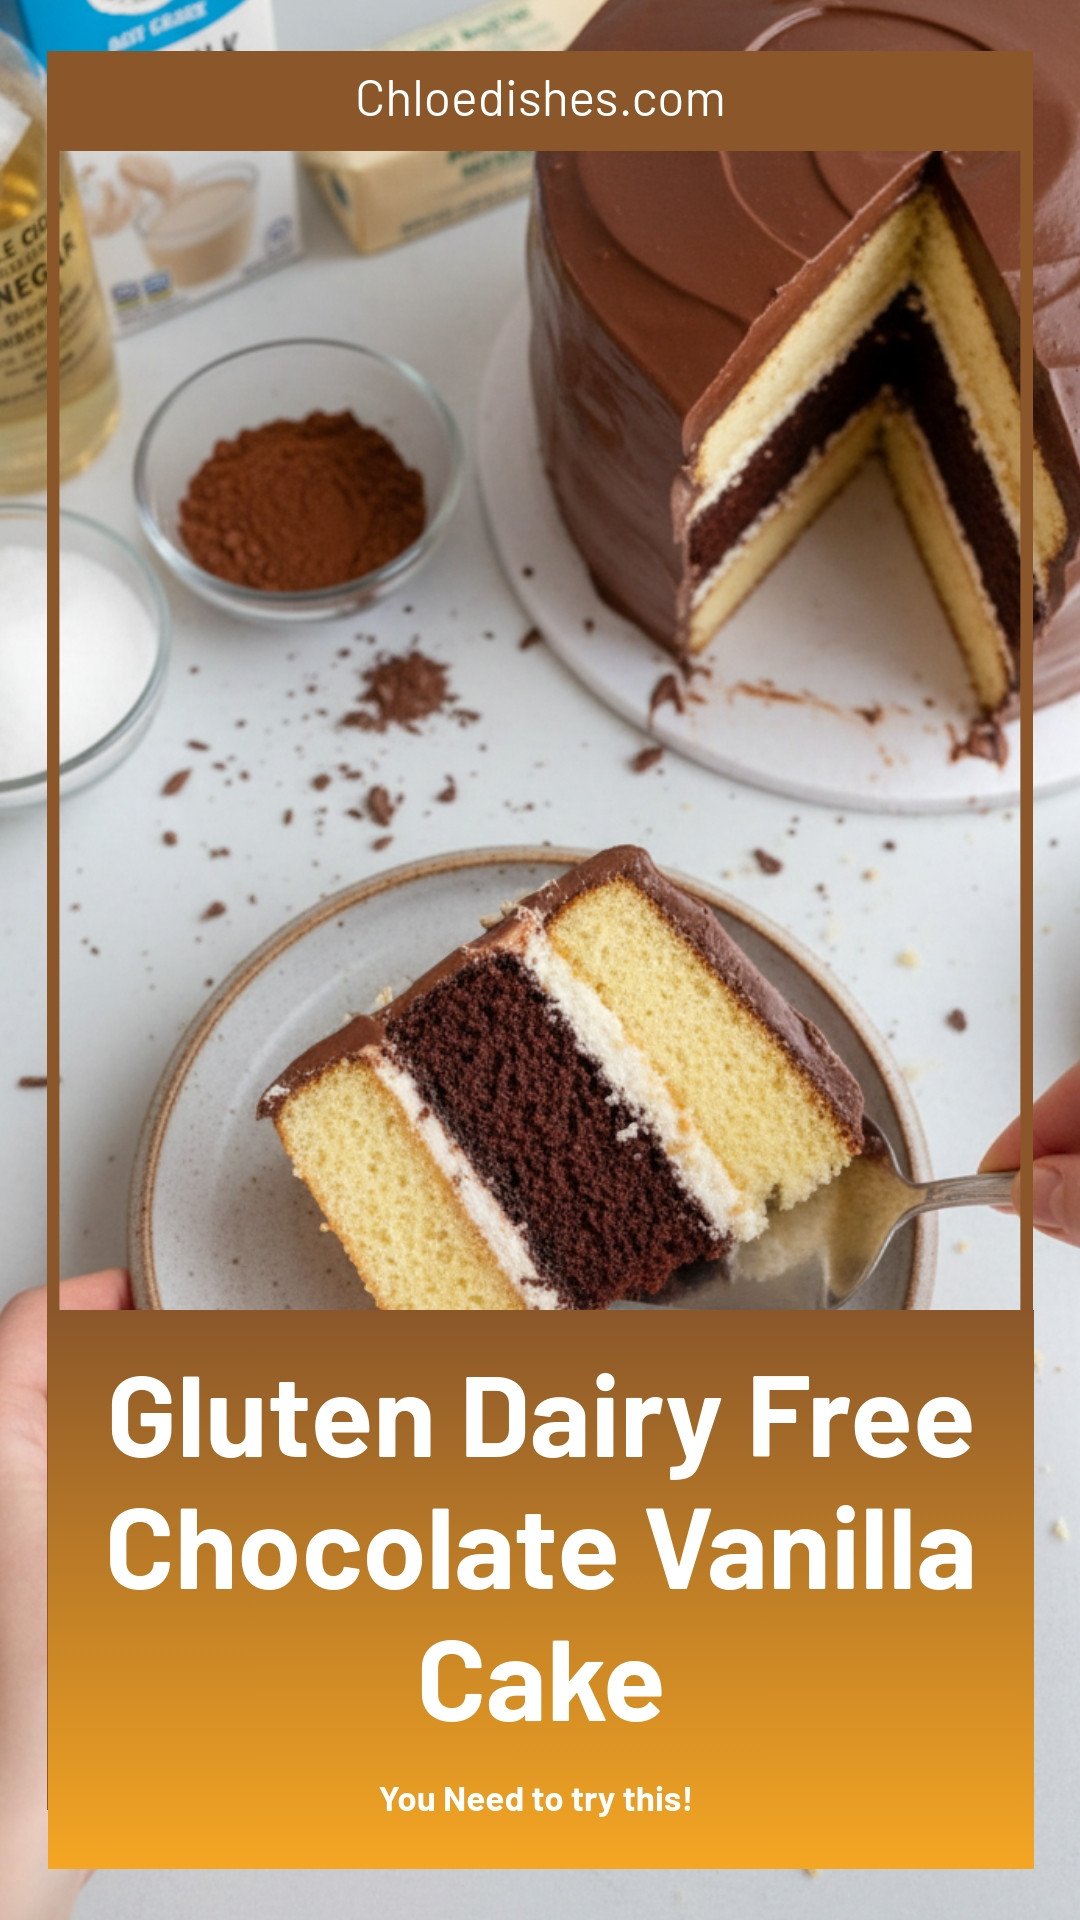
Building Your Cake Tower
Assembling the layers is my favorite part. You flip a vanilla cake upside down. This gives you a flat top. Spread on the vanilla frosting. Then add the chocolate layer.
Another vanilla layer goes on top. Now, cover it all with chocolate frosting. Take your time smoothing it. This is your creation. Do you like lots of frosting or just a little? I am a “lots” person myself.
A Cake For Everyone
This cake is special. It lets friends who eat differently join the party. No gluten. No dairy. Just sweet, happy slices. Food should include people, not leave them out.
That is the most important ingredient of all. Kindness. Sharing this cake is a quiet way to say, “I thought of you.” Who would you love to make this cake for? I would love to know.
Ingredients:
| Ingredient | Amount | Notes |
|---|---|---|
| Greek yogurt (df) | ¾ cup | Vanilla cake – Wet |
| Vegetable oil | ¼ cup | Vanilla cake – Wet |
| Plant butter | ½ cup | Vanilla cake – Wet, softened |
| Oat milk | 1 cup | Vanilla cake – Wet, room temperature |
| Vanilla extract (singingdog) | 1 tablespoon | Vanilla cake – Wet |
| Eggs | 6 | Vanilla cake – Wet, room temperature |
| Gluten free flour | 2 ¾ cups | Vanilla cake – Dry |
| Corn starch | 3 tablespoons | Vanilla cake – Dry |
| Sugar | 2 ¼ cups | Vanilla cake – Dry |
| Baking powder | 4 teaspoons | Vanilla cake – Dry |
| Salt | ½ teaspoon | Vanilla cake – Dry |
| Sugar | ⅔ cup | Chocolate cake – Wet |
| Apple cider vinegar | 1 teaspoon | Chocolate cake – Wet |
| Vanilla extract (singingdog) | 1 tablespoon | Chocolate cake – Wet |
| Brown sugar | ¼ cup | Chocolate cake – Wet |
| Eggs | 2 | Chocolate cake – Wet |
| Vegetable oil | ⅓ cup | Chocolate cake – Wet |
| Boiling water | ⅔ cup | Chocolate cake – Wet |
| Baking powder | ¾ teaspoon | Chocolate cake – Dry |
| Cocoa powder | ½ cup | Chocolate cake – Dry |
| 1:1 Gluten free flour | ¾ cup + 2 tbsp | Chocolate cake – Dry |
| Baking soda | ½ teaspoon | Chocolate cake – Dry |
| Salt | ¼ teaspoon | Chocolate cake – Dry |
How to Make a Chocolate-Vanilla Swirl Dream Cake
Hello, my dear. Come sit at the counter. I want to tell you about my favorite cake. It’s half vanilla, half chocolate. My grandkids call it the “swirl dream.” We’re making it so everyone can enjoy it. That means no gluten or dairy. But trust me, it’s still pure magic. Doesn’t that sound lovely?
We’ll make three layers. Two vanilla, one chocolate. It seems like a lot, but we’ll go step-by-step. I’ll share my little secrets along the way. I still laugh at the time I used salt instead of sugar. What a mess! Let’s begin.
Step 1: First, turn your oven to 350 degrees. Grease three round cake pans. Line the bottoms with parchment paper. This little paper circle is a lifesaver. It stops the cake from sticking. I learned that the hard way once!
Step 2: Now, make the vanilla cake batter. Put your soft plant butter and half the sugar in a bowl. Mix it on high. It will get fluffy and light, like a cloud. Then add the rest of the sugar and the oil. Mix it again. Doesn’t that smell amazing already?
Step 3: Crack in the eggs, one or two at a time. Mix after each addition. Then pour in the vanilla. In another bowl, whisk all your dry ingredients together. This is the flour, corn starch, baking powder, and salt. (A hard-learned tip: always whisk your dry stuff first. It stops little lumps of baking powder in your cake!).
Step 4: Add half the dry mix to your butter bowl. Mix gently. Then pour in the oat milk and yogurt. Mix. Finally, add the last of the dry mix. Your batter will look like thick pudding. That’s perfect! Divide it between two of your pans. Quick quiz: why do we add eggs one at a time? Share below!
Step 5: Time for chocolate! Whisk all the dry ingredients in a clean bowl. That’s the flour, cocoa, baking soda, and powder. Pour in the oil and eggs. Mix it well. It will be very thick. Now, add the sugars, vanilla, vinegar, and boiling water. Mix for a few minutes. It becomes silky and smooth. Pour this into your last pan.
Step 6: Bake all three pans for 30-35 minutes. Do the toothpick test. If it comes out clean, they’re done. Let them cool for a whole hour. I know, waiting is hard! Use this time to make your frostings. Follow the package directions. It’s easy.
Step 7: The fun part! Place one vanilla layer flat-side up. Spread vanilla frosting on top. Add the chocolate layer. Frost it with more vanilla. Top with the last vanilla layer. Now, cover the whole cake with chocolate frosting. Smooth it all around. You can add shaved chocolate on top. It looks so pretty.
Cook Time: 35 minutes
Total Time: About 2 hours (with cooling)
Yield: 1 beautiful layer cake
Category: Dessert, Baking
Three Fun Twists on Our Swirl Dream
This cake is wonderful as it is. But sometimes, you want to play. Here are three fun ideas. They make the cake new again. My neighbor tried the orange one last week. She hasn’t stopped talking about it!
Peanut Butter Cup: Add 1/2 cup peanut butter to the vanilla frosting. Sprinkle chopped peanuts between the layers.
Orange Zest Zing: Add the zest of one orange to the vanilla cake batter. That citrus smell will fill your kitchen.
Mint Chocolate Chip: Add 1/2 teaspoon peppermint extract to the chocolate frosting. Mix in mini chocolate chips before frosting.
Which one would you try first? Comment below!
Serving Your Masterpiece
This cake is a celebration all by itself. But a few little touches make it special. For a party, add fresh berries around the plate. A few raspberries look so pretty with the chocolate. You could also serve it with a scoop of dairy-free vanilla ice cream. The mix of warm cake and cold ice cream is heaven.
What to drink? For the grown-ups, a small glass of coffee liqueur is nice. It sips like a creamy, sweet coffee. For everyone, I love a tall glass of cold oat milk. It’s creamy and cools you down. Which would you choose tonight?

Keeping Your Cake Fresh and Happy
Let’s talk about storing this special cake. First, let it cool completely. A warm cake in a container gets soggy. I learned that the hard way with my first layered cake.
For the fridge, cover it well. Use a cake carrier or wrap it in plastic. It will stay fresh for about four days. You can also freeze the layers separately for later.
This is a great cake for batch cooking. Bake the layers ahead of a busy week. Wrap them tightly and freeze. Thaw them at room temperature when you need them.
Why does this matter? Good storage saves your hard work. It means you can have a sweet treat ready anytime. Have you ever tried storing it this way? Share below!
Simple Fixes for Common Cake Troubles
Sometimes cakes don’t behave. Here are easy fixes. First, a dry cake. This often means it baked too long. Check it five minutes before the timer goes off.
Second, a sunken middle. Your batter might have been over-mixed. I remember my first sunken cake. I was so disappointed. Just mix until the flour disappears.
Third, the cake sticks to the pan. Always line the bottom with parchment paper. Grease the sides well too. This simple step saves so much frustration.
Why fix these problems? It builds your confidence in the kitchen. It also makes sure your cake tastes as good as it looks. Which of these problems have you run into before?
Your Cake Questions, Answered
Q: Can I make this cake ahead of time? A: Yes! Bake the layers up to two days early. Wrap them and store at room temperature.
Q: What if I don’t have oat milk? A: Any plant-based milk works here. Almond or soy milk are fine swaps.
Q: Can I make a smaller cake? A: You can halve the recipe. Use two six-inch pans. Bake time will be less.
Q: Is the gluten-free flour important? A: Yes, use a 1:1 blend. It has special starches. *Fun fact: These starches help mimic regular flour’s texture!*
Q: Any optional tips? A: A crumb coat of frosting first helps. It traps loose crumbs for a smooth finish. Which tip will you try first?
From My Kitchen to Yours
I hope you love making this cake. It is a celebration of sweet, simple things. Sharing food is one of life’s great joys.
I would love to see your creation. Did you add sprinkles or berries? Your kitchen stories make my day. Have you tried this recipe? Tag us on Pinterest!
Thank you for baking with me today. Remember, the best ingredient is always a little love.
Happy cooking!
—Chloe Hartwell.

Gluten Dairy Free Chocolate Vanilla Cake
Description
Indulge in this moist gluten-free, dairy-free chocolate vanilla marble cake. Perfect for celebrations and food allergies. Easy recipe with stunning layers.
Ingredients
Vanilla cake – Wet ingredients
Vanilla cake – Dry ingredients
Chocolate cake – Wet ingredients
Chocolate cake – Dry ingredients
Instructions
- Preheat your oven to 350 ℉. Lightly grease three 8” cake pans and line their bottoms with parchment paper. You can bake all three cakes at the same time if desired.
- Vanilla cake: Add all of your ingredients to a bowl and mix to thoroughly combine. Add the butter and half of the sugar to the bowl of your mixer and mix on high for a minute and a half. It will become light and fluffy. Add in the remaining sugar and oil and mix for about a minute until fluffy. Add your eggs one by one, mixing after every two. Next, add your vanilla and mix until just combined. Carefully add half of your dry ingredients and mix, followed by the milk and yogurt. Once that has been incorporated add your remaining dry ingredients and mix until completely combined. The batter will be wet and pudding-like. Divide the vanilla cake batter between two prepared cake pans.
- Chocolate cake: Add all of your dry ingredients to a bowl and whisk to combine them. Pour your oil into the dry ingredients followed by the eggs and mix on medium speed until completely incorporated. Add the sugar, brown sugar, apple cider vinegar, vanilla, and boiling water and mix on medium high for 3-4 minutes until completely combined. Pour the batter into the third cake pan and spread it out evenly.
- Allow your three cakes to bake for 30-35 minutes, or until a toothpick comes out clean. Let your cakes cool for an hour before frosting. Follow the directions on the package for the frosting and prepare them accordingly.
- Assemble: To assemble your cake, flip over a vanilla cake, making the flat bottom the top. Evenly spread some of the vanilla frosting over the top of it. Top the cake with the chocolate cake, making the bottom the top. Frost with more vanilla frosting. Stack the final vanilla cake on top. Spread the chocolate frosting over the top and down the sides, smoothing it out. You can garnish with shaved chocolate if desired.
Notes
- Ensure all ingredients, like yogurt and butter, are dairy-free versions. For best results, have all ingredients at room temperature before mixing.


Leave a Reply