
My First Galette Fumble
My first galette was a funny mess. The apples slid right off the crust. I still laugh at that. It looked more like a pancake with apples on the side. But you know what? It tasted just as good. That’s the beauty of a galette. It’s meant to be rustic and free-form.
No perfect circles needed here. Just fold the dough over your filling. It’s like giving your apples a cozy blanket. This matters because cooking should be fun, not stressful. If your crust cracks, just pinch it back together. It will still be delicious. What’s your funniest kitchen mistake? I’d love to hear it.
Why This Recipe Works For Everyone
This galette is for sharing. The crust is gluten-free. You can skip the egg wash to make it vegan. Everyone at the table can have a slice. That matters to me. Food should bring people together, not leave anyone out.
The filling is simple. Just apples, sugar, and warm cinnamon. Doesn’t that smell amazing? The cornstarch thickens the juices. This stops a soggy crust. *Fun fact: A galette is just a fancy French word for a free-form, flat pie.* It’s less work than a pie, but just as special.
The Secret is in The Fold
Don’t worry about making it pretty. Roll your crust on parchment paper. Leave a good border. Pile your spiced apples in the middle. Now, fold the edges up and over. It’s okay if it overlaps. See those little pleats? That’s where the charm is.
If you like, brush the crust with a whisked egg. Sprinkle on sugar or chopped nuts. This gives a lovely crunch. Are you team extra-crunchy crust or team soft and simple? I sometimes add seeds for a little texture.
Waiting for The Bubble
Bake it until the crust is golden. Here’s the important part. Wait for the middle to bubble. Not just the edges. This means the cornstarch has done its job. The center will set as it cools. Patience is a cook’s best tool.
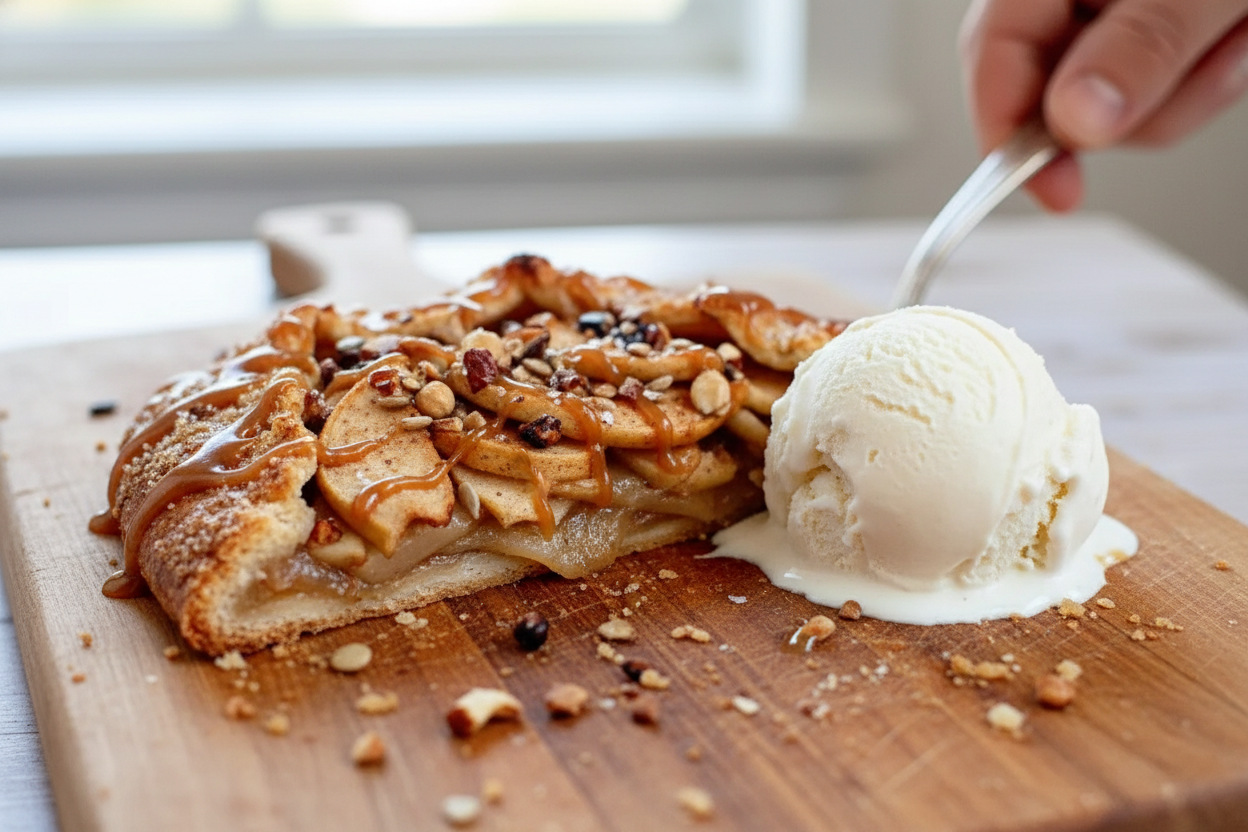
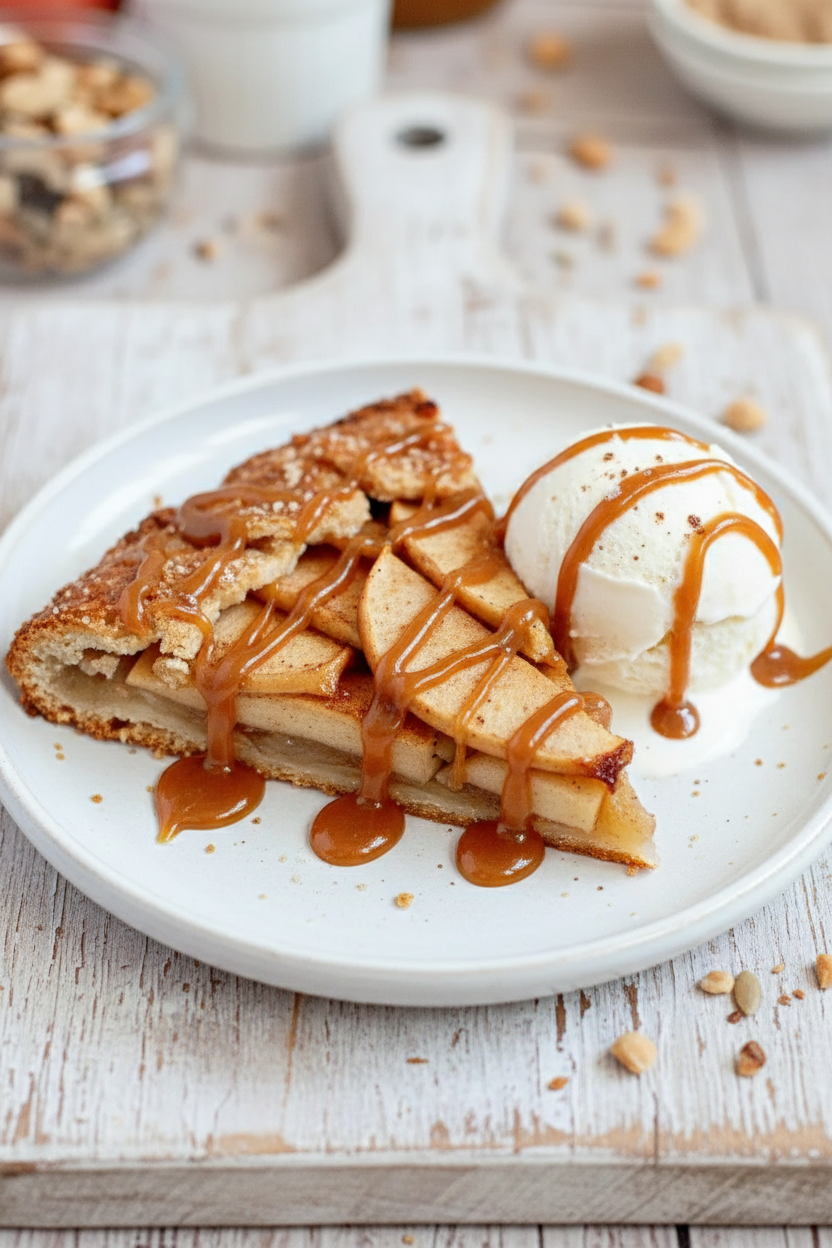
Let it rest for 15 minutes. This is the hardest part! The smell is wonderful. But waiting lets the filling firm up. Then, drizzle on salted caramel if you wish. A scoop of vanilla ice cream is perfect here. What’s your favorite way to serve warm desserts?
A Lesson in Imperfection
This dessert taught me a lesson. The imperfect things are often the most loved. A lopsided galette has character. It shows it was made by hand, with care. This matters more than a perfect look.
It’s best eaten the day you make it. The crust is so crisp. Leftovers soften, but are still a treat. I hope you try this. Share it with someone you love. Tell me, what’s your favorite apple to bake with? Mine is Granny Smith for a little tartness.
Ingredients:
| Ingredient | Amount | Notes |
|---|---|---|
| Gluten-free pie crust | 1 (9-inch), prepared | |
| Apples | 3 | peeled, cored, & thinly sliced |
| Brown sugar | 1/4 cup (50g) | |
| Lemon juice | 1 teaspoon | |
| Vanilla extract | 1 teaspoon | |
| Cornstarch | 1 teaspoon | |
| Ground cinnamon | 1/2 teaspoon | |
| Fine sea salt | 1/2 teaspoon | |
| Large egg, whisked | 1 | optional |
| Granulated sugar | optional, for sprinkling | |
| Chopped nuts and/or seeds | optional | |
| Salted caramel sauce | optional, for serving |
My Cozy Apple Galette
Hello, my dear. Come sit at the table. Let’s make something simple and sweet. Today, it’s my gluten-free apple galette. A galette is just a rustic, free-form pie. No fancy pie dish needed. I love how forgiving it is. If the crust cracks, we just pinch it back. Perfection is overrated, don’t you think? The smell of apples and cinnamon baking is pure comfort. It reminds me of my own grandma’s kitchen. I still smile thinking of her.
Here is how we make our cozy treat together. I’ve written it all out for you. Follow these simple steps. You’ll have a beautiful dessert in no time. Remember, cooking is about joy, not stress. Let’s begin.
Step 1: First, heat your oven to 400°F. Put a rack in the lower middle spot. Get out a big baking sheet. Now, roll your chilled pie crust on some floured parchment paper. Roll it into a circle, not too thin. A little thickness keeps it sturdy. (My hard-learned tip: Keep everything cold for the best crust!).
Step 2: Let’s prepare the apples. Peel and slice three apples thinly. Toss them in a big bowl. Add the brown sugar, lemon juice, and vanilla. The cornstarch, cinnamon, and salt go in next. Gently mix it all. Doesn’t that smell amazing already? The lemon keeps the apples bright.
Step 3: Pile the apple filling in the middle of your crust. Leave a good 2-inch border all around. Now, fold that bare crust edge over the apples. It will look pretty and ruffled. If it cracks, just pinch it together. I still laugh at my first galette. It looked like a happy mess!
Step 4: This step is optional but fun. Brush the folded crust with a whisked egg. Then sprinkle on sugar and chopped nuts. This makes it shiny and crunchy. Sweet or crunchy—which do you prefer? Share below! Now, slide the parchment onto your baking sheet.
Step 5: Bake it for 40 to 45 minutes. Watch for a golden crust and bubbling apples. The center must bubble, not just the edges. That means it’s done. Let it cool for 15 minutes. This wait is the hardest part, I know. Then slice and enjoy the warmth.
Cook Time: 45 minutes
Total Time: 1 hour 15 minutes
Yield: 6 servings
Category: Dessert, Baking
Three Fun Twists to Try
This recipe is like a blank canvas. You can paint it with different flavors. Here are a few ideas from my kitchen. They are all simple and delicious. I love playing with food, don’t you?
Berry Apple Mix: Swap one apple for a cup of fresh berries. Raspberries are my favorite. They add a lovely tart surprise.
Ginger Spice: Add a teaspoon of grated fresh ginger to the apples. It gives a little warm zing. Perfect for a chilly day.
Nutty Caramel Crunch: Skip the egg wash. Instead, drizzle caramel and chopped pecans on top after baking. So decadent!
Which one would you try first? Comment below!
Serving It Up Sweet
A warm slice of galette is wonderful on its own. But a little extra love makes it special. For a real treat, add a scoop of vanilla ice cream. The cold and hot together is magic. A drizzle of salted caramel sauce is also lovely. It pools around the apples so nicely.
What to drink? For a cozy night in, I love hot spiced apple cider. It doubles down on the apple goodness. For a grown-up pairing, a small glass of sweet dessert wine is nice. It sips like liquid honey. Which would you choose tonight?
Keeping Your Galette Happy After Baking
Let’s talk about storing your beautiful galette. First, let it cool completely. I learned this the hard way. I once put a warm galette in a container. It got very soggy very fast.
For room temperature, cover it loosely with a towel for a day. For the fridge, use an airtight container for two days. The crust will soften, but it’s still tasty. You can freeze slices on a tray first. Then wrap them tightly for a month.
To reheat, use your oven or toaster oven. A few minutes at 350°F brings back the crisp. This matters because good food deserves a second life. It saves you time and prevents waste. Have you ever tried storing it this way? Share below!
Simple Fixes for Common Galette Troubles
Is your crust cracking? Do not worry. This happens to everyone. Just pinch the cracks together with your fingers. A little water helps the dough stick. I remember when my first galette looked like a puzzle.
Are the apples not tender? Make sure your slices are thin. Also, wait for the center to bubble in the oven. The edges bubbling alone is not enough. This ensures your filling is perfectly cooked.
Is the bottom crust pale? Baking on the lower rack helps. So does using a hot baking sheet. This gives you a golden, crisp base every time. Fixing small issues builds your kitchen confidence. It also makes your food taste its very best. Which of these problems have you run into before?
Your Quick Galette Questions, Answered
Q: Can I make this ahead? A: Yes. Assemble the galette and freeze it before baking. Bake straight from frozen, adding extra time.
Q: What if I don’t have cornstarch? A: Tapioca starch or arrowroot powder work the same. They thicken the apple juices.
Q: Can I use a different fruit? A: Pears or peaches are lovely. Just keep the slices thin. *Fun fact: This free-form style is called a ‘galette’ in French.*
Q: Can I double the recipe? A: Absolutely. Make two separate galettes. This is easier than one giant one.
Q: Are the nuts necessary? A: Not at all. They add a nice crunch. Seeds are a great option too. Which tip will you try first?
From My Kitchen to Yours
I hope you love making this cozy dessert. It always makes my kitchen smell like autumn. I would love to see your creation. Sharing food stories connects us all.
Please show me your beautiful galettes. A picture is worth a thousand words. Have you tried this recipe? Tag us on Pinterest! I look at every single one. Thank you for baking with me today.
Happy cooking!
—Chloe Hartwell.


Gluten-Free Apple Galette (Vegan Option): Gluten-Free Vegan Apple Galette Recipe
Description
Easy gluten-free vegan apple galette! A rustic, delicious dessert with a flaky crust and cinnamon-spiced filling. Perfect for fall and simple to make.
Ingredients
Instructions
- Preheat the oven to 400ºF and place a rack in the lower middle position. Have a large baking sheet ready to use.
- Place the chilled pie crust on a lightly floured piece of parchment paper and roll it out into a circle approximately ⅛-¼ inch thick.
- In a large mixing bowl, gently toss together the apple slices, brown sugar, lemon juice, vanilla extract, cornstarch, cinnamon, and salt.
- Spread the apple filling evenly in the middle of the prepared pie crust with a 2-inch border all around the edges.
- Fold the edges of the crust over the filling. It’s okay if it overlaps. If the crust cracks anywhere, pinch it back together to avoid leaking.
- Brush the crust with the whisked egg and generously sprinkle on granulated sugar and chopped nuts/seeds, if desired.
- Slide the parchment paper and galette onto the large baking sheet. Trim any excess edges of the paper if needed.
- Bake on the lower middle rack for 40-45 minutes or until the crust is a golden brown and the middle of the apple filling is bubbling. Note: Make sure the entire filling is bubbling and not just the edges. This will ensure the center sets fully after cooling.
- Remove from the oven and allow it to cool for 15-20 minutes before serving warm. If desired, drizzle on salted caramel sauce and serve with a scoop of ice cream. Enjoy!
Notes
- Store leftover apple galette loosely covered at room temperature or in an airtight container in the fridge for up to 2 days. Note: the pie crust will soften as time passes. It’s best enjoyed when freshly baked.


Leave a Reply