
My First Galette
I made my first galette when I was a girl. I was helping my grandma. We had too many berries from the bush. She said, “Let’s make a lazy pie.” I still laugh at that. A galette is just that. It’s a free-form, rustic tart. No fancy pie dish needed.
It doesn’t have to be perfect. That’s the best part. The folds and cracks give it character. It tastes like summer and love. This matters because cooking should feel joyful, not stressful. What’s your favorite “lazy” dessert to make?
The Secret in the Crust
Let’s talk about the crust. The key is cold butter and patience. You squish the butter into the flour. You want little lumps. Those lumps melt in the oven. They make the crust wonderfully flaky.
Then we do a simple fold and roll. It sounds fancy, but it’s easy. You fold it like a letter. This creates lovely, tender layers. *Fun fact: this method is called “laminating.” It’s what makes croissants flaky too!* Does your family have a special pie crust trick?
Juicy Blackberry Heart
Now for the filling. Use fresh or frozen berries. I don’t thaw frozen ones. They hold their shape better. We mix them with a little sugar and cornstarch. The cornstarch is the magic.
It thickens all those beautiful berry juices. So you get a jammy center, not a soupy one. This matters because a good filling should hold together when you slice it. Doesn’t that smell amazing when it bakes?
Bringing It All Together
Roll your dough into a big circle. Pile the berries in the middle. Leave a good border. Then, just fold the edges up over the fruit. It’s okay if it cracks. Pinch it back together. Think of it as giving your dessert a hug.
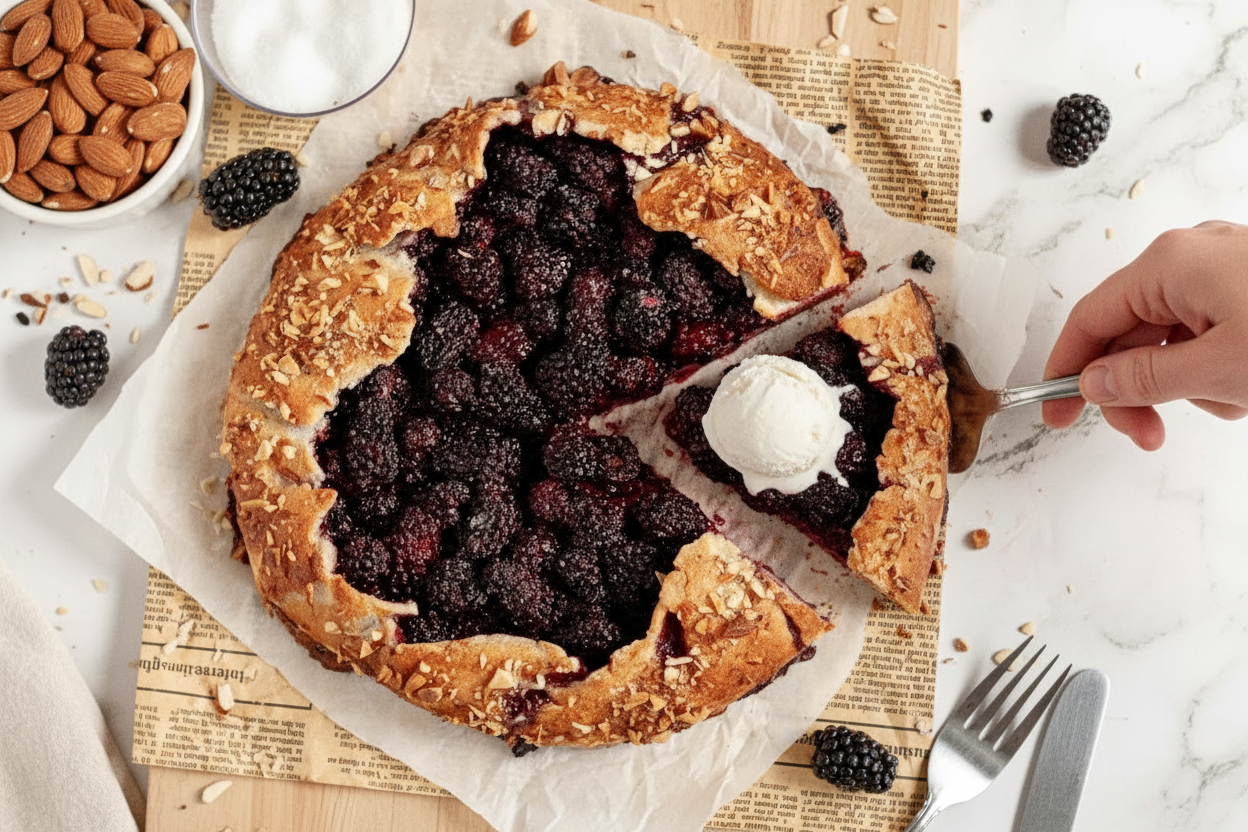
I like to brush the crust with a bit of plant-based milk. Then I sprinkle sugar and almonds on top. It gets so golden and pretty. Which topping do you prefer: plain sugar, nuts, or something else?
A Lesson in Imperfection
You must wait for the whole center to bubble. Not just the edges. This means the cornstarch has cooked. It will set as it cools. Let it rest for 15 minutes. I know it’s hard to wait!
The galette is best warm from the oven. The crust is crisp. The berries are sweet and tangy. It teaches us that the most beautiful things aren’t always perfect. They are made with care and shared with joy.
Ingredients:
| Ingredient | Amount | Notes |
|---|---|---|
| gluten-free flour 1:1 baking blend | 1 1/2 cups (180g) | |
| granulated sugar | 1 tablespoon (15g) | for crust |
| fine sea salt | 1/4 teaspoon | |
| salted butter, cubed and chilled | 1/2 cup (114g) | *regular or plant-based |
| water, very cold | 1/4 cup (60ml) | |
| blackberries, fresh or frozen | 4 cups (576g) | for filling |
| granulated sugar | 1/4 cup (50g) | for filling |
| cornstarch | 2 tablespoons (16g) | |
| lemon juice | 1 tablespoon (15ml) | |
| egg, whisked | 1 | optional crust topping *see note for vegan option |
| granulated sugar | for sprinkling | optional crust topping |
| chopped almonds | for sprinkling | optional crust topping |
My Rustic Blackberry Galette
Hello, my dear. Let’s make a galette. It’s a fancy word for a free-form pie. I love it because it’s supposed to look messy. No perfect edges needed here. It’s just fruit and a flaky crust, all cozy together. Doesn’t that sound lovely?
This one is special. It works for almost everyone. We use a simple gluten-free flour and plant butter. The crust takes a little patience. But I promise, it’s worth it. I still laugh at my first one. The berries ran everywhere! Now I know the secret. You’ll know it soon, too.
Step 1: First, make your dough. Mix the flour, sugar, and salt in a big bowl. Drop in your cold, cubed butter. Use your fingers to squish it all together. You want little butter lumps, like tiny pebbles. This makes the crust flaky. Then, drizzle in the cold water and mix gently.
Step 2: Now, be patient. Squeeze the dough into a shaggy ball. It will seem too dry at first. Just keep gently pressing. It comes together, I promise. Shape it into a disc, wrap it, and let it nap in the fridge. (My hard-learned tip: truly cold butter is the key to flaky layers!)
Step 3: Time for the fun folding part. Roll the dough into a rectangle. Fold it like a letter. Turn it, roll, and fold again. This makes wonderful, flaky layers. Do this a few times. If the dough gets warm or sticky, just let it chill again. No stress.
Step 4: Let’s prepare the filling. Toss your blackberries with sugar, cornstarch, and lemon juice. The cornstarch is our friend. It thickens the berry juices so they don’t run. Use frozen berries straight from the freezer. Fresh or frozen berries—which do you prefer? Share below!
Step 5: Roll your dough into a big, rustic circle on parchment paper. Pile the berries in the middle, leaving a good border. Now, fold the edges up over the fruit. It’s okay if it cracks. Just pinch it back together. This is your creation. It’s beautiful.
Step 6: Brush the crust with a little beaten egg or plant milk. Sprinkle with sugar and almonds. This gives it a sweet, crunchy sparkle. Slide the whole parchment onto a baking sheet. Bake it until it’s golden and the berries bubble happily. That smell is pure summer.
Step 7: The hardest part is waiting. Let it cool for a bit before you slice. The filling needs to set. Serve it warm. The crust will be tender and the berries, just tart enough. Store leftovers covered, but it’s best the day you make it.
Cook Time: 45-50 minutes
Total Time: About 2 hours (with chilling)
Yield: 6 generous slices
Category: Dessert, Baking
Three Tasty Twists to Try
This recipe is like a blank canvas. You can paint it with so many flavors. Here are a few of my favorite ideas. They make it feel new every time.
Mixed Berry Bliss: Use half blackberries and half raspberries. The color is just gorgeous. It tastes like a berry patch in a pie.
Peach & Blackberry Dream: Add a chopped peach or two. The peach gets so soft and sweet. It pairs perfectly with the tart berries.
Lemon-Thyme Surprise: Add a teaspoon of fresh thyme leaves to the filling. It sounds funny, but it’s amazing. The lemon and thyme sing together.
Which one would you try first? Comment below!
Serving It Up Just Right
A warm slice of galette is a treat all on its own. But a little extra love makes it a celebration. Here’s how I like to serve it.
Place a slice on a pretty plate. Add a scoop of vanilla ice cream or coconut whipped cream. The cold cream melting into the warm berries is magic. A sprinkle of powdered sugar looks like a light snowfall.
For drinks, I have two choices. A glass of cold, creamy oat milk is so comforting. For a special evening, a small glass of sweet dessert wine pairs beautifully. It sips like liquid sunshine. Which would you choose tonight?

Keeping Your Galette Happy After Baking
Let’s talk about storing your beautiful galette. Room temperature is fine for a day. Just cover it loosely with a towel.
For the fridge, use an airtight container. It will keep for two days. The crust softens, but it’s still tasty.
You can freeze it before baking too. Assemble the galette on parchment paper. Freeze it solid on the tray first.
Then wrap it tightly in plastic. Bake from frozen, adding a few extra minutes. I once forgot to wrap a pie well.
It tasted like my freezer smells! Good storage keeps your hard work delicious. It means you can enjoy a treat later.
Have you ever tried storing it this way? Share below!
Galette Troubles? Easy Fixes Right Here
Is your dough too crumbly? It just needs more patience. Squeeze it gently for a full five minutes.
I remember when my first crust fell apart. I learned to be gentle, not forceful. This matters for a tender crust.
Is the filling too runny? Make sure your cornstarch is fresh. Also, let the galette cool fully before slicing.
The filling needs time to set up. This waiting matters for the perfect slice. Is the crust browning too fast?
Move your baking rack lower in the oven. You can also cover the edges with foil. This protects them from burning.
Which of these problems have you run into before?
Your Top Galette Questions, Answered
Q: Can I use a different gluten-free flour?
A: Stick with a 1:1 baking blend for best results.
Q: Can I make the dough ahead?
A: Yes! Keep the dough disc in the fridge for two days.
Q: What if I don’t have blackberries?
A: Try blueberries or sliced peaches. Use the same amount.
Q: Can I make a smaller galette?
A: Absolutely. Just use half the dough and filling.
Q: Is the egg wash necessary?
A: No, but it gives a shiny, golden crust. For vegan, use plant milk.
*Fun fact: A galette is just a rustic, free-form pie. No fancy pie dish needed!
Which tip will you try first?
From My Kitchen to Yours
I hope you love making this galette. It is one of my favorite summer treats. I feel joy sharing it with you.
Remember, cooking is about the love you stir in. It is not about perfection. Your version will be wonderful.
I would love to see your creation. Please share a photo of your kitchen adventure. Have you tried this recipe? Tag us on Pinterest!
Happy cooking!
—Chloe Hartwell.


Gluten-Free Vegan Blackberry Galette Recipe
Description
Easy, stunning gluten-free vegan blackberry galette! A simple summer dessert with a flaky crust and juicy berry filling. Perfect for any occasion.
Ingredients
Crust
Filling
Optional Crust Topping
Instructions
- Crust In a large bowl, mix together the flour, sugar, and salt. Add the cold butter and gently toss it all together until fully coated. With a fork, pastry cutter, or your fingers, squish the butter pieces into the flour until each piece is about the size of a walnut half. Add the cold water and mix until a rough dough begins to shape. Note that it will still look very dry. Gently squeeze the dough into a shaggy ball with minimal dry spots. This can take up to 5 minutes so be patient. Shape the dough into a disc and wrap tightly with plastic wrap. Allow it to chill in the refrigerator for 30 minutes.
- Roll the dough on a lightly floured surface into a rectangle shape approximately ¼ inch thick with the narrow end facing you. Brush off any excess flour and fold the bottom edge of the dough ⅓ of the way up. Fold the top edge of the dough ⅓ of the way down over the first fold, just like how you’d fold a letter. Turn the dough 90 degrees and roll it into another rectangle, ¼ inch thick. Repeat the same fold as you did above. For best results, repeat this roll and fold process 4-6 times. Wrap the dough again and chill for another 30 minutes. If, at any point during the folding process, the dough starts to feel soft or sticky, stop what you are doing, wrap with plastic wrap, and chill for 15 minutes before resuming.
- Filling & Assembly Preheat the oven to 400ºF and place a rack in the lower middle position. Have a large baking sheet ready to use. Place the chilled pastry dough on a lightly floured piece of parchment paper and roll it out into a circle approximately 13-14 inches in diameter. In a large mixing bowl, evenly combine the fresh or frozen blackberries, sugar, cornstarch, and lemon juice. Note: don’t defrost the berries if using frozen. Spread the filling evenly in the middle of the prepared pie crust with a 2-inch border all around the edges.
- Fold the edges of the crust over the filling. It’s okay if it overlaps. If the crust cracks anywhere, pinch it back together to avoid leaking. Brush the crust with the whisked egg and generously sprinkle on granulated sugar and sliced almonds if desired. Slide the parchment paper and galette onto the large baking sheet. Trim any excess edges of the paper if needed.
- Bake on the lower middle rack for 45-50 minutes or until the crust is a golden brown and the middle of the filling is bubbling. Note: make sure the entire filling is bubbling and not just the edges. This will ensure the center sets fully after cooled. Remove from the oven and allow it to cool for 15-20 minutes before serving warm. Enjoy!
Notes
- Store leftover blackberry galette loosely covered at room temperature or in an airtight container in the fridge for up to 2 days. Note: the pie crust will soften as time passes. It’s best enjoyed when freshly baked.


Leave a Reply