

The Best Bananas Are Ugly Bananas
Let me tell you a secret. The best banana bread starts with the worst-looking bananas. I mean black, spotty, and soft. They look sad on the counter. But they are sweet and ready for baking.
I once tried to use pretty yellow bananas. The bread was bland. I learned my lesson. Now I let them get very ripe. It makes all the difference. That natural sweetness is why we use less maple syrup. What do you do with your overripe bananas? I’d love to hear.
My One-Bowl Promise
I hate washing dishes. Don’t you? This recipe uses just one bowl. You mix the wet things first. Then you pile the dry stuff right on top. Give the dry bits a little stir together before you mix it all.
Here’s the important part. Stop stirring as soon as you see no more dry flour. A few lumps are just fine. Over-mixing makes tough bread. This matters because gentle handling keeps it tender. It’s a little kitchen kindness that shows in every slice.
A Topping That Tells a Story
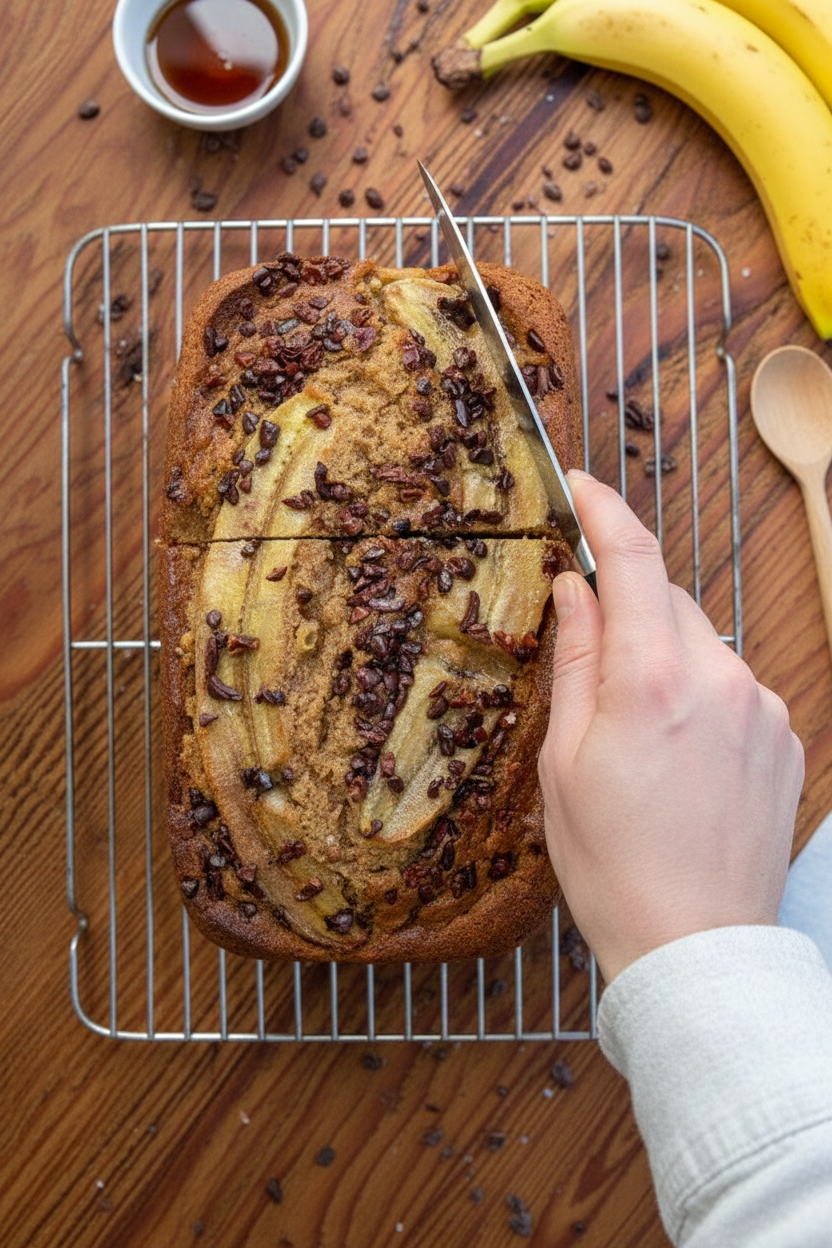
Pressing those banana halves on top is my favorite step. It looks so pretty. It also tells everyone what’s inside. The cacao nibs add a fun crunch. They are like little bursts of dark chocolate.
Fun fact: Cacao nibs are just crushed cocoa beans. They are less sweet than chocolate chips. A pinch of flaky salt on top is magic. It makes the sweet flavors pop. Do you prefer your sweets plain, or with a salty twist?
Grandma’s Baking Sheet Trick
Always put your loaf pan on a baking sheet. I learned this the messy way. I still laugh at that. Once, my bread bubbled over in the oven. It made a sticky, smoky mess.
The baking sheet catches any drips. It saves you from oven cleaning. This is a small step with a big payoff. It means peace of mind while you bake. Doesn’t that smell amazing while it cooks?
The Hardest Part: Letting It Cool
You must let the bread cool. I know, it’s hard. The wait feels forever. But if you cut it too soon, it gets gummy inside. Let it rest in the pan for ten minutes.
Then move it to a rack. This matters because the bread keeps cooking from its own heat. Waiting gives you the perfect texture. It’s a lesson in patience. What’s your favorite thing to do while you wait for baked goods to cool?
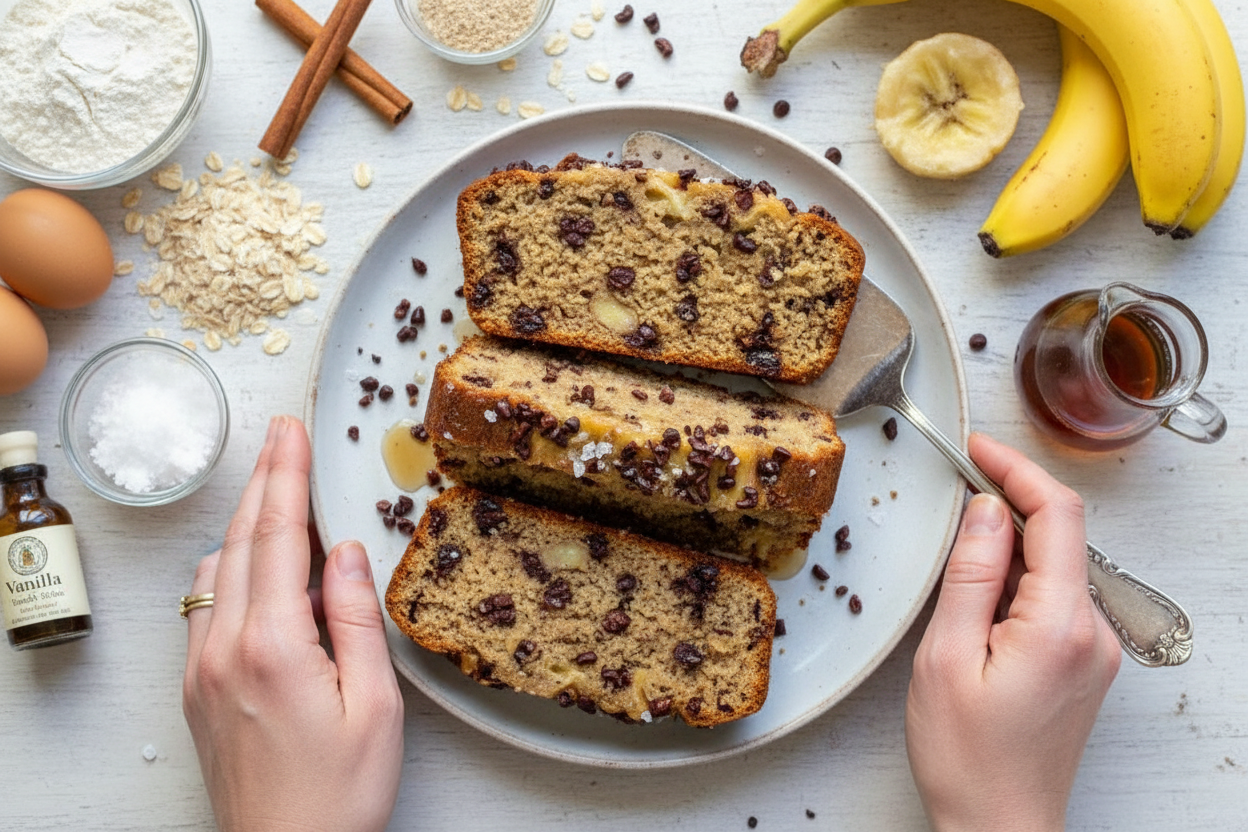
Ingredients:
| Ingredient | Amount | Notes |
|---|---|---|
| Maple syrup | 3/4 cup | |
| Coconut oil | 1/2 cup | Melted, plus more for greasing |
| Bananas | 5 medium | Extremely overripe |
| Eggs | 2 large | |
| Vanilla extract | 2 tbsp | |
| Whole wheat flour | 2 cups | Or 1 cup whole wheat + 1 cup spelt |
| Baking soda | 1 tsp | |
| Baking powder | 1/2 tsp | |
| Ground cinnamon | 1/2 tsp | |
| Kosher salt | 1/4 tsp | |
| Banana | 1 medium | Halved vertically, for topping |
| Cacao nibs or chocolate chips | 2 tbsp | Optional |
| Flaky sea salt | sprinkle | Optional |
My Cozy Kitchen Banana Bread
Hello, my dear. Come sit. Let’s make my favorite banana bread. It uses just one bowl. That means less washing up. I love that. This recipe is my little secret for using up those black bananas. Doesn’t that smell amazing? It fills the whole house with warmth. I still laugh at that time my grandson called it “grandma’s cake.” Let’s begin.
Step 1:
First, warm your oven to 350°F. Get your big mixing bowl. Whisk the maple syrup and melted coconut oil together. It will look shiny and sweet. Now, peel your five very ripe bananas. The blacker, the better. Mash them right in the bowl. A few lumps are just fine. They give the bread little pockets of flavor.
Step 2:
Crack in the two eggs. Add the vanilla. Stir it all until it’s a happy, messy mixture. Now, pour the flour right on top. Do not stir! Just let it sit like a fluffy blanket. Sprinkle the baking soda, powder, cinnamon, and salt on the flour. (My hard-learned tip: mixing the dry bits on top first stops you from over-mixing later. Trust me!).
Step 3:
Now, stir everything together. Go slowly. Stop the very second you see no more dry flour. Over-mixing makes tough bread. We want it tender. Grease your loaf pan with a little coconut oil. Pour in your lovely batter. It will be thick and speckled with banana.
Step 4:
Take that last banana. Cut it in half the long way. Press the halves gently into the top. They look so pretty. Sprinkle on cacao nibs if you like. For a magic touch, add a tiny pinch of flaky salt. It makes the sweet taste sweeter. Sweet or salty-sweet? Share below! Always put the loaf pan on a baking sheet. Sometimes it gets too happy and bubbles over.
Step 5:
Bake it for about 70 minutes. To check, poke a knife into the middle. If it comes out clean, it’s done. Let it cool in the pan for 10 minutes. Then, turn it out to cool completely. Waiting is the hardest part. I know.
Cook Time: 70–80 minutes
Total Time: About 1 hour 40 minutes
Yield: 1 loaf
Category: Baking, Snack
Three Fun Twists to Try
This bread is like a blank canvas. You can play with it. Here are my favorite ideas. They make it feel new every time.
- Berry Burst: Fold a handful of frozen blueberries into the batter. They turn it purple in spots.
- Nutty Crunch: Stir in half a cup of chopped walnuts or pecans. It adds a wonderful crunch.
- Chocolate Dream: Swap the cacao nibs for chocolate chips. Let them melt into every bite.
Which one would you try first? Comment below!
Serving It With Style
A warm slice is perfect alone. But sometimes, I like to dress it up. A little smear of almond butter makes it a filling breakfast. For dessert, try it with a dollop of whipped cream. A scoop of vanilla ice cream is pure joy on the side.
For drinks, a cold glass of milk is my classic choice. It just belongs. For the grown-ups, a cup of strong coffee with cream is lovely. The bitter coffee and sweet bread are best friends. Which would you choose tonight?
Keeping Your Banana Bread Happy
This bread stays fresh on the counter for three days. Just wrap it in a clean towel. For longer life, slice it and freeze the pieces.
Wrap slices in plastic wrap. Then pop them into a freezer bag. You can grab one slice anytime you want. I once froze a whole loaf for my grandson’s visit. He was so happy to find it!
To reheat, toast a frozen slice straight from the freezer. It warms up the spices perfectly. Batch cooking matters because it saves time and reduces waste. You always have a little treat ready. Have you ever tried storing it this way? Share below!
Banana Bread Troubleshooting
Is your bread too dense? You probably over-mixed the batter. Stir just until the flour disappears. I remember when my first loaf was like a brick. I learned to be gentle.
Is the top burning? Your oven might run hot. Place a baking sheet on the rack above the loaf. This shields it from direct heat. Is the center still gooey? Your bananas were likely too large. Use medium-sized ones for best results.
Fixing these issues builds your cooking confidence. It also makes your food taste much better. You learn how ingredients work together. Which of these problems have you run into before?
Your Quick Questions, Answered
Q: Can I make this gluten-free? A: Yes. Use a 1-to-1 gluten-free flour blend instead of wheat flour.
Q: Can I make it ahead? A: Absolutely. The batter can sit in the fridge overnight. Bake it fresh in the morning.
Q: What can I swap for coconut oil? A: Melted butter or a light olive oil will work just fine here.
Q: Can I double the recipe? A: You can. Just use two loaf pans. Do not put all the batter in one pan.
Q: Any optional tips? A: A sprinkle of flaky salt on top is magic. *It makes the banana flavor pop!* Which tip will you try first?
From My Kitchen to Yours
I hope this recipe becomes a favorite in your home. It holds many sweet memories for me. I love seeing your kitchen creations.
Please share your results with me. Show me your beautiful loaf. Have you tried this recipe? Tag us on Pinterest! I would love to see your photos.
Happy cooking!
—Chloe Hartwell.
Healthy One Bowl Banana Bread Recipe
Description
Easy one-bowl banana bread! No mixer needed, just stir and bake. This healthy, moist recipe is perfect for a quick snack or breakfast.
Ingredients
Instructions
- Preheat oven to 350°F.
- In a large bowl, whisk maple syrup and coconut oil until combined. Add bananas and mash until the biggest chunk is about the size of a marble. Stir in the eggs and vanilla extract.
- Place the flour on top – don’t stir it in yet! Add the baking soda, baking powder, cinnamon, and salt on top of the flour and gently stir to sift all of the dry goods together.
- Stir the wet and dry ingredients together. Stop stirring as soon as everything is combined, you don’t want to over-mix!
- Grease a 9×5” loaf pan with coconut oil. Pour batter into loaf pan and press the two banana halves gently into the top of the batter. Sprinkle cacao nibs over the top. If you’re into salty-sweet things, sprinkle a pinch of flaky sea salt over top.
- Place the loaf pan on top of a baking sheet just in case it overflows.
- Bake for 70 to 80 minutes, until a cake tester (I just use a paring knife) inserted into the center of the loaf comes out clean.
- Let the banana bread cool in the pan for 10 minutes, then turn out onto a wire rack to cool completely.
Notes
- Full Nutrition: Not provided in the text.


Leave a Reply