
Why I Love This Pot Pie
There are some dinners that feel like a warm hug. This chicken pot pie is one of them. I first made it on a chilly Tuesday when my grandkids came over with cold noses. They helped me roll the dough and peeked into the oven every five minutes. I still laugh at how they tried to sneak bites of the filling before it went in. You might wonder why I use pre-made pie crust. It saves time and lets us focus on what really matters: that creamy, cozy filling. *Fun fact: The first pot pies were made by ancient Romans, who used a thick crust as a lid to keep the meat warm.* Isn’t it neat how some ideas never get old?The Secret to No-Fuss Filling
The filling is the heart of this dish. You start with butter and oil, then add onion and garlic until your kitchen smells amazing. When you crumble in those chicken stock cubes, everything gets a deep, savory flavor. That is why this matters: good seasoning turns simple ingredients into something special. I use frozen veggies because they are always ready. Corn, carrots, and peas are my favorites. They add color and sweetness. Have you ever noticed how the little green peas pop when you bite into them? That makes me smile every time.A Little Trick for the Crust
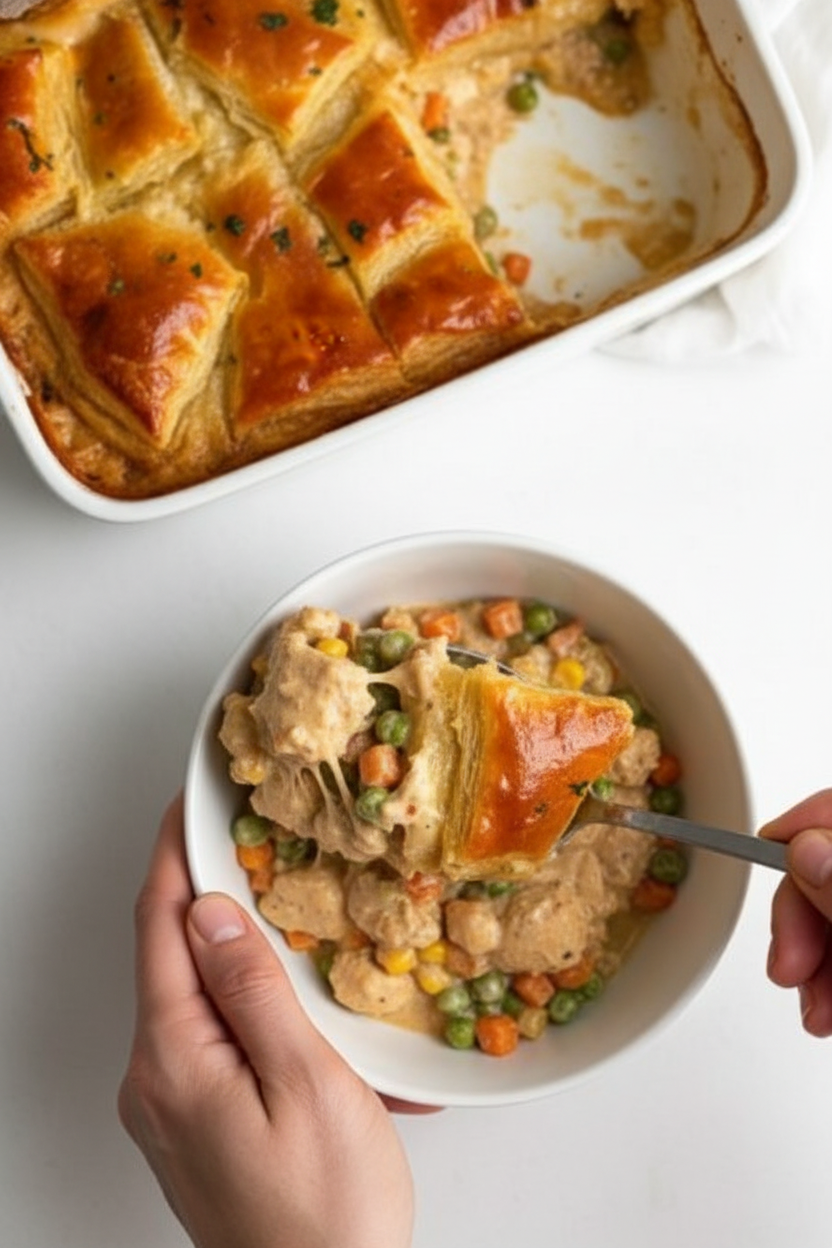
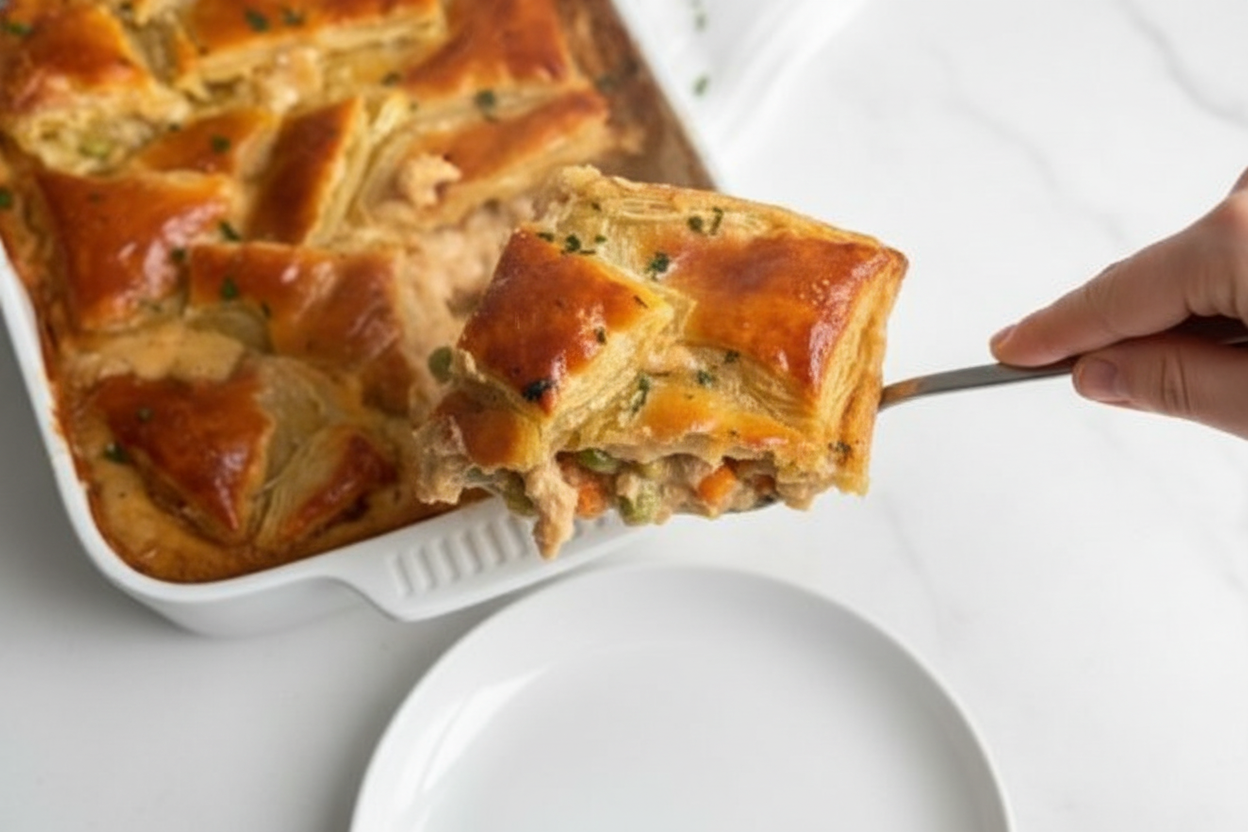
Now, about the crust on top. I cut it into squares instead of one big sheet. This lets steam escape and keeps the top crispy. You want to poke a few holes or leave small gaps. Trust me, no one likes a soggy pie top. That is why this matters: little details make big differences. Brush the crust with egg wash. It gives that golden, shiny look we all love. My neighbor once forgot the egg wash and her pie came out pale and sad. She never skipped it again. What is one cooking trick you never forget?The Best Part of Baking
When the pie goes into the oven, the magic begins. You start to smell butter, chicken, and herbs all mixing together. After about thirty minutes, the top turns golden and crispy. I usually pull up a chair and just watch through the oven door. Doesn’t that smell amazing just thinking about it? I once burned a pie because I got distracted by a phone call. Now I set a timer and stay close. The recipe says 30-40 minutes, but every oven is different. If the top browns too fast, just cover it with foil. Have you ever had a baking mishap that taught you something?Making It Your Own
This recipe is very flexible. You can add more cheese if you like it gooey. You can skip the bottom crust to make it lighter. Some folks add a pinch of cayenne for a little kick. I once used leftover turkey instead of chicken, and it was just as good. The important thing is to taste the filling before you bake it. Adjust the salt and pepper to your liking. Remember, the flavors get a little calmer when baked. So make it a tiny bit stronger now. What would you add to make this pot pie your own?Serving with Love
This pie is best served hot, right from the dish. I like to let it sit for five minutes so the filling sets. Then I scoop it into bowls. Sometimes I put a little blob of cranberry sauce on the side. That sweet-tart flavor matches the creamy filling perfectly. When my family eats this, there is hardly any talking. Just smiles and second helpings. That is the kind of meal I love to make. A simple dish that brings everyone together. Do you have a family meal that always makes everyone happy?Ingredients:
| Ingredient | Amount | Notes |
|---|---|---|
| Olive oil | 2 tbsp | |
| Butter | 4 tbsp | |
| Onion | ½ | Finely chopped |
| Minced garlic | 1-2 tbsp | |
| Chicken stock cubes (Knorr) | 2-3 cubes | |
| All purpose flour | 4 tbsp | |
| Milk | 2 ½ cups | |
| Salt, pepper, chili flakes, oregano | ½ tsp each | Or to taste |
| Boiled, shredded chicken | 2 ¼ cups (250g) | |
| Frozen veggies (corn, carrots, peas) | 1 ½ cups | Chopped, of choice |
| Shredded mozzarella cheese | ¾ cup | Optional |
| Pre-made pie crust | 1 to 2 sheets | Top only or top & bottom |
| Egg yolk + milk | 1 yolk + 1 tbsp milk | For egg wash |
My Grandma’s Chicken Pot Pie Secret
When I was little, my grandma made chicken pot pie on cold, rainy nights. The whole house smelled like butter and love. I still remember peeking into the oven, watching the crust turn golden. This recipe is just like hers, but I made it a little easier for busy nights. Doesn’t that smell amazing just thinking about it?
I learned the hard way that rushing the filling makes a soggy mess. So take your time and let it bubble. The secret is in that creamy, cozy sauce. And the crispy top? That’s pure magic. Let’s get our hands a little floury and make some memories.
Let’s Make It Together
Step 1: Preheat your oven to 400°F. Grab a 7×11-inch baking dish and brush it with butter. My grandma used to say, “A buttered dish is a happy dish.” I still laugh at that. (Hard-learned tip: Don’t skip the butter—it stops the crust from sticking and adds flavor.)
Step 2: In a large nonstick pan, heat 2 tablespoons of olive oil and 4 tablespoons of butter over medium heat. Add ½ finely chopped onion and cook until it looks soft and see-through. That usually takes about 3 minutes. Stir in 1–2 tablespoons of minced garlic and 2–3 crumbled chicken stock cubes. Cook for one more minute.
Step 3: Sprinkle 4 tablespoons of all-purpose flour over the onion mix. Stir it around for a few seconds. Then pour in 2½ cups of milk. Keep stirring until it starts to bubble and thicken. Add ½ teaspoon each of salt, pepper, chili flakes, and oregano. (Fun fact: If you taste it now and it feels too thick, add a splash more milk—it will thicken more in the oven.)
Step 4: Turn off the heat. Stir in 2¼ cups of boiled and shredded chicken, 1½ cups of frozen veggies (I use corn, carrots, and peas), and ¾ cup of shredded mozzarella cheese if you like it cheesy. Taste it and add a pinch more salt if needed. My kids always sneak a spoonful at this point—I pretend not to notice.
Step 5: Pour the filling into your buttered baking dish. If you want a bottom crust, place one sheet of pie crust in the dish first. If not, just add the filling. Now cut a second sheet of pie crust into 2-inch squares. Arrange them on top of the filling, leaving small gaps for steam to escape. What’s your favorite pie crust shape—squares, strips, or a full top crust? Share below!
Step 6: Make your egg wash by whisking 1 egg yolk with 1 tablespoon of milk. Brush it generously over the crust squares. Pop the dish into the oven and bake for 30 to 40 minutes. If the top browns too fast, cover it loosely with aluminum foil. Serve hot and watch everyone smile.
Cook Time: 40 minutes
Total Time: 1 hour
Yield: 6 servings
Category: Dinner, Comfort Food
Three Fun Twists to Try
Veggie Lover’s Twist: Swap the chicken for 2 cups of mushrooms and extra frozen veggies. It’s still creamy and cozy, but totally meat-free.
Spicy Tex-Mex Twist: Add ½ teaspoon of smoked paprika and ½ cup of canned corn. Use pepper jack cheese instead of mozzarella for a little kick.
Herby Spring Twist: Stir in a handful of fresh parsley and some peas. Swap the oregano for dill. It tastes like sunshine in a bowl. Which one would you try first? Comment below!
How to Serve It Up
This pie loves a simple side. A crisp green salad with lemon vinaigrette cuts through the richness. Or try steamed broccoli with a little butter. For a garnish, sprinkle fresh parsley on top—it looks pretty.
For drinks, pour a cold glass of apple cider for the kids. Grown-ups might enjoy a light white wine like a Sauvignon Blanc. The bubbly fruitiness matches the creamy filling perfectly. Which would you choose tonight?
Storing Your Chicken Pot Pie
Let me tell you about my first time storing this pie. I made a huge batch and stuck it right in the fridge. The next day, the bottom crust was soggy and sad. I learned my lesson fast. Now I let the pie cool completely before covering it. That little step keeps the crust crisp. You can store leftovers in the fridge for up to three days. Just wrap the dish tightly with foil or plastic wrap.
Freezing works like a charm too. I like to make two pies at once. One for dinner tonight, one for the freezer. Bake the first one fully. For the second one, stop before the egg wash step. Wrap it well in plastic wrap, then foil. It will keep for three months. When you want it, thaw it in the fridge overnight. Then add the egg wash and bake as usual. Why does this matter? It saves you time on busy nights. A warm, homemade meal is always ready. Have you ever tried storing it this way? Share below!
For reheating, skip the microwave. It makes the crust chewy. Place slices in a 350 F oven for ten minutes. The crust gets crispy again. The filling stays creamy. Batch cooking matters because it fills your freezer with comfort. That is a gift to your future self.
Common Problems and Easy Fixes
I remember the first time my filling was too runny. It leaked everywhere in the oven. What a mess. The fix is simple. Cook the filling on the stove a bit longer. Let it bubble until it thickens. Why does this matter? A thick filling stays inside the crust. It makes every bite perfect.
Another problem is a burnt crust. You peek in the oven and the top is dark brown. That happened to me once. I was so sad. Now I check the pie after 20 minutes. If the crust is browning fast, lay a piece of foil loosely over it. The pie will keep baking without burning. Why does this matter? You get a golden crust, not a black one. That is how you build cooking confidence.
The third issue is bland filling. I once forgot the salt. Everyone noticed. Taste the filling before you pour it in. Add a little more salt or pepper if needed. A pinch of chili flakes wakes it up too. Which of these problems have you run into before?
Your Top 5 Questions Answered
Q: Can I make this gluten-free?
A: Yes. Use a gluten-free flour blend for the sauce. Find a gluten-free pie crust at the store.
Q: Can I make the filling the night before?
A: Absolutely. Cook the filling and store it in the fridge. Assemble and bake the next day.
Q: What can I swap for chicken?
A: Try shredded turkey or canned tuna. Both work great. You can even use leftover roast beef.
Q: How do I make this for a crowd?
A: Double or triple the recipe. Use a larger baking dish or two separate dishes. Bake a little longer.
Q: Any tips for making it extra special?
A: Add a sprinkle of fresh thyme on top before serving. It looks fancy and tastes wonderful. Which tip will you try first?
A Warm Goodbye from My Kitchen
Thank you for cooking along with me. I adore how this pie fills the house with a cozy smell. It reminds me of Sunday dinners at my grandmother’s table. I hope this recipe becomes a favorite in your home too. Nothing beats a warm, flaky crust with creamy chicken and veggies. It is comfort in a dish.
*Fun fact: Chicken pot pie was first mentioned in a cookbook in 1889. It has been warming hearts ever since.*
I would love to see your baking. Have you tried this recipe? Tag us on Pinterest! Share your photos and stories. That is what makes cooking so special. We learn and grow together. Happy cooking! —Chloe Hartwell.

Easy Chicken Pot Pie Recipe for Dinner
Description
Easy, cozy chicken pot pie recipe for a perfect dinner night. Flaky crust, creamy filling, pure comfort in every bite.
Ingredients
Instructions
- Preheat oven to 400 F and brush a 7×11″ baking dish with butter (you can also use a 9″ round pie dish for a taller pie)
- Heat oil and butter in a nonstick pan over medium heat. Add the onion and sauté until translucent, then add garlic and chicken stock cubes, and sauté for another min
- Add the flour and milk, and cook while stirring for a few seconds. Add all the seasoning and cook until the mixture starts to bubble
- Turn off heat and add the shredded chicken, veggies and cheese. Taste and adjust seasoning as needed. You can also adjust the consistency: if you want it to be more runny, add more milk (remember, it will become thicker when baked)
- If adding a bottom layer of crust, add that to your pie dish first. If not, skip that and add the filling to the prepared pish dish
- Cut the pie crust into 2″ squares and arrange them on top of the filling. Make sure to poke some holes or leave a few small gaps so steam can escape
- Make the egg wash by mixing the egg yolk and milk, and generously brush the pie crust on top with the egg wash
- Bake for 30-40 min until the pie looks nicely golden and crispy. If it starts to brown too much, cover with aluminum foil
- Serve while it’s hot and enjoy!


Leave a Reply