
Ingredients:
| Ingredient | Amount | Notes |
|---|---|---|
| Gluten Free 1:1 Flour | 2 ½ cups | |
| Salt | ½ teaspoon | |
| Baking Powder | 2 teaspoons | |
| Baking Soda | 1 teaspoon | |
| Olivenation gingerbread seasoning | 1 ½ teaspoons | |
| Vegetable oil | 1 cup | |
| Large eggs | 4 | room temperature |
| Sugar | ½ cup | |
| Brown sugar | ½ cup | |
| Unsweetened almond milk | ⅓ cup | room temperature |
| Unsulfured molasses | 1 cup | |
| Cream cheese | 1 (8 oz) pack | for frosting |
| Butter | 1 stick | for frosting |
| OliveNation egg nog extract | 1 teaspoon | for frosting |
| Vanilla Extract | ½ teaspoon | for frosting |
| Powdered Sugar | 3 cups | for frosting |
| Almond milk | 1-2 tablespoons | for frosting |
The Day I Fell in Love With Gingerbread
I still remember the first time I made a gingerbread cake that wasn’t dry. It was a rainy Tuesday, and my kitchen smelled like a holiday hug. Doesn’t that smell amazing? But I had to learn the hard way that gluten free baking is a little picky. It needs extra love and patience, but I promise it’s worth every bite.
This recipe came from a friend who swore by her “secret spice blend.” I begged her for it for years. When she finally shared it, I laughed—it was just store-bought gingerbread seasoning! Still, I use it every time because it works. And that eggnog cream cheese frosting? Pure magic on a spoon.
Now, before we get our hands sticky, here’s a little truth. Hard-learned tip: Make sure your eggs and almond milk are truly room temperature. Cold ingredients can make gluten free batter lumpy, and nobody wants that. Trust me, I learned this after a very sad, lumpy cake.
Let’s Bake Together: Step-by-Step
Alright, pull up a stool and let’s make this cake. I’ll walk you through it like we’re standing side by side in my kitchen.
Step 1: Preheat your oven to 350 degrees Fahrenheit. Then, lightly grease two 8-inch round cake pans. I like to use a little butter on a paper towel. My grandma always said “grease like you mean it,” so don’t be shy. Set the pans aside for now.
Step 2: Grab a big bowl and whisk together your dry ingredients. That means the gluten free flour, salt, baking powder, baking soda, and that gingerbread seasoning. I once forgot the baking soda and my cake looked like a pancake. We don’t need that kind of drama today.
Step 3: Now pour your dry mix into a stand mixer. Add all the wet ingredients: vegetable oil, eggs, both sugars, almond milk, and molasses. Turn the mixer to medium speed and let it run until everything is smooth and happy. Here’s a mini-quiz for you: What’s the trick to a super moist gluten free cake? Hint—it’s in the wet ingredients! Share below!
Step 4: Pour the batter evenly into your two greased pans. Pop them in the oven for 35 to 40 minutes. You’ll know they’re done when a toothpick stuck in the center comes out clean. No gooey batter clinging to it. Let the cakes cool completely before you even think about frosting.
Step 5: Time for frosting! In your mixer (use the paddle attachment), beat the butter and cream cheese together until smooth. Add powdered sugar one cup at a time. After the second cup, toss in the eggnog extract, vanilla, a pinch of salt, and one tablespoon of almond milk. Mix it up, then add the last cup of sugar. Add more milk if you want it spreadable.
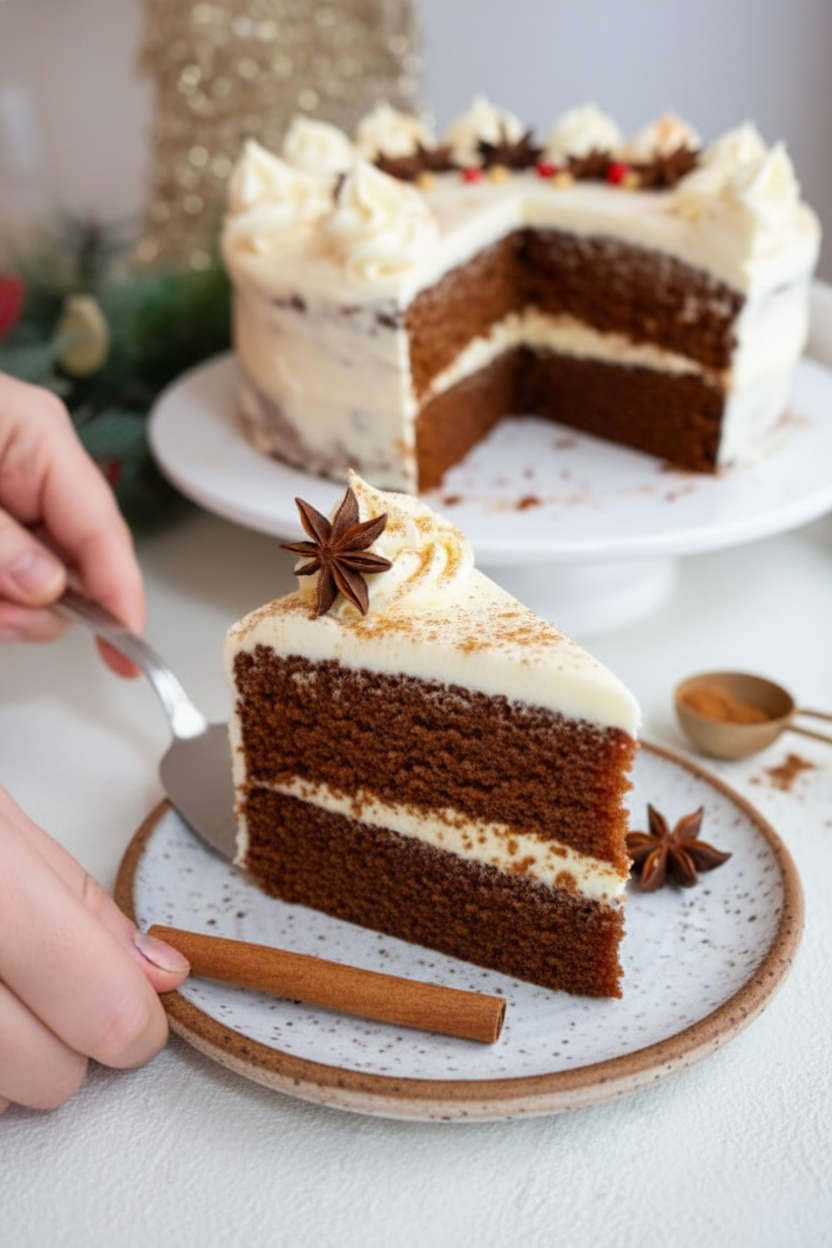
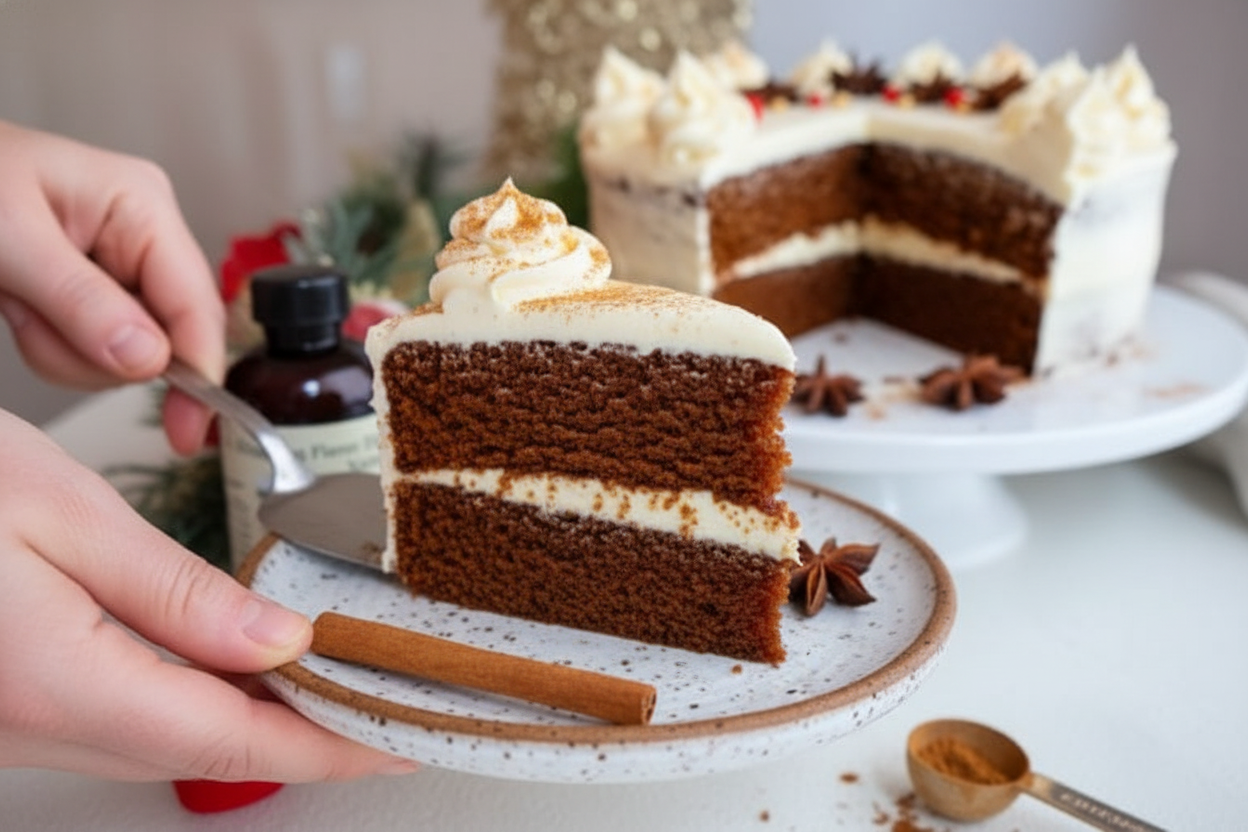
Step 6: Place one cooled cake layer on a plate. Spread a generous layer of frosting on top. Stack the second cake on top, then frost the whole thing like you’re painting a masterpiece. Smooth it out, or make swirls—your call.
Cook Time: 35–40 minutes
Total Time: 1 hour 15 minutes
Yield: 10–12 servings
Category: Dessert, Cake
Three Fun Twists to Try
Sometimes I like to change things up so the cake feels brand new. Here are a few ideas I’ve tried on sleepy Sunday afternoons.
Spicy Kick Version: Add a pinch of cayenne pepper and extra ginger to the batter. It gives a warm tingle that wakes up your taste buds. My neighbor called it “gingerbread with a handshake.”
Orange Dreamsicle Twist: Swap the eggnog extract for orange extract in the frosting. Then add a teaspoon of orange zest to the cake batter. It tastes like winter sunshine on a plate.
Maple Pecan Crunch: Fold half a cup of chopped pecans into the batter. Then drizzle maple syrup over the finished cake instead of frosting. It’s messy but delicious. Which one would you try first? Comment below!
How to Serve and What to Sip
This cake is lovely all on its own, but a few extras make it feel like a celebration. Try topping each slice with a dollop of whipped cream and a dusting of cinnamon. Or serve it warm with a scoop of vanilla ice cream melting on the side.
For drinks, I love a tall glass of cold eggnog with it. That’s for my kids and me. For grown-ups at the table, a cup of spiced rum-spiked hot apple cider is cozy and perfect. Which would you choose tonight?
Storing and Reheating Your Gingerbread Cake
This cake stays moist for days if you store it right. First, let the cake cool completely. I learned this the hard way when my first cake turned into a sticky mess. Wrap the cake tightly in plastic wrap, then foil. Place it in the fridge for up to five days. You can also freeze the unfrosted layers for up to three months. Just wrap them well and pop them in a freezer bag. When you want a slice, let it thaw in the fridge overnight. For a warm treat, microwave a slice for 15 seconds. This brings out the gingerbread spice. Batch cooking this cake is a lifesaver for holiday parties. You can bake the layers a week ahead and frost them the day you serve. Have you ever tried storing it this way? Share below!
Why does this matter? Storing your cake properly means you always have a dessert ready. It saves you from rushing at the last minute. Plus, the flavors get even better after a day or two.
Three Common Problems and Easy Fixes
Sometimes your cake might sink in the middle. This happens if the oven door is opened too early. I once peeked at my cake after 20 minutes and it fell flat. Wait until the 35-minute mark to check. Another problem is a dry cake. This usually means it baked too long. Check it with a toothpick at 35 minutes. If it comes out clean, it is done. A third issue is frosting that is too runny. This happened to me when the cream cheese was too cold. Let your butter and cream cheese sit out for an hour before mixing. Why does this matter? Fixing these problems makes your cake taste amazing every time. You will feel confident baking for any gathering. Which of these problems have you run into before?
Why does this matter? Getting these simple fixes right turns a good cake into a great one. It helps you understand your oven and ingredients better.
Your Top 5 Questions Answered
Q: Can I use a different gluten-free flour?
A: Yes, but 1:1 flour works best. Other blends may change the texture.
Q: Can I make this cake ahead of time?
A: Absolutely. Bake the layers up to three days early and store them in the fridge.
Q: What can I swap for almond milk?
A: Use regular milk or oat milk. Both work just fine in this recipe.
Q: How do I double the recipe?
A: Double all ingredients. Use three 8-inch pans and bake a few minutes longer.
Q: Can I skip the eggnog extract?
A: Yes, use extra vanilla extract or a pinch of nutmeg instead. Which tip will you try first?
A Warm Goodbye from Chloe
Thank you for baking with me today. I hope this gingerbread cake fills your home with warm, spicy smells. Share your photos or stories with me. I love seeing your beautiful creations. Have you tried this recipe? Tag us on Pinterest! Remember, baking is about joy and sharing. Every messy kitchen and happy bite is worth it. Happy cooking!
—Chloe Hartwell
Gluten Free Gingerbread Spiced Cake
Description
Moist gluten free gingerbread spiced cake, perfectly spiced and easy to make. A cozy holiday dessert everyone will love.
Ingredients
Instructions
- Preheat oven to 350 ℉Lightly grease 2 8 inch cake pans.Combine all dry ingredients in large bowl. Then, add to mixer.Add all wet ingredients.Mix on medium until well combined.Pour the batter into prepared cake pans and bake for 35-40 minutes until a toothpick comes out clean.Allow the cakes to cool completely before frosting.
- In mixer, using paddle attachment mix together butter and cream cheese until smooth.Next, add in powdered sugar 1 cup at a time. After the 2nd cup add the egg nog extract, vanilla extract, salt, and 1 tablespoon of milk.Mix until combined. Then add the remaining powdered sugar and almond milk. Mix until desired consistency is met.
- Place the first cake on a cake stand or plate. Spread some of the frosting over the top. Stack the second cake on top and frost the entire cake.
Ingredients:
| Ingredient | Amount | Notes |
|---|---|---|
| Gluten Free 1:1 Flour | 2 ½ cups | |
| Salt | ½ teaspoon | |
| Baking Powder | 2 teaspoons | |
| Baking Soda | 1 teaspoon | |
| Olivenation gingerbread seasoning | 1 ½ teaspoons | |
| Vegetable oil | 1 cup | |
| Large eggs | 4 | room temperature |
| Sugar | ½ cup | |
| Brown sugar | ½ cup | |
| Unsweetened almond milk | ⅓ cup | room temperature |
| Unsulfured molasses | 1 cup | |
| Cream cheese | 1 (8 oz) pack | for frosting |
| Butter | 1 stick | for frosting |
| OliveNation egg nog extract | 1 teaspoon | for frosting |
| Vanilla Extract | ½ teaspoon | for frosting |
| Powdered Sugar | 3 cups | for frosting |
| Almond milk | 1-2 tablespoons | for frosting |
The Day I Fell in Love With Gingerbread
I still remember the first time I made a gingerbread cake that wasn’t dry. It was a rainy Tuesday, and my kitchen smelled like a holiday hug. Doesn’t that smell amazing? But I had to learn the hard way that gluten free baking is a little picky. It needs extra love and patience, but I promise it’s worth every bite.
This recipe came from a friend who swore by her “secret spice blend.” I begged her for it for years. When she finally shared it, I laughed—it was just store-bought gingerbread seasoning! Still, I use it every time because it works. And that eggnog cream cheese frosting? Pure magic on a spoon.
Now, before we get our hands sticky, here’s a little truth. Hard-learned tip: Make sure your eggs and almond milk are truly room temperature. Cold ingredients can make gluten free batter lumpy, and nobody wants that. Trust me, I learned this after a very sad, lumpy cake.
Let’s Bake Together: Step-by-Step
Alright, pull up a stool and let’s make this cake. I’ll walk you through it like we’re standing side by side in my kitchen.
Step 1: Preheat your oven to 350 degrees Fahrenheit. Then, lightly grease two 8-inch round cake pans. I like to use a little butter on a paper towel. My grandma always said “grease like you mean it,” so don’t be shy. Set the pans aside for now.
Step 2: Grab a big bowl and whisk together your dry ingredients. That means the gluten free flour, salt, baking powder, baking soda, and that gingerbread seasoning. I once forgot the baking soda and my cake looked like a pancake. We don’t need that kind of drama today.
Step 3: Now pour your dry mix into a stand mixer. Add all the wet ingredients: vegetable oil, eggs, both sugars, almond milk, and molasses. Turn the mixer to medium speed and let it run until everything is smooth and happy. Here’s a mini-quiz for you: What’s the trick to a super moist gluten free cake? Hint—it’s in the wet ingredients! Share below!
Step 4: Pour the batter evenly into your two greased pans. Pop them in the oven for 35 to 40 minutes. You’ll know they’re done when a toothpick stuck in the center comes out clean. No gooey batter clinging to it. Let the cakes cool completely before you even think about frosting.
Step 5: Time for frosting! In your mixer (use the paddle attachment), beat the butter and cream cheese together until smooth. Add powdered sugar one cup at a time. After the second cup, toss in the eggnog extract, vanilla, a pinch of salt, and one tablespoon of almond milk. Mix it up, then add the last cup of sugar. Add more milk if you want it spreadable.
Step 6: Place one cooled cake layer on a plate. Spread a generous layer of frosting on top. Stack the second cake on top, then frost the whole thing like you’re painting a masterpiece. Smooth it out, or make swirls—your call.
Cook Time: 35–40 minutes
Total Time: 1 hour 15 minutes
Yield: 10–12 servings
Category: Dessert, Cake
Three Fun Twists to Try
Sometimes I like to change things up so the cake feels brand new. Here are a few ideas I’ve tried on sleepy Sunday afternoons.
Spicy Kick Version: Add a pinch of cayenne pepper and extra ginger to the batter. It gives a warm tingle that wakes up your taste buds. My neighbor called it “gingerbread with a handshake.”
Orange Dreamsicle Twist: Swap the eggnog extract for orange extract in the frosting. Then add a teaspoon of orange zest to the cake batter. It tastes like winter sunshine on a plate.
Maple Pecan Crunch: Fold half a cup of chopped pecans into the batter. Then drizzle maple syrup over the finished cake instead of frosting. It’s messy but delicious. Which one would you try first? Comment below!
How to Serve and What to Sip
This cake is lovely all on its own, but a few extras make it feel like a celebration. Try topping each slice with a dollop of whipped cream and a dusting of cinnamon. Or serve it warm with a scoop of vanilla ice cream melting on the side.
For drinks, I love a tall glass of cold eggnog with it. That’s for my kids and me. For grown-ups at the table, a cup of spiced rum-spiked hot apple cider is cozy and perfect. Which would you choose tonight?
Storing and Reheating Your Gingerbread Cake
This cake stays moist for days if you store it right. First, let the cake cool completely. I learned this the hard way when my first cake turned into a sticky mess. Wrap the cake tightly in plastic wrap, then foil. Place it in the fridge for up to five days. You can also freeze the unfrosted layers for up to three months. Just wrap them well and pop them in a freezer bag. When you want a slice, let it thaw in the fridge overnight. For a warm treat, microwave a slice for 15 seconds. This brings out the gingerbread spice. Batch cooking this cake is a lifesaver for holiday parties. You can bake the layers a week ahead and frost them the day you serve. Have you ever tried storing it this way? Share below!
Why does this matter? Storing your cake properly means you always have a dessert ready. It saves you from rushing at the last minute. Plus, the flavors get even better after a day or two.
Three Common Problems and Easy Fixes
Sometimes your cake might sink in the middle. This happens if the oven door is opened too early. I once peeked at my cake after 20 minutes and it fell flat. Wait until the 35-minute mark to check. Another problem is a dry cake. This usually means it baked too long. Check it with a toothpick at 35 minutes. If it comes out clean, it is done. A third issue is frosting that is too runny. This happened to me when the cream cheese was too cold. Let your butter and cream cheese sit out for an hour before mixing. Why does this matter? Fixing these problems makes your cake taste amazing every time. You will feel confident baking for any gathering. Which of these problems have you run into before?
Why does this matter? Getting these simple fixes right turns a good cake into a great one. It helps you understand your oven and ingredients better.
Your Top 5 Questions Answered
Q: Can I use a different gluten-free flour?
A: Yes, but 1:1 flour works best. Other blends may change the texture.
Q: Can I make this cake ahead of time?
A: Absolutely. Bake the layers up to three days early and store them in the fridge.
Q: What can I swap for almond milk?
A: Use regular milk or oat milk. Both work just fine in this recipe.
Q: How do I double the recipe?
A: Double all ingredients. Use three 8-inch pans and bake a few minutes longer.
Q: Can I skip the eggnog extract?
A: Yes, use extra vanilla extract or a pinch of nutmeg instead. Which tip will you try first?
A Warm Goodbye from Chloe
Thank you for baking with me today. I hope this gingerbread cake fills your home with warm, spicy smells. Share your photos or stories with me. I love seeing your beautiful creations. Have you tried this recipe? Tag us on Pinterest! Remember, baking is about joy and sharing. Every messy kitchen and happy bite is worth it. Happy cooking!
—Chloe Hartwell
Putting It All Together – Stack and Frost
Once the cakes are completely cool, you can build your masterpiece. Place one layer on a plate. Spread a thick layer of frosting on top. Then gently place the second layer on top. Frost the whole cake like you are painting a snowy hill. I like to spread extra frosting on the sides. Some people leave the sides bare. It is your cake. You get to decide how it looks. That is the best part of cooking at home. One last question: Who would you share this cake with? A friend, a neighbor, or just yourself with a big glass of milk?Ingredients:
| Ingredient | Amount | Notes |
|---|---|---|
| Gluten Free 1:1 Flour | 2 ½ cups | |
| Salt | ½ teaspoon | |
| Baking Powder | 2 teaspoons | |
| Baking Soda | 1 teaspoon | |
| Olivenation gingerbread seasoning | 1 ½ teaspoons | |
| Vegetable oil | 1 cup | |
| Large eggs | 4 | room temperature |
| Sugar | ½ cup | |
| Brown sugar | ½ cup | |
| Unsweetened almond milk | ⅓ cup | room temperature |
| Unsulfured molasses | 1 cup | |
| Cream cheese | 1 (8 oz) pack | for frosting |
| Butter | 1 stick | for frosting |
| OliveNation egg nog extract | 1 teaspoon | for frosting |
| Vanilla Extract | ½ teaspoon | for frosting |
| Powdered Sugar | 3 cups | for frosting |
| Almond milk | 1-2 tablespoons | for frosting |
The Day I Fell in Love With Gingerbread
I still remember the first time I made a gingerbread cake that wasn’t dry. It was a rainy Tuesday, and my kitchen smelled like a holiday hug. Doesn’t that smell amazing? But I had to learn the hard way that gluten free baking is a little picky. It needs extra love and patience, but I promise it’s worth every bite.
This recipe came from a friend who swore by her “secret spice blend.” I begged her for it for years. When she finally shared it, I laughed—it was just store-bought gingerbread seasoning! Still, I use it every time because it works. And that eggnog cream cheese frosting? Pure magic on a spoon.
Now, before we get our hands sticky, here’s a little truth. Hard-learned tip: Make sure your eggs and almond milk are truly room temperature. Cold ingredients can make gluten free batter lumpy, and nobody wants that. Trust me, I learned this after a very sad, lumpy cake.
Let’s Bake Together: Step-by-Step
Alright, pull up a stool and let’s make this cake. I’ll walk you through it like we’re standing side by side in my kitchen.
Step 1: Preheat your oven to 350 degrees Fahrenheit. Then, lightly grease two 8-inch round cake pans. I like to use a little butter on a paper towel. My grandma always said “grease like you mean it,” so don’t be shy. Set the pans aside for now.
Step 2: Grab a big bowl and whisk together your dry ingredients. That means the gluten free flour, salt, baking powder, baking soda, and that gingerbread seasoning. I once forgot the baking soda and my cake looked like a pancake. We don’t need that kind of drama today.
Step 3: Now pour your dry mix into a stand mixer. Add all the wet ingredients: vegetable oil, eggs, both sugars, almond milk, and molasses. Turn the mixer to medium speed and let it run until everything is smooth and happy. Here’s a mini-quiz for you: What’s the trick to a super moist gluten free cake? Hint—it’s in the wet ingredients! Share below!
Step 4: Pour the batter evenly into your two greased pans. Pop them in the oven for 35 to 40 minutes. You’ll know they’re done when a toothpick stuck in the center comes out clean. No gooey batter clinging to it. Let the cakes cool completely before you even think about frosting.
Step 5: Time for frosting! In your mixer (use the paddle attachment), beat the butter and cream cheese together until smooth. Add powdered sugar one cup at a time. After the second cup, toss in the eggnog extract, vanilla, a pinch of salt, and one tablespoon of almond milk. Mix it up, then add the last cup of sugar. Add more milk if you want it spreadable.
Step 6: Place one cooled cake layer on a plate. Spread a generous layer of frosting on top. Stack the second cake on top, then frost the whole thing like you’re painting a masterpiece. Smooth it out, or make swirls—your call.
Cook Time: 35–40 minutes
Total Time: 1 hour 15 minutes
Yield: 10–12 servings
Category: Dessert, Cake
Three Fun Twists to Try
Sometimes I like to change things up so the cake feels brand new. Here are a few ideas I’ve tried on sleepy Sunday afternoons.
Spicy Kick Version: Add a pinch of cayenne pepper and extra ginger to the batter. It gives a warm tingle that wakes up your taste buds. My neighbor called it “gingerbread with a handshake.”
Orange Dreamsicle Twist: Swap the eggnog extract for orange extract in the frosting. Then add a teaspoon of orange zest to the cake batter. It tastes like winter sunshine on a plate.
Maple Pecan Crunch: Fold half a cup of chopped pecans into the batter. Then drizzle maple syrup over the finished cake instead of frosting. It’s messy but delicious. Which one would you try first? Comment below!
How to Serve and What to Sip
This cake is lovely all on its own, but a few extras make it feel like a celebration. Try topping each slice with a dollop of whipped cream and a dusting of cinnamon. Or serve it warm with a scoop of vanilla ice cream melting on the side.
For drinks, I love a tall glass of cold eggnog with it. That’s for my kids and me. For grown-ups at the table, a cup of spiced rum-spiked hot apple cider is cozy and perfect. Which would you choose tonight?
Storing and Reheating Your Gingerbread Cake
This cake stays moist for days if you store it right. First, let the cake cool completely. I learned this the hard way when my first cake turned into a sticky mess. Wrap the cake tightly in plastic wrap, then foil. Place it in the fridge for up to five days. You can also freeze the unfrosted layers for up to three months. Just wrap them well and pop them in a freezer bag. When you want a slice, let it thaw in the fridge overnight. For a warm treat, microwave a slice for 15 seconds. This brings out the gingerbread spice. Batch cooking this cake is a lifesaver for holiday parties. You can bake the layers a week ahead and frost them the day you serve. Have you ever tried storing it this way? Share below!
Why does this matter? Storing your cake properly means you always have a dessert ready. It saves you from rushing at the last minute. Plus, the flavors get even better after a day or two.
Three Common Problems and Easy Fixes
Sometimes your cake might sink in the middle. This happens if the oven door is opened too early. I once peeked at my cake after 20 minutes and it fell flat. Wait until the 35-minute mark to check. Another problem is a dry cake. This usually means it baked too long. Check it with a toothpick at 35 minutes. If it comes out clean, it is done. A third issue is frosting that is too runny. This happened to me when the cream cheese was too cold. Let your butter and cream cheese sit out for an hour before mixing. Why does this matter? Fixing these problems makes your cake taste amazing every time. You will feel confident baking for any gathering. Which of these problems have you run into before?
Why does this matter? Getting these simple fixes right turns a good cake into a great one. It helps you understand your oven and ingredients better.
Your Top 5 Questions Answered
Q: Can I use a different gluten-free flour?
A: Yes, but 1:1 flour works best. Other blends may change the texture.
Q: Can I make this cake ahead of time?
A: Absolutely. Bake the layers up to three days early and store them in the fridge.
Q: What can I swap for almond milk?
A: Use regular milk or oat milk. Both work just fine in this recipe.
Q: How do I double the recipe?
A: Double all ingredients. Use three 8-inch pans and bake a few minutes longer.
Q: Can I skip the eggnog extract?
A: Yes, use extra vanilla extract or a pinch of nutmeg instead. Which tip will you try first?
A Warm Goodbye from Chloe
Thank you for baking with me today. I hope this gingerbread cake fills your home with warm, spicy smells. Share your photos or stories with me. I love seeing your beautiful creations. Have you tried this recipe? Tag us on Pinterest! Remember, baking is about joy and sharing. Every messy kitchen and happy bite is worth it. Happy cooking!
—Chloe Hartwell
How to Tell When the Cake is Done
You do not need fancy tools. Just a wooden toothpick or a thin knife. Stick it right in the middle of the cake. If it comes out clean, the cake is ready. I always check at 35 minutes. Ovens can be tricky. Some run hot, some run cool. Your cake might be done faster or need an extra five minutes. That is okay. Baking teaches us patience. Here is a mini-poll: Do you check your cake with a toothpick, or do you wait until you smell it burning? Be honest. I have done both.Putting It All Together – Stack and Frost
Once the cakes are completely cool, you can build your masterpiece. Place one layer on a plate. Spread a thick layer of frosting on top. Then gently place the second layer on top. Frost the whole cake like you are painting a snowy hill. I like to spread extra frosting on the sides. Some people leave the sides bare. It is your cake. You get to decide how it looks. That is the best part of cooking at home. One last question: Who would you share this cake with? A friend, a neighbor, or just yourself with a big glass of milk?Ingredients:
| Ingredient | Amount | Notes |
|---|---|---|
| Gluten Free 1:1 Flour | 2 ½ cups | |
| Salt | ½ teaspoon | |
| Baking Powder | 2 teaspoons | |
| Baking Soda | 1 teaspoon | |
| Olivenation gingerbread seasoning | 1 ½ teaspoons | |
| Vegetable oil | 1 cup | |
| Large eggs | 4 | room temperature |
| Sugar | ½ cup | |
| Brown sugar | ½ cup | |
| Unsweetened almond milk | ⅓ cup | room temperature |
| Unsulfured molasses | 1 cup | |
| Cream cheese | 1 (8 oz) pack | for frosting |
| Butter | 1 stick | for frosting |
| OliveNation egg nog extract | 1 teaspoon | for frosting |
| Vanilla Extract | ½ teaspoon | for frosting |
| Powdered Sugar | 3 cups | for frosting |
| Almond milk | 1-2 tablespoons | for frosting |
The Day I Fell in Love With Gingerbread
I still remember the first time I made a gingerbread cake that wasn’t dry. It was a rainy Tuesday, and my kitchen smelled like a holiday hug. Doesn’t that smell amazing? But I had to learn the hard way that gluten free baking is a little picky. It needs extra love and patience, but I promise it’s worth every bite.
This recipe came from a friend who swore by her “secret spice blend.” I begged her for it for years. When she finally shared it, I laughed—it was just store-bought gingerbread seasoning! Still, I use it every time because it works. And that eggnog cream cheese frosting? Pure magic on a spoon.
Now, before we get our hands sticky, here’s a little truth. Hard-learned tip: Make sure your eggs and almond milk are truly room temperature. Cold ingredients can make gluten free batter lumpy, and nobody wants that. Trust me, I learned this after a very sad, lumpy cake.
Let’s Bake Together: Step-by-Step
Alright, pull up a stool and let’s make this cake. I’ll walk you through it like we’re standing side by side in my kitchen.
Step 1: Preheat your oven to 350 degrees Fahrenheit. Then, lightly grease two 8-inch round cake pans. I like to use a little butter on a paper towel. My grandma always said “grease like you mean it,” so don’t be shy. Set the pans aside for now.
Step 2: Grab a big bowl and whisk together your dry ingredients. That means the gluten free flour, salt, baking powder, baking soda, and that gingerbread seasoning. I once forgot the baking soda and my cake looked like a pancake. We don’t need that kind of drama today.
Step 3: Now pour your dry mix into a stand mixer. Add all the wet ingredients: vegetable oil, eggs, both sugars, almond milk, and molasses. Turn the mixer to medium speed and let it run until everything is smooth and happy. Here’s a mini-quiz for you: What’s the trick to a super moist gluten free cake? Hint—it’s in the wet ingredients! Share below!
Step 4: Pour the batter evenly into your two greased pans. Pop them in the oven for 35 to 40 minutes. You’ll know they’re done when a toothpick stuck in the center comes out clean. No gooey batter clinging to it. Let the cakes cool completely before you even think about frosting.
Step 5: Time for frosting! In your mixer (use the paddle attachment), beat the butter and cream cheese together until smooth. Add powdered sugar one cup at a time. After the second cup, toss in the eggnog extract, vanilla, a pinch of salt, and one tablespoon of almond milk. Mix it up, then add the last cup of sugar. Add more milk if you want it spreadable.
Step 6: Place one cooled cake layer on a plate. Spread a generous layer of frosting on top. Stack the second cake on top, then frost the whole thing like you’re painting a masterpiece. Smooth it out, or make swirls—your call.
Cook Time: 35–40 minutes
Total Time: 1 hour 15 minutes
Yield: 10–12 servings
Category: Dessert, Cake
Three Fun Twists to Try
Sometimes I like to change things up so the cake feels brand new. Here are a few ideas I’ve tried on sleepy Sunday afternoons.
Spicy Kick Version: Add a pinch of cayenne pepper and extra ginger to the batter. It gives a warm tingle that wakes up your taste buds. My neighbor called it “gingerbread with a handshake.”
Orange Dreamsicle Twist: Swap the eggnog extract for orange extract in the frosting. Then add a teaspoon of orange zest to the cake batter. It tastes like winter sunshine on a plate.
Maple Pecan Crunch: Fold half a cup of chopped pecans into the batter. Then drizzle maple syrup over the finished cake instead of frosting. It’s messy but delicious. Which one would you try first? Comment below!
How to Serve and What to Sip
This cake is lovely all on its own, but a few extras make it feel like a celebration. Try topping each slice with a dollop of whipped cream and a dusting of cinnamon. Or serve it warm with a scoop of vanilla ice cream melting on the side.
For drinks, I love a tall glass of cold eggnog with it. That’s for my kids and me. For grown-ups at the table, a cup of spiced rum-spiked hot apple cider is cozy and perfect. Which would you choose tonight?
Storing and Reheating Your Gingerbread Cake
This cake stays moist for days if you store it right. First, let the cake cool completely. I learned this the hard way when my first cake turned into a sticky mess. Wrap the cake tightly in plastic wrap, then foil. Place it in the fridge for up to five days. You can also freeze the unfrosted layers for up to three months. Just wrap them well and pop them in a freezer bag. When you want a slice, let it thaw in the fridge overnight. For a warm treat, microwave a slice for 15 seconds. This brings out the gingerbread spice. Batch cooking this cake is a lifesaver for holiday parties. You can bake the layers a week ahead and frost them the day you serve. Have you ever tried storing it this way? Share below!
Why does this matter? Storing your cake properly means you always have a dessert ready. It saves you from rushing at the last minute. Plus, the flavors get even better after a day or two.
Three Common Problems and Easy Fixes
Sometimes your cake might sink in the middle. This happens if the oven door is opened too early. I once peeked at my cake after 20 minutes and it fell flat. Wait until the 35-minute mark to check. Another problem is a dry cake. This usually means it baked too long. Check it with a toothpick at 35 minutes. If it comes out clean, it is done. A third issue is frosting that is too runny. This happened to me when the cream cheese was too cold. Let your butter and cream cheese sit out for an hour before mixing. Why does this matter? Fixing these problems makes your cake taste amazing every time. You will feel confident baking for any gathering. Which of these problems have you run into before?
Why does this matter? Getting these simple fixes right turns a good cake into a great one. It helps you understand your oven and ingredients better.
Your Top 5 Questions Answered
Q: Can I use a different gluten-free flour?
A: Yes, but 1:1 flour works best. Other blends may change the texture.
Q: Can I make this cake ahead of time?
A: Absolutely. Bake the layers up to three days early and store them in the fridge.
Q: What can I swap for almond milk?
A: Use regular milk or oat milk. Both work just fine in this recipe.
Q: How do I double the recipe?
A: Double all ingredients. Use three 8-inch pans and bake a few minutes longer.
Q: Can I skip the eggnog extract?
A: Yes, use extra vanilla extract or a pinch of nutmeg instead. Which tip will you try first?
A Warm Goodbye from Chloe
Thank you for baking with me today. I hope this gingerbread cake fills your home with warm, spicy smells. Share your photos or stories with me. I love seeing your beautiful creations. Have you tried this recipe? Tag us on Pinterest! Remember, baking is about joy and sharing. Every messy kitchen and happy bite is worth it. Happy cooking!
—Chloe Hartwell
Eggnog Frosting That Tastes Like a Hug
This frosting is not like the kind from a plastic tub. It is creamy, tangy, and a little bit sweet. The secret is eggnog flavor, but no actual eggnog. Just a special extract that tastes like the holidays in a drop. Cream cheese and butter get whipped together until they are soft and fluffy. Then you add powdered sugar, a cup at a time. It is like making a cloud. A delicious, sweet cloud you can spread on cake. Why does this matter? Because a good frosting can turn a simple cake into a celebration. It is the hug on top of the dessert. You deserve a hug.How to Tell When the Cake is Done
You do not need fancy tools. Just a wooden toothpick or a thin knife. Stick it right in the middle of the cake. If it comes out clean, the cake is ready. I always check at 35 minutes. Ovens can be tricky. Some run hot, some run cool. Your cake might be done faster or need an extra five minutes. That is okay. Baking teaches us patience. Here is a mini-poll: Do you check your cake with a toothpick, or do you wait until you smell it burning? Be honest. I have done both.Putting It All Together – Stack and Frost
Once the cakes are completely cool, you can build your masterpiece. Place one layer on a plate. Spread a thick layer of frosting on top. Then gently place the second layer on top. Frost the whole cake like you are painting a snowy hill. I like to spread extra frosting on the sides. Some people leave the sides bare. It is your cake. You get to decide how it looks. That is the best part of cooking at home. One last question: Who would you share this cake with? A friend, a neighbor, or just yourself with a big glass of milk?Ingredients:
| Ingredient | Amount | Notes |
|---|---|---|
| Gluten Free 1:1 Flour | 2 ½ cups | |
| Salt | ½ teaspoon | |
| Baking Powder | 2 teaspoons | |
| Baking Soda | 1 teaspoon | |
| Olivenation gingerbread seasoning | 1 ½ teaspoons | |
| Vegetable oil | 1 cup | |
| Large eggs | 4 | room temperature |
| Sugar | ½ cup | |
| Brown sugar | ½ cup | |
| Unsweetened almond milk | ⅓ cup | room temperature |
| Unsulfured molasses | 1 cup | |
| Cream cheese | 1 (8 oz) pack | for frosting |
| Butter | 1 stick | for frosting |
| OliveNation egg nog extract | 1 teaspoon | for frosting |
| Vanilla Extract | ½ teaspoon | for frosting |
| Powdered Sugar | 3 cups | for frosting |
| Almond milk | 1-2 tablespoons | for frosting |
The Day I Fell in Love With Gingerbread
I still remember the first time I made a gingerbread cake that wasn’t dry. It was a rainy Tuesday, and my kitchen smelled like a holiday hug. Doesn’t that smell amazing? But I had to learn the hard way that gluten free baking is a little picky. It needs extra love and patience, but I promise it’s worth every bite.
This recipe came from a friend who swore by her “secret spice blend.” I begged her for it for years. When she finally shared it, I laughed—it was just store-bought gingerbread seasoning! Still, I use it every time because it works. And that eggnog cream cheese frosting? Pure magic on a spoon.
Now, before we get our hands sticky, here’s a little truth. Hard-learned tip: Make sure your eggs and almond milk are truly room temperature. Cold ingredients can make gluten free batter lumpy, and nobody wants that. Trust me, I learned this after a very sad, lumpy cake.
Let’s Bake Together: Step-by-Step
Alright, pull up a stool and let’s make this cake. I’ll walk you through it like we’re standing side by side in my kitchen.
Step 1: Preheat your oven to 350 degrees Fahrenheit. Then, lightly grease two 8-inch round cake pans. I like to use a little butter on a paper towel. My grandma always said “grease like you mean it,” so don’t be shy. Set the pans aside for now.
Step 2: Grab a big bowl and whisk together your dry ingredients. That means the gluten free flour, salt, baking powder, baking soda, and that gingerbread seasoning. I once forgot the baking soda and my cake looked like a pancake. We don’t need that kind of drama today.
Step 3: Now pour your dry mix into a stand mixer. Add all the wet ingredients: vegetable oil, eggs, both sugars, almond milk, and molasses. Turn the mixer to medium speed and let it run until everything is smooth and happy. Here’s a mini-quiz for you: What’s the trick to a super moist gluten free cake? Hint—it’s in the wet ingredients! Share below!
Step 4: Pour the batter evenly into your two greased pans. Pop them in the oven for 35 to 40 minutes. You’ll know they’re done when a toothpick stuck in the center comes out clean. No gooey batter clinging to it. Let the cakes cool completely before you even think about frosting.
Step 5: Time for frosting! In your mixer (use the paddle attachment), beat the butter and cream cheese together until smooth. Add powdered sugar one cup at a time. After the second cup, toss in the eggnog extract, vanilla, a pinch of salt, and one tablespoon of almond milk. Mix it up, then add the last cup of sugar. Add more milk if you want it spreadable.
Step 6: Place one cooled cake layer on a plate. Spread a generous layer of frosting on top. Stack the second cake on top, then frost the whole thing like you’re painting a masterpiece. Smooth it out, or make swirls—your call.
Cook Time: 35–40 minutes
Total Time: 1 hour 15 minutes
Yield: 10–12 servings
Category: Dessert, Cake
Three Fun Twists to Try
Sometimes I like to change things up so the cake feels brand new. Here are a few ideas I’ve tried on sleepy Sunday afternoons.
Spicy Kick Version: Add a pinch of cayenne pepper and extra ginger to the batter. It gives a warm tingle that wakes up your taste buds. My neighbor called it “gingerbread with a handshake.”
Orange Dreamsicle Twist: Swap the eggnog extract for orange extract in the frosting. Then add a teaspoon of orange zest to the cake batter. It tastes like winter sunshine on a plate.
Maple Pecan Crunch: Fold half a cup of chopped pecans into the batter. Then drizzle maple syrup over the finished cake instead of frosting. It’s messy but delicious. Which one would you try first? Comment below!
How to Serve and What to Sip
This cake is lovely all on its own, but a few extras make it feel like a celebration. Try topping each slice with a dollop of whipped cream and a dusting of cinnamon. Or serve it warm with a scoop of vanilla ice cream melting on the side.
For drinks, I love a tall glass of cold eggnog with it. That’s for my kids and me. For grown-ups at the table, a cup of spiced rum-spiked hot apple cider is cozy and perfect. Which would you choose tonight?
Storing and Reheating Your Gingerbread Cake
This cake stays moist for days if you store it right. First, let the cake cool completely. I learned this the hard way when my first cake turned into a sticky mess. Wrap the cake tightly in plastic wrap, then foil. Place it in the fridge for up to five days. You can also freeze the unfrosted layers for up to three months. Just wrap them well and pop them in a freezer bag. When you want a slice, let it thaw in the fridge overnight. For a warm treat, microwave a slice for 15 seconds. This brings out the gingerbread spice. Batch cooking this cake is a lifesaver for holiday parties. You can bake the layers a week ahead and frost them the day you serve. Have you ever tried storing it this way? Share below!
Why does this matter? Storing your cake properly means you always have a dessert ready. It saves you from rushing at the last minute. Plus, the flavors get even better after a day or two.
Three Common Problems and Easy Fixes
Sometimes your cake might sink in the middle. This happens if the oven door is opened too early. I once peeked at my cake after 20 minutes and it fell flat. Wait until the 35-minute mark to check. Another problem is a dry cake. This usually means it baked too long. Check it with a toothpick at 35 minutes. If it comes out clean, it is done. A third issue is frosting that is too runny. This happened to me when the cream cheese was too cold. Let your butter and cream cheese sit out for an hour before mixing. Why does this matter? Fixing these problems makes your cake taste amazing every time. You will feel confident baking for any gathering. Which of these problems have you run into before?
Why does this matter? Getting these simple fixes right turns a good cake into a great one. It helps you understand your oven and ingredients better.
Your Top 5 Questions Answered
Q: Can I use a different gluten-free flour?
A: Yes, but 1:1 flour works best. Other blends may change the texture.
Q: Can I make this cake ahead of time?
A: Absolutely. Bake the layers up to three days early and store them in the fridge.
Q: What can I swap for almond milk?
A: Use regular milk or oat milk. Both work just fine in this recipe.
Q: How do I double the recipe?
A: Double all ingredients. Use three 8-inch pans and bake a few minutes longer.
Q: Can I skip the eggnog extract?
A: Yes, use extra vanilla extract or a pinch of nutmeg instead. Which tip will you try first?
A Warm Goodbye from Chloe
Thank you for baking with me today. I hope this gingerbread cake fills your home with warm, spicy smells. Share your photos or stories with me. I love seeing your beautiful creations. Have you tried this recipe? Tag us on Pinterest! Remember, baking is about joy and sharing. Every messy kitchen and happy bite is worth it. Happy cooking!
—Chloe Hartwell
The Secret Power of Molasses
Molasses is not just sweet. It is dark, thick, and full of deep, cozy flavor. It comes from boiling sugarcane juice until it becomes rich and gooey. My grandmother used to call it “liquid gold.” When you add molasses to cake batter, it makes the cake dark and tender. It also keeps the cake moist for days. I have left a slice on the counter overnight, and it was still soft the next morning. That is the power of molasses. Here is a little question for you: Do you remember the first time you tasted gingerbread? Was it a cookie, a cake, or a little house?Eggnog Frosting That Tastes Like a Hug
This frosting is not like the kind from a plastic tub. It is creamy, tangy, and a little bit sweet. The secret is eggnog flavor, but no actual eggnog. Just a special extract that tastes like the holidays in a drop. Cream cheese and butter get whipped together until they are soft and fluffy. Then you add powdered sugar, a cup at a time. It is like making a cloud. A delicious, sweet cloud you can spread on cake. Why does this matter? Because a good frosting can turn a simple cake into a celebration. It is the hug on top of the dessert. You deserve a hug.How to Tell When the Cake is Done
You do not need fancy tools. Just a wooden toothpick or a thin knife. Stick it right in the middle of the cake. If it comes out clean, the cake is ready. I always check at 35 minutes. Ovens can be tricky. Some run hot, some run cool. Your cake might be done faster or need an extra five minutes. That is okay. Baking teaches us patience. Here is a mini-poll: Do you check your cake with a toothpick, or do you wait until you smell it burning? Be honest. I have done both.Putting It All Together – Stack and Frost
Once the cakes are completely cool, you can build your masterpiece. Place one layer on a plate. Spread a thick layer of frosting on top. Then gently place the second layer on top. Frost the whole cake like you are painting a snowy hill. I like to spread extra frosting on the sides. Some people leave the sides bare. It is your cake. You get to decide how it looks. That is the best part of cooking at home. One last question: Who would you share this cake with? A friend, a neighbor, or just yourself with a big glass of milk?Ingredients:
| Ingredient | Amount | Notes |
|---|---|---|
| Gluten Free 1:1 Flour | 2 ½ cups | |
| Salt | ½ teaspoon | |
| Baking Powder | 2 teaspoons | |
| Baking Soda | 1 teaspoon | |
| Olivenation gingerbread seasoning | 1 ½ teaspoons | |
| Vegetable oil | 1 cup | |
| Large eggs | 4 | room temperature |
| Sugar | ½ cup | |
| Brown sugar | ½ cup | |
| Unsweetened almond milk | ⅓ cup | room temperature |
| Unsulfured molasses | 1 cup | |
| Cream cheese | 1 (8 oz) pack | for frosting |
| Butter | 1 stick | for frosting |
| OliveNation egg nog extract | 1 teaspoon | for frosting |
| Vanilla Extract | ½ teaspoon | for frosting |
| Powdered Sugar | 3 cups | for frosting |
| Almond milk | 1-2 tablespoons | for frosting |
The Day I Fell in Love With Gingerbread
I still remember the first time I made a gingerbread cake that wasn’t dry. It was a rainy Tuesday, and my kitchen smelled like a holiday hug. Doesn’t that smell amazing? But I had to learn the hard way that gluten free baking is a little picky. It needs extra love and patience, but I promise it’s worth every bite.
This recipe came from a friend who swore by her “secret spice blend.” I begged her for it for years. When she finally shared it, I laughed—it was just store-bought gingerbread seasoning! Still, I use it every time because it works. And that eggnog cream cheese frosting? Pure magic on a spoon.
Now, before we get our hands sticky, here’s a little truth. Hard-learned tip: Make sure your eggs and almond milk are truly room temperature. Cold ingredients can make gluten free batter lumpy, and nobody wants that. Trust me, I learned this after a very sad, lumpy cake.
Let’s Bake Together: Step-by-Step
Alright, pull up a stool and let’s make this cake. I’ll walk you through it like we’re standing side by side in my kitchen.
Step 1: Preheat your oven to 350 degrees Fahrenheit. Then, lightly grease two 8-inch round cake pans. I like to use a little butter on a paper towel. My grandma always said “grease like you mean it,” so don’t be shy. Set the pans aside for now.
Step 2: Grab a big bowl and whisk together your dry ingredients. That means the gluten free flour, salt, baking powder, baking soda, and that gingerbread seasoning. I once forgot the baking soda and my cake looked like a pancake. We don’t need that kind of drama today.
Step 3: Now pour your dry mix into a stand mixer. Add all the wet ingredients: vegetable oil, eggs, both sugars, almond milk, and molasses. Turn the mixer to medium speed and let it run until everything is smooth and happy. Here’s a mini-quiz for you: What’s the trick to a super moist gluten free cake? Hint—it’s in the wet ingredients! Share below!
Step 4: Pour the batter evenly into your two greased pans. Pop them in the oven for 35 to 40 minutes. You’ll know they’re done when a toothpick stuck in the center comes out clean. No gooey batter clinging to it. Let the cakes cool completely before you even think about frosting.
Step 5: Time for frosting! In your mixer (use the paddle attachment), beat the butter and cream cheese together until smooth. Add powdered sugar one cup at a time. After the second cup, toss in the eggnog extract, vanilla, a pinch of salt, and one tablespoon of almond milk. Mix it up, then add the last cup of sugar. Add more milk if you want it spreadable.
Step 6: Place one cooled cake layer on a plate. Spread a generous layer of frosting on top. Stack the second cake on top, then frost the whole thing like you’re painting a masterpiece. Smooth it out, or make swirls—your call.
Cook Time: 35–40 minutes
Total Time: 1 hour 15 minutes
Yield: 10–12 servings
Category: Dessert, Cake
Three Fun Twists to Try
Sometimes I like to change things up so the cake feels brand new. Here are a few ideas I’ve tried on sleepy Sunday afternoons.
Spicy Kick Version: Add a pinch of cayenne pepper and extra ginger to the batter. It gives a warm tingle that wakes up your taste buds. My neighbor called it “gingerbread with a handshake.”
Orange Dreamsicle Twist: Swap the eggnog extract for orange extract in the frosting. Then add a teaspoon of orange zest to the cake batter. It tastes like winter sunshine on a plate.
Maple Pecan Crunch: Fold half a cup of chopped pecans into the batter. Then drizzle maple syrup over the finished cake instead of frosting. It’s messy but delicious. Which one would you try first? Comment below!
How to Serve and What to Sip
This cake is lovely all on its own, but a few extras make it feel like a celebration. Try topping each slice with a dollop of whipped cream and a dusting of cinnamon. Or serve it warm with a scoop of vanilla ice cream melting on the side.
For drinks, I love a tall glass of cold eggnog with it. That’s for my kids and me. For grown-ups at the table, a cup of spiced rum-spiked hot apple cider is cozy and perfect. Which would you choose tonight?
Storing and Reheating Your Gingerbread Cake
This cake stays moist for days if you store it right. First, let the cake cool completely. I learned this the hard way when my first cake turned into a sticky mess. Wrap the cake tightly in plastic wrap, then foil. Place it in the fridge for up to five days. You can also freeze the unfrosted layers for up to three months. Just wrap them well and pop them in a freezer bag. When you want a slice, let it thaw in the fridge overnight. For a warm treat, microwave a slice for 15 seconds. This brings out the gingerbread spice. Batch cooking this cake is a lifesaver for holiday parties. You can bake the layers a week ahead and frost them the day you serve. Have you ever tried storing it this way? Share below!
Why does this matter? Storing your cake properly means you always have a dessert ready. It saves you from rushing at the last minute. Plus, the flavors get even better after a day or two.
Three Common Problems and Easy Fixes
Sometimes your cake might sink in the middle. This happens if the oven door is opened too early. I once peeked at my cake after 20 minutes and it fell flat. Wait until the 35-minute mark to check. Another problem is a dry cake. This usually means it baked too long. Check it with a toothpick at 35 minutes. If it comes out clean, it is done. A third issue is frosting that is too runny. This happened to me when the cream cheese was too cold. Let your butter and cream cheese sit out for an hour before mixing. Why does this matter? Fixing these problems makes your cake taste amazing every time. You will feel confident baking for any gathering. Which of these problems have you run into before?
Why does this matter? Getting these simple fixes right turns a good cake into a great one. It helps you understand your oven and ingredients better.
Your Top 5 Questions Answered
Q: Can I use a different gluten-free flour?
A: Yes, but 1:1 flour works best. Other blends may change the texture.
Q: Can I make this cake ahead of time?
A: Absolutely. Bake the layers up to three days early and store them in the fridge.
Q: What can I swap for almond milk?
A: Use regular milk or oat milk. Both work just fine in this recipe.
Q: How do I double the recipe?
A: Double all ingredients. Use three 8-inch pans and bake a few minutes longer.
Q: Can I skip the eggnog extract?
A: Yes, use extra vanilla extract or a pinch of nutmeg instead. Which tip will you try first?
A Warm Goodbye from Chloe
Thank you for baking with me today. I hope this gingerbread cake fills your home with warm, spicy smells. Share your photos or stories with me. I love seeing your beautiful creations. Have you tried this recipe? Tag us on Pinterest! Remember, baking is about joy and sharing. Every messy kitchen and happy bite is worth it. Happy cooking!
—Chloe Hartwell
The Day the Gingerbread Smelled Like Christmas Morning
The first time I made this cake, snow was falling outside my kitchen window. I had just pulled a batch of burnt cookies out of the oven. My grandson Ben walked in, wrinkled his nose, and said, “Grandma, what happened?” I still laugh at that. I told him, “Sometimes we mess up, and sometimes we make something better.” This cake was the better thing. It filled the whole house with warm, spicy smells. It smelled like Christmas morning, even though it was only a Tuesday. Doesn’t that smell amazing? That is the kind of magic I love sharing. Have you ever had a kitchen accident that turned into a win? Tell me your story. I would love to hear it.Why This Cake is Kind to Your Tummy
Some people cannot eat regular flour. It makes them feel sick or tired. That is why I love gluten-free baking. It lets everyone share the same warm slice of cake. This cake uses a special gluten-free flour blend. It acts just like regular flour. The cake stays soft, moist, and full of flavor. Nobody will guess it is gluten-free. That makes me smile every time. *Fun fact: Ginger was used long ago to help soothe bellies after big meals. That is why gingerbread was often served at winter feasts.* Why does this matter? Because food should bring people together, not leave someone out. A gluten-free cake means no one sits at the table feeling left behind.The Secret Power of Molasses
Molasses is not just sweet. It is dark, thick, and full of deep, cozy flavor. It comes from boiling sugarcane juice until it becomes rich and gooey. My grandmother used to call it “liquid gold.” When you add molasses to cake batter, it makes the cake dark and tender. It also keeps the cake moist for days. I have left a slice on the counter overnight, and it was still soft the next morning. That is the power of molasses. Here is a little question for you: Do you remember the first time you tasted gingerbread? Was it a cookie, a cake, or a little house?Eggnog Frosting That Tastes Like a Hug
This frosting is not like the kind from a plastic tub. It is creamy, tangy, and a little bit sweet. The secret is eggnog flavor, but no actual eggnog. Just a special extract that tastes like the holidays in a drop. Cream cheese and butter get whipped together until they are soft and fluffy. Then you add powdered sugar, a cup at a time. It is like making a cloud. A delicious, sweet cloud you can spread on cake. Why does this matter? Because a good frosting can turn a simple cake into a celebration. It is the hug on top of the dessert. You deserve a hug.How to Tell When the Cake is Done
You do not need fancy tools. Just a wooden toothpick or a thin knife. Stick it right in the middle of the cake. If it comes out clean, the cake is ready. I always check at 35 minutes. Ovens can be tricky. Some run hot, some run cool. Your cake might be done faster or need an extra five minutes. That is okay. Baking teaches us patience. Here is a mini-poll: Do you check your cake with a toothpick, or do you wait until you smell it burning? Be honest. I have done both.Putting It All Together – Stack and Frost
Once the cakes are completely cool, you can build your masterpiece. Place one layer on a plate. Spread a thick layer of frosting on top. Then gently place the second layer on top. Frost the whole cake like you are painting a snowy hill. I like to spread extra frosting on the sides. Some people leave the sides bare. It is your cake. You get to decide how it looks. That is the best part of cooking at home. One last question: Who would you share this cake with? A friend, a neighbor, or just yourself with a big glass of milk?Ingredients:
| Ingredient | Amount | Notes |
|---|---|---|
| Gluten Free 1:1 Flour | 2 ½ cups | |
| Salt | ½ teaspoon | |
| Baking Powder | 2 teaspoons | |
| Baking Soda | 1 teaspoon | |
| Olivenation gingerbread seasoning | 1 ½ teaspoons | |
| Vegetable oil | 1 cup | |
| Large eggs | 4 | room temperature |
| Sugar | ½ cup | |
| Brown sugar | ½ cup | |
| Unsweetened almond milk | ⅓ cup | room temperature |
| Unsulfured molasses | 1 cup | |
| Cream cheese | 1 (8 oz) pack | for frosting |
| Butter | 1 stick | for frosting |
| OliveNation egg nog extract | 1 teaspoon | for frosting |
| Vanilla Extract | ½ teaspoon | for frosting |
| Powdered Sugar | 3 cups | for frosting |
| Almond milk | 1-2 tablespoons | for frosting |
The Day I Fell in Love With Gingerbread
I still remember the first time I made a gingerbread cake that wasn’t dry. It was a rainy Tuesday, and my kitchen smelled like a holiday hug. Doesn’t that smell amazing? But I had to learn the hard way that gluten free baking is a little picky. It needs extra love and patience, but I promise it’s worth every bite.
This recipe came from a friend who swore by her “secret spice blend.” I begged her for it for years. When she finally shared it, I laughed—it was just store-bought gingerbread seasoning! Still, I use it every time because it works. And that eggnog cream cheese frosting? Pure magic on a spoon.
Now, before we get our hands sticky, here’s a little truth. Hard-learned tip: Make sure your eggs and almond milk are truly room temperature. Cold ingredients can make gluten free batter lumpy, and nobody wants that. Trust me, I learned this after a very sad, lumpy cake.
Let’s Bake Together: Step-by-Step
Alright, pull up a stool and let’s make this cake. I’ll walk you through it like we’re standing side by side in my kitchen.
Step 1: Preheat your oven to 350 degrees Fahrenheit. Then, lightly grease two 8-inch round cake pans. I like to use a little butter on a paper towel. My grandma always said “grease like you mean it,” so don’t be shy. Set the pans aside for now.
Step 2: Grab a big bowl and whisk together your dry ingredients. That means the gluten free flour, salt, baking powder, baking soda, and that gingerbread seasoning. I once forgot the baking soda and my cake looked like a pancake. We don’t need that kind of drama today.
Step 3: Now pour your dry mix into a stand mixer. Add all the wet ingredients: vegetable oil, eggs, both sugars, almond milk, and molasses. Turn the mixer to medium speed and let it run until everything is smooth and happy. Here’s a mini-quiz for you: What’s the trick to a super moist gluten free cake? Hint—it’s in the wet ingredients! Share below!
Step 4: Pour the batter evenly into your two greased pans. Pop them in the oven for 35 to 40 minutes. You’ll know they’re done when a toothpick stuck in the center comes out clean. No gooey batter clinging to it. Let the cakes cool completely before you even think about frosting.
Step 5: Time for frosting! In your mixer (use the paddle attachment), beat the butter and cream cheese together until smooth. Add powdered sugar one cup at a time. After the second cup, toss in the eggnog extract, vanilla, a pinch of salt, and one tablespoon of almond milk. Mix it up, then add the last cup of sugar. Add more milk if you want it spreadable.
Step 6: Place one cooled cake layer on a plate. Spread a generous layer of frosting on top. Stack the second cake on top, then frost the whole thing like you’re painting a masterpiece. Smooth it out, or make swirls—your call.
Cook Time: 35–40 minutes
Total Time: 1 hour 15 minutes
Yield: 10–12 servings
Category: Dessert, Cake
Three Fun Twists to Try
Sometimes I like to change things up so the cake feels brand new. Here are a few ideas I’ve tried on sleepy Sunday afternoons.
Spicy Kick Version: Add a pinch of cayenne pepper and extra ginger to the batter. It gives a warm tingle that wakes up your taste buds. My neighbor called it “gingerbread with a handshake.”
Orange Dreamsicle Twist: Swap the eggnog extract for orange extract in the frosting. Then add a teaspoon of orange zest to the cake batter. It tastes like winter sunshine on a plate.
Maple Pecan Crunch: Fold half a cup of chopped pecans into the batter. Then drizzle maple syrup over the finished cake instead of frosting. It’s messy but delicious. Which one would you try first? Comment below!
How to Serve and What to Sip
This cake is lovely all on its own, but a few extras make it feel like a celebration. Try topping each slice with a dollop of whipped cream and a dusting of cinnamon. Or serve it warm with a scoop of vanilla ice cream melting on the side.
For drinks, I love a tall glass of cold eggnog with it. That’s for my kids and me. For grown-ups at the table, a cup of spiced rum-spiked hot apple cider is cozy and perfect. Which would you choose tonight?
Storing and Reheating Your Gingerbread Cake
This cake stays moist for days if you store it right. First, let the cake cool completely. I learned this the hard way when my first cake turned into a sticky mess. Wrap the cake tightly in plastic wrap, then foil. Place it in the fridge for up to five days. You can also freeze the unfrosted layers for up to three months. Just wrap them well and pop them in a freezer bag. When you want a slice, let it thaw in the fridge overnight. For a warm treat, microwave a slice for 15 seconds. This brings out the gingerbread spice. Batch cooking this cake is a lifesaver for holiday parties. You can bake the layers a week ahead and frost them the day you serve. Have you ever tried storing it this way? Share below!
Why does this matter? Storing your cake properly means you always have a dessert ready. It saves you from rushing at the last minute. Plus, the flavors get even better after a day or two.
Three Common Problems and Easy Fixes
Sometimes your cake might sink in the middle. This happens if the oven door is opened too early. I once peeked at my cake after 20 minutes and it fell flat. Wait until the 35-minute mark to check. Another problem is a dry cake. This usually means it baked too long. Check it with a toothpick at 35 minutes. If it comes out clean, it is done. A third issue is frosting that is too runny. This happened to me when the cream cheese was too cold. Let your butter and cream cheese sit out for an hour before mixing. Why does this matter? Fixing these problems makes your cake taste amazing every time. You will feel confident baking for any gathering. Which of these problems have you run into before?
Why does this matter? Getting these simple fixes right turns a good cake into a great one. It helps you understand your oven and ingredients better.
Your Top 5 Questions Answered
Q: Can I use a different gluten-free flour?
A: Yes, but 1:1 flour works best. Other blends may change the texture.
Q: Can I make this cake ahead of time?
A: Absolutely. Bake the layers up to three days early and store them in the fridge.
Q: What can I swap for almond milk?
A: Use regular milk or oat milk. Both work just fine in this recipe.
Q: How do I double the recipe?
A: Double all ingredients. Use three 8-inch pans and bake a few minutes longer.
Q: Can I skip the eggnog extract?
A: Yes, use extra vanilla extract or a pinch of nutmeg instead. Which tip will you try first?
A Warm Goodbye from Chloe
Thank you for baking with me today. I hope this gingerbread cake fills your home with warm, spicy smells. Share your photos or stories with me. I love seeing your beautiful creations. Have you tried this recipe? Tag us on Pinterest! Remember, baking is about joy and sharing. Every messy kitchen and happy bite is worth it. Happy cooking!
—Chloe Hartwell


Leave a Reply