
The Day I Forgot the Crust
I was making these bars for a picnic once. I was in a hurry. I forgot to press the base layer down at all. When I tried to lift the first bar, it fell apart into a pile of crumbs. My husband walked in and asked if I was making a new kind of “deconstructed dessert.” I still laugh at that. So the lesson is simple: press that bottom layer down like you mean it. Really push it into the pan with your fingers or the bottom of a glass. That firm press is what holds everything together. Why does that matter? Because a crumbly bar is a sad bar. You want something you can hold in your hand and eat while standing at the counter. That is a good thing in life. Have you ever had a dessert fall apart right before you could taste it? Tell me in the comments—I want to know I am not alone.What Makes This So Good
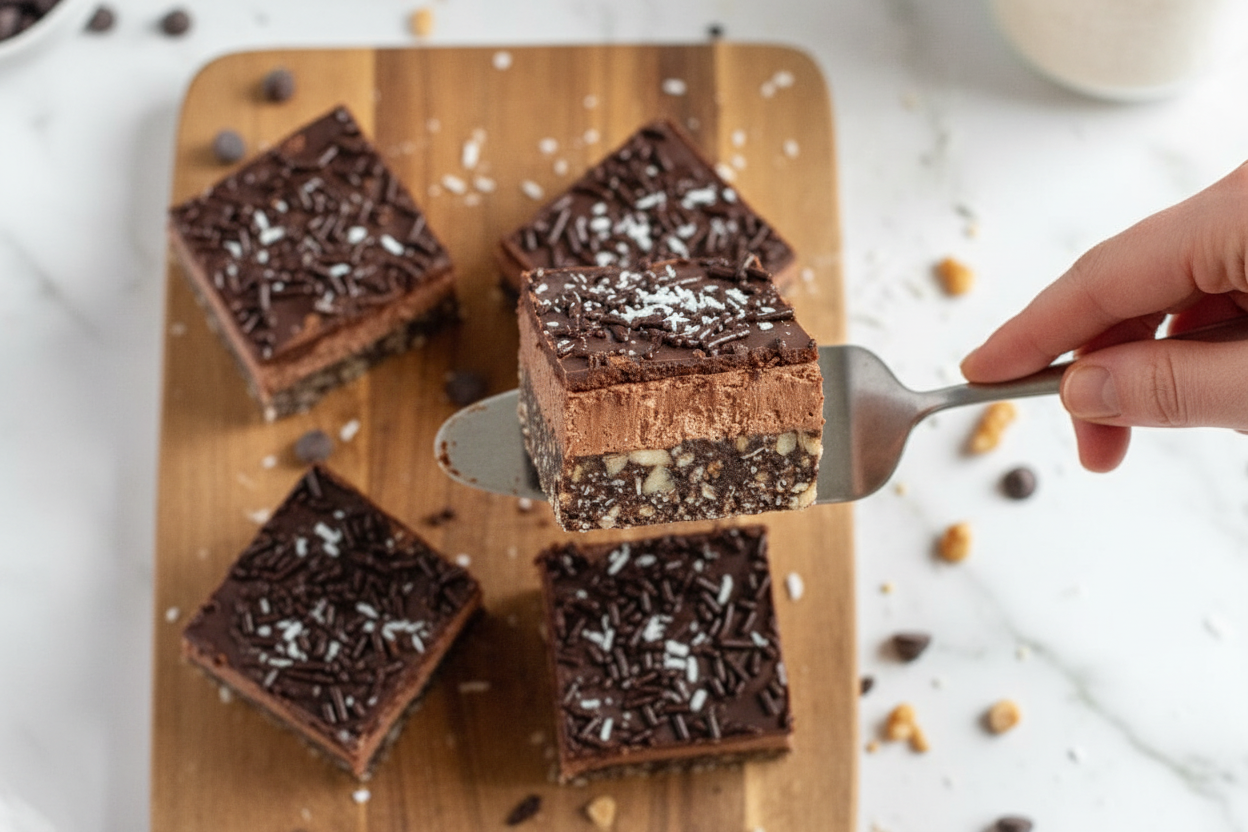
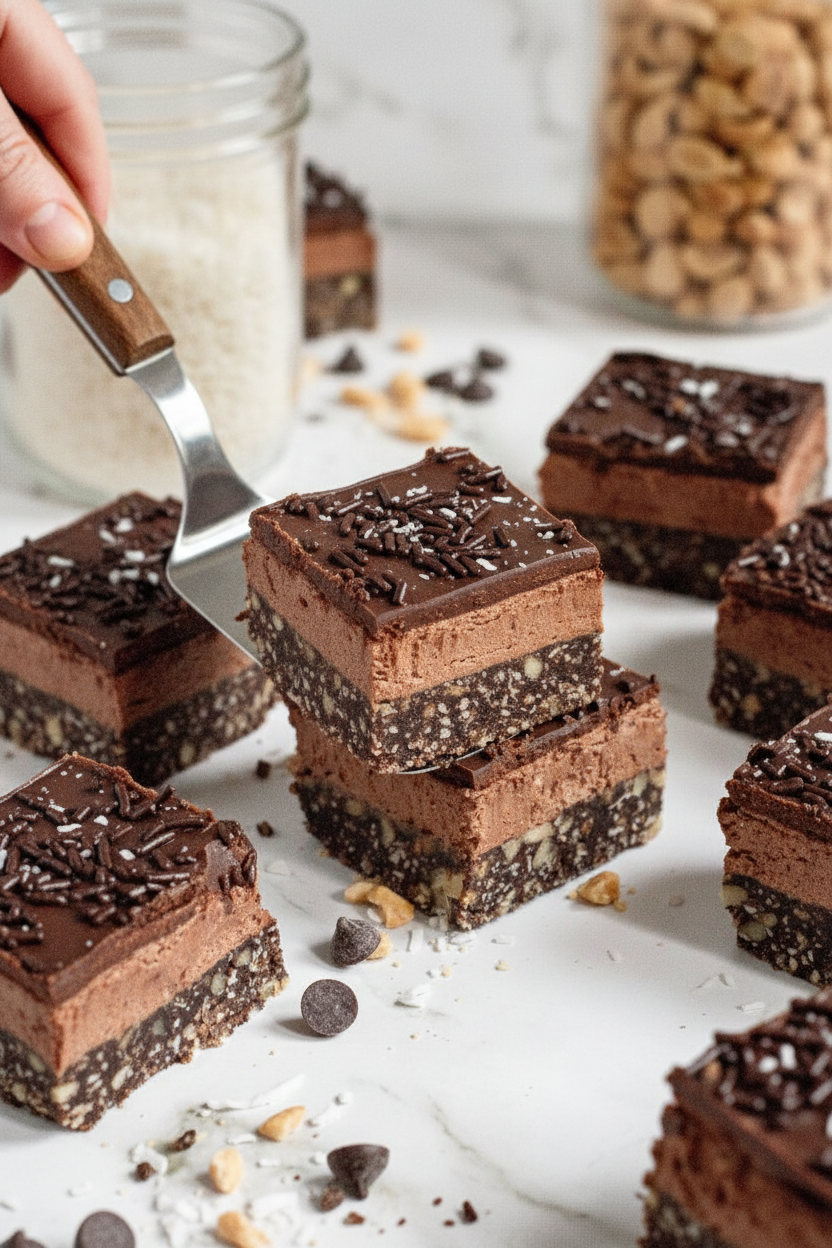
Think of this recipe like a sandwich. But instead of bread, you have three cozy layers. The bottom is a little crunchy with graham crackers, coconut, and walnuts. The middle is a creamy, whipped chocolate frosting. The top is a smooth shell of melted chocolate. Every bite gives you a different feeling. The crunch. The cream. The snap. That mix of textures is what makes you close your eyes and say “Mmmmm.” Doesnt that sound nice? Why does this matter? Because food is not just about taste. It is about how it feels in your mouth and how it makes you feel inside. This bar does both. And since it is gluten-free and vegan, everyone at the table can have a piece. That is a wonderful thing. Have you ever made a dessert that was safe for everyone to eat, but still tasted like a real treat?Where the Flavor Came From
This recipe reminds me of the 1950s. That is when no-bake cookies and bars really became popular. Moms wanted desserts that did not heat up the whole kitchen in summer. They used simple things like graham crackers, butter, and cocoa powder. Those old recipes were not vegan or gluten-free. But the idea was the same: make something fast, no oven, that kids would love. I think that spirit of generosity—making something good for the people you love—is still alive in this kitchen today. The fun fact here is that graham crackers were invented in 1829 by a man named Sylvester Graham. He thought plain food made people healthier. But someone else added the chocolate and marshmallow for s’mores, and the world got happier. Sometimes rules are made to be broken with chocolate. So when you mix the coconut and walnuts into this base, you are continuing a long tradition. You are taking old ideas and making them work for today. Maybe you do not eat dairy or gluten. Or maybe you just want a dessert that feels light on your belly. That is okay. Those 1950s moms would be proud of you for adapting. Which old recipe from your family do you wish you could make gluten-free? I would love to hear about it.The Secret to the Middle Layer
Do not rush the middle layer. That is the frosting part. It asks you to beat it for five whole minutes. That feels long when you are hungry. But trust me, it matters. The butter and powdered sugar need that time to get fluffy and light. If you only mix for one minute, it will be flat and dense. You want it to be like a cloud. I sometimes set a timer on my phone and just let the mixer do the work. I walk away and wipe the counter. By the time I come back, the frosting is ready. That little patience makes a big difference in how the bar feels when you eat it. Have you ever ruined a recipe because you were impatient? I have done it many times. We can learn together.How to Get the Perfect Top
The top layer is just chocolate chips and milk. Easy. But be careful with the microwave. Heat for 30 seconds, stir, then do it again. Do not just blast it for two minutes. Burnt chocolate tastes bitter and sad. You want it shiny and smooth. When you pour it over the frosting, use a spatula to spread it gently. Do not push too hard or you will mix the top into the middle. Think of it like spreading butter on a soft roll. Light touch. Then you can add sprinkles or a little extra shredded coconut on top while the chocolate is still wet. That makes it look fancy with almost no effort. I love a dessert that looks like I tried hard when really I just threw some sprinkles on top. Dont you love that trick too?Why You Should Make These Today
Life gets busy. You do not always have time to bake for an hour. These bars go from your bowl to your fridge in about 15 minutes. Then you wait one hour. That is it. You get a whole pan of chocolate happiness. And since they keep in the fridge for five days, you have a snack ready for after school or late at night. I like to cut them into small squares. Then I pretend I am being healthy by only eating one. That never works. But it is worth trying. What is your favorite kind of easy dessert to make when you are short on time? I am always looking for new ideas.One Last Tip Before You Go
When you take the pan out of the fridge, let it sit on the counter for five minutes before cutting. If the chocolate is too cold, it can crack. A little warmth helps it cut clean. Use a sharp knife and wipe it between cuts. That gives you neat bars that look like they came from a bakery. But they came from your kitchen. That is better. And if you make a mess, just call it rustic. I call my messy ones “artisan.” It sounds fancy. I hope you try this recipe and love it. I would love to see a photo of your bars when they are done. Share one with me if you can. Happy kitchen adventures, my friend.Ingredients:
| Ingredient | Amount | Notes |
|---|---|---|
| Vegan salted butter | 1/2 cup (114g) | Melted, for base layer |
| Gluten-free graham cracker crumbs | 1 3/4 cups (210g) | Base layer |
| Unsweetened shredded coconut | 1 cup (120g) | Base layer |
| Chopped walnuts | 1/2 cup (60g) | Base layer |
| Granulated sugar | 2 tablespoons (25g) | Base layer |
| Unsweetened cocoa powder | 2 tablespoons (11g) | Base layer |
| Vegan salted butter | 1/2 cup | Softened, for middle layer |
| Powdered sugar | 2 cups (240g) | Middle layer |
| Unsweetened cocoa powder | 2 tablespoons (11g) | Middle layer |
| Vegan milk | 1 tablespoon (15ml) | Middle layer |
| Fine sea salt | 1/4 teaspoon | Middle layer |
| Vegan chocolate chips | 3/4 cup (126g) | Top layer |
| Vegan milk | 6 tablespoons (90ml) | Top layer |
| Vegan chocolate sprinkles | optional | For decor |
| Shredded coconut | optional | For decor |
Why These Bars Make Me Feel Like a Kid Again
I remember the first time I made these gluten-free vegan no-bake chocolate bars. My grandkids were coming over, and I wanted something sweet they could help with. No oven needed, which meant less mess and more fun. We stood in the kitchen, sneaking little bites of coconut and chocolate chips. I still laugh at how my youngest tried to “test” the middle layer with his finger before I even spread it.
These bars have three layers: a crunchy base, a creamy middle, and a shiny chocolate top. Each layer has its own job, like a little team working together. The base is like a sandy path you press down tight. The middle is soft and fluffy, like a cloud of cocoa. And the top? It’s the shiny crown that makes you smile.
You don’t need fancy tools or hard-to-find ingredients. Just a mixing bowl, a pan, and a little patience. My secret? Let the bars chill in the fridge for a full hour. If you hurry, they fall apart. And trust me, you want them to hold together so you can share the joy. What is your favorite no-bake dessert? Share below!
Let’s Make These Bars, Step by Step
Grab your apron and let’s get started. I’ll walk you through each step like we’re in my kitchen together. These bars are simple, but don’t rush. Good things take a little love and time.
Step 1: Take an 8×8-inch baking pan and spray it with non-stick spray. Then lay two pieces of parchment paper in a crisscross pattern so the bars lift out easily later. Set the pan aside for now. I once forgot the parchment and had to dig the bars out with a spatula. Not fun. Step 2: In a big bowl, mix the melted butter, graham cracker crumbs, shredded coconut, chopped walnuts, sugar, and cocoa powder. Stir until it looks like wet sand. Press this mixture into the prepared pan very firmly. (Hard-learned tip: Use the bottom of a glass to press it down really tight. If it’s loose, the base crumbles when you cut it.) Step 3: Now make the creamy middle layer. In a stand mixer or with a hand mixer, beat the softened butter, powdered sugar, cocoa powder, vegan milk, and salt. Start on low so the powder doesn’t fly everywhere. Then turn it to high and beat for five full minutes. It will get light and fluffy, like frosting. Step 4: Spread that fluffy frosting evenly over the base layer. Use a spatula to smooth it out to the edges. Take your time here. A nice even layer means every bite tastes the same. Set it aside while you melt the chocolate. Doesn’t that smell amazing already? Step 5: Put the chocolate chips and milk in a small microwave-safe bowl. Heat for 30 seconds, stir, then heat again until smooth. You can also do this on the stove in a small pot. Pour the melted chocolate over the frosting layer and spread it gently. Add sprinkles or extra coconut on top if you like. Step 6: Place the pan in the fridge to chill for at least one hour. This is the hardest part because you’ll want to sneak a taste. But wait. When it’s firm, lift the bars out using the parchment and cut into squares. Store leftovers in the fridge for up to five days, or freeze for up to six months. Cook Time: 5 minutes (plus 1 hour chilling)Total Time: 1 hour 15 minutes
Yield: 9 to 12 bars
Category: Dessert, Snack
Three Fun Twists to Try Next Time
Once you master the original, you can play around. These twists keep the bars fun and new. I love trying a different flavor every month.
Peanut Butter Dream: Swap the walnuts for crushed peanuts and add 2 tablespoons of peanut butter to the middle layer. It turns into a peanut butter cup bar. So good. Mint Chocolate Cool: Add 1/2 teaspoon of mint extract to the melted chocolate top layer. Sprinkle crushed peppermint candies on top for a holiday feel. Fruity Sunrise: Fold 1/4 cup of dried cranberries or chopped dried cherries into the base layer. The tart fruit cuts the sweet chocolate perfectly. Which one would you try first? Comment below!How to Serve and What to Sip
These bars are lovely on their own, but a little extra makes them special. Serve them on a pretty plate with a few fresh berries on the side. The berries add a pop of color and a fresh taste. You can also dust the top with a tiny pinch of flaky sea salt before serving. That salt makes the chocolate sing.
For a cozy afternoon, pair a bar with a tall glass of cold oat milk. The creamy milk balances the rich chocolate. If you’re having grown-up guests, a small cup of warm coffee or a glass of red wine works well too. The chocolate loves a little coffee friend. Which would you choose tonight?
Storing Your Chocolate Bars the Right Way
These bars need to stay cold. Keep them in the fridge in an airtight container. They will stay fresh for up to five days. I once forgot a batch on the counter overnight. The chocolate got soft and the base fell apart. Now I always pop them straight into the fridge. You can also freeze them for up to six months. Just wrap each bar in wax paper and put them in a freezer bag. To thaw, set one on the counter for ten minutes. Have you ever tried storing it this way? Share below!
Batch cooking these bars is a big time-saver. Make a double batch on Sunday. You will have treats ready for school lunches or after-dinner snacks all week long. This matters because it keeps you from reaching for store-bought sweets. You know exactly what is in each bite. *Fun fact: These bars taste even better on day two, after the flavors have settled together in the fridge.*
Three Common Problems and Easy Fixes
The first problem is a crumbly base. This happens when you do not press the mixture down hard enough. Use the bottom of a glass to really pack it flat. I remember helping my niece make these. She patted it gently and the whole base fell apart when we cut it. So press firmly, friends.
The second problem is a middle layer that is too soft. You need to beat the butter and sugar for the full five minutes. This whips in air and makes the frosting fluffy. If you stop early, it will be runny and messy. Why this matters: A stable middle layer gives you clean, pretty slices every time.
The third problem is the top chocolate cracking when you cut it. Let the bars sit at room temperature for five minutes before slicing. Use a sharp knife and wipe it clean between cuts. This makes each bar look perfect. Which of these problems have you run into before?
Quick Questions and Answers
Q: Are these bars truly gluten-free?
A: Yes, if you use certified gluten-free graham cracker crumbs. Check the label on your box.
Q: Can I make them ahead of time?
A: Yes. Make them the night before and chill in the fridge. They taste even better the next day.
Q: Can I swap the walnuts for something else?
A: Sure. Use pecans, almonds, or even sunflower seeds for a nut-free version.
Q: How do I double the recipe?
A: Use a 9×13-inch pan and double every ingredient. Press the base firmly and chill longer.
Q: What can I add on top?
A: Sprinkle sea salt flakes, extra coconut, or crushed peppermint on top. Which tip will you try first?
A Warm Send-Off from Chloe
I hope you love these bars as much as my family does. They are fun to make with kids on a rainy afternoon. The no-bake part means you do not need to heat up the kitchen. I love hearing about your kitchen adventures. Have you tried this recipe? Tag us on Pinterest! Share a photo and tell me how they turned out. Happy cooking!
—Chloe Hartwell.


Leave a Reply