

The Day I Learned to Cheat on My Diet
My friend Becky once said I was a “dessert traitor.” I had told her I was cutting out gluten. Then I showed up at her door with this Oreo cheesecake. She just laughed and grabbed a fork. The truth is, I love finding ways to keep the good stuff in our lives. This recipe proves you don’t need fancy flours or weird tricks. You just need good ingredients and a little patience. Have you ever had a dessert that made you forget it was “special”?Why the Crust Matters Most
I remember my first gluten-free crust. It fell apart like sad sand. My kitchen looked like a crime scene. But this one is different. The butter and salt hold everything together like a hug. That pinch of salt is my secret weapon. It wakes up the chocolate flavor. It makes the Oreo taste even more like itself. *Fun fact: Oreos were first made in 1912 and were originally called “Oreo Biscuits.”* When you press the crust into the pan, press firmly. Think of it like making a sandcastle. You want it to stick. Does your family fight over the crust pieces like mine does?The Cream Cheese Lesson My Grandma Taught Me
My grandma never let cold cream cheese into her kitchen. She would set it on the counter for an hour. “Cream cheese needs to soften like a stubborn heart,” she would say. This matters because cold cream cheese makes lumpy filling. Lumpy filling makes a sad cheesecake. We are not here for sad cheesecake. We are here for smooth, dreamy slices that melt on your tongue. Why this matters: Room temperature ingredients mix better. They create a silky texture. Your patience pays off in every single bite. What kitchen trick did your grandma teach you?The Whipped Cream Magic Trick
I still laugh at the first time I tried to whip cream by hand. My arm got so tired I had to stop and eat a spoonful of sugar. Now I use a mixer and it takes two minutes. Two minutes! Here is the important part: fold the whipped cream into the cream cheese gently. Do not stir like you are angry at it. Use a soft, cutting motion. You want the air bubbles to stay put. Those bubbles make your cheesecake light and fluffy. Doesn’t that smell amazing? The vanilla and cream together smell like a bakery. Why this matters: Over-mixing makes a dense, heavy cheesecake. Gentle folding keeps it cloud-like.The Waiting Game (Worth Every Second)
I know six hours sounds like forever. The first time I made this, I checked it every thirty minutes. My fridge door probably wore out. But overnight is the true magic. While you sleep, the flavors get to know each other. The Oreo pieces soften just a little. The cream cheese sets into perfect slices. It is like the cheesecake is dreaming itself into being. I once tried to rush it after four hours. The middle was still gooey. I served it anyway. My guests were polite but I saw their forks dripping. Never again. Have you ever ruined a dessert by being impatient?Toppings and Tiny Victories
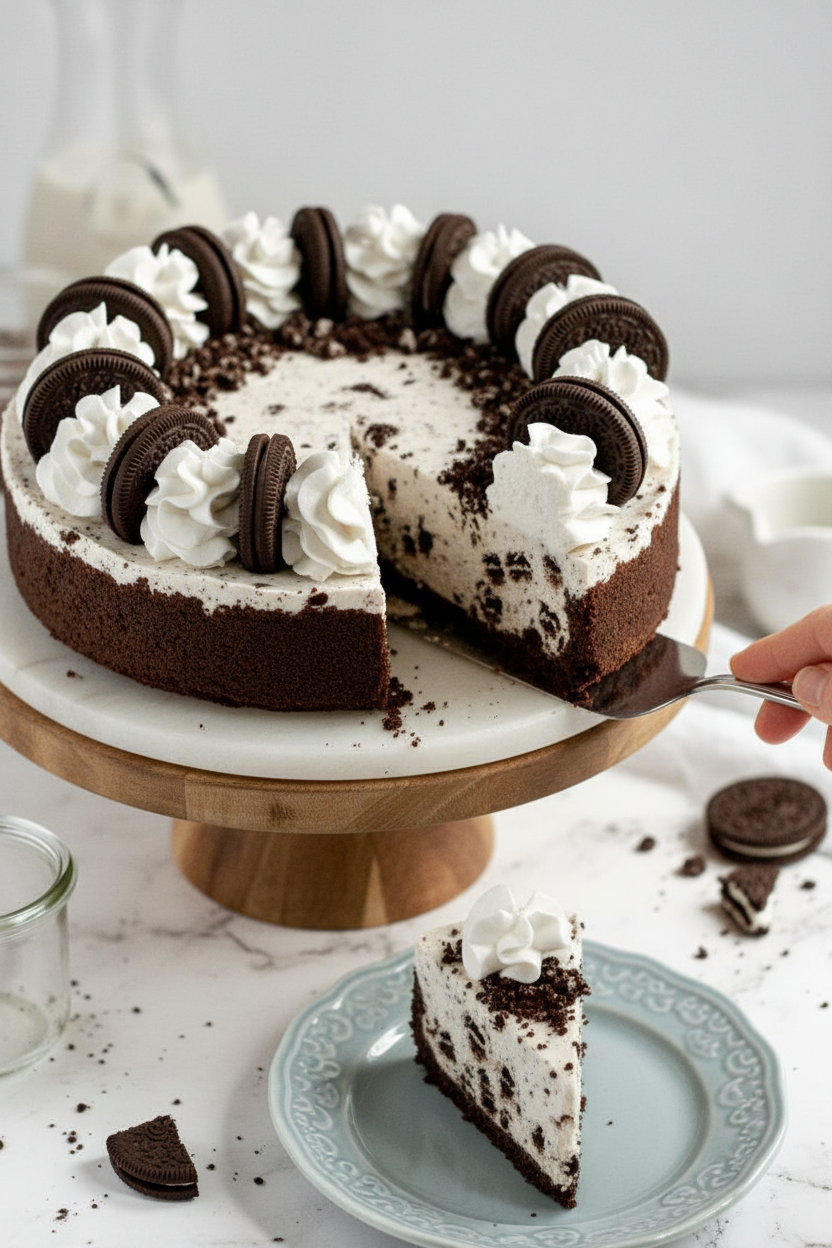
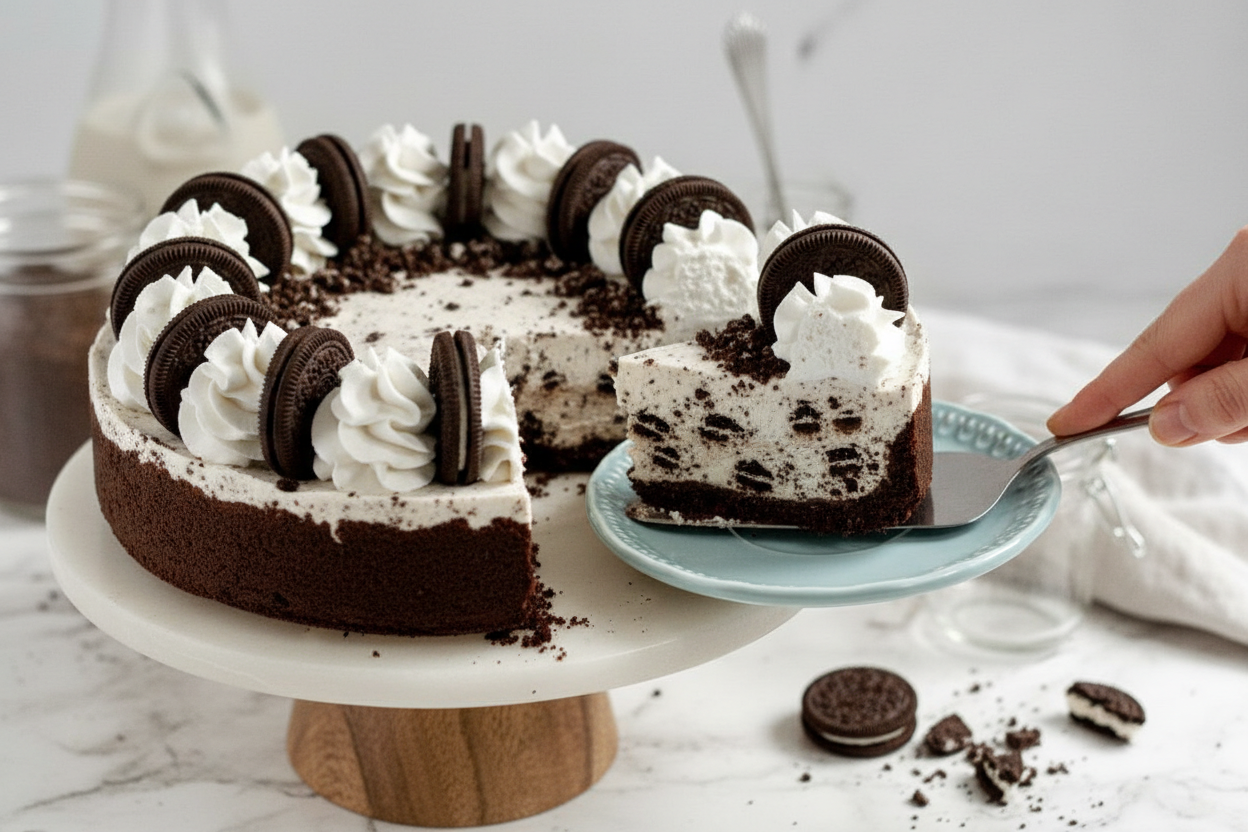
The whipped topping is like a crown for your cheesecake. I like to pile it high. Then I crush extra Oreos on top. Sometimes I add a drizzle of chocolate syrup if I am feeling fancy. Here is a tip: take the cheesecake out of the springform pan before you add the topping. If you try to do it after, the whipped cream gets all over your hands. I know this from experience. I still find sticky spots on my counter. One last question for you: Would you rather have one giant slice or two small slices with extra whipped cream? I am a two-slice person myself.Ingredients:
| Ingredient | Amount | Notes |
|---|---|---|
| Crushed Oreos | 3 cups (400g) | approximately 35 Oreos |
| Butter, melted | 5 tablespoons (75ml) | regular or plant-based |
| Fine sea salt | 1 pinch | for crust |
| Cream cheese, room temperature | 3 cups (24oz/696g) | regular or plant-based |
| Granulated sugar | 1/2 cup (100g) | |
| Vanilla extract | 1 teaspoon | |
| Fine sea salt | 1/4 teaspoon | |
| Heavy whipping cream, cold | 1 1/4 cup (300ml) | regular or plant-based |
| Powdered sugar | 1/2 cup (60g) | |
| Roughly chopped gluten-free Oreos | 2 cups (100g) | approximately 9 Oreos |
| Heavy whipping cream, cold | 1 cup (240ml) | for whipped topping, regular or plant-based |
| Powdered sugar | 1/4 cup (30g) | for whipped topping |
| Oreos for decor | optional |
My Grandma’s Secret to the Best No-Bake Oreo Cheesecake
I still remember the first time I made this for my niece. She took one bite, looked at me with big eyes, and whispered, “This is magic.” And you know what? She was right. This cheesecake is creamy, crunchy, and so dreamy. Best part? No oven needed. That means no sweating over a hot kitchen in summer. Just a fridge and a little patience. Doesn’t that sound nice?
This recipe works for everyone. It’s gluten-free and vegan if you pick the right ingredients. I swapped in plant-based butter and cream cheese once, and nobody even noticed. The secret is letting the fridge do all the hard work. You just mix, press, and wait. Easy as pie—well, easier than pie, actually. I still laugh at how simple it is.
Before we start, here’s a little quiz for you. Have you ever tried a no-bake cheesecake before? If you had to pick, would you rather have chocolate or vanilla in your dessert? Share below! I’ll bet you pick chocolate once you see those Oreos in there. Now, let’s get our hands busy.
Let’s Make the Cheesecake – Step by Step
Step 1: First, make the crust. Grab a big mixing bowl and toss in 3 cups of crushed gluten-free Oreos (about 35 cookies). Pour in 5 tablespoons of melted butter (regular or plant-based) and a pinch of salt. Mix with a fork until it looks like wet sand. (If it feels too dry, add one more tiny splash of melted butter. Trust me on this.) Press it firmly into the bottom and up the sides of your springform pan. Pop it in the fridge to chill while you make the filling.
Step 2: Now for the creamy part. In a large bowl, beat 3 cups of room-temperature cream cheese with 1/2 cup sugar, 1 teaspoon vanilla, and 1/4 teaspoon salt. Beat until it’s smooth and fluffy—about 2 minutes. Don’t rush this step. If your cream cheese is too cold, you’ll get lumps. (Hard-learned tip: Set your cream cheese on the counter an hour early. Cold cheese makes lumpy cheesecake!) Set this bowl aside for now.
Step 3: In a separate bowl, pour in 1 1/4 cups of cold heavy whipping cream and add 1/2 cup powdered sugar. Whip on high speed for about 2 minutes until stiff peaks form. That means when you lift the beater, the cream stands up in a point. Don’t over-whip or you’ll get butter! Gently fold this fluffy cream into your cream cheese mixture. Fold slowly, like you’re tucking in a blanket, so you don’t lose all the air.
Step 4: Chop up about 2 cups of gluten-free Oreos (roughly 9 cookies) into small chunks. Fold them gently into the cheesecake filling. Spread this lovely mixture into your chilled crust. Smooth the top with a spatula. Cover with plastic wrap and refrigerate for at least 6 hours—overnight is even better. This is the hardest part: waiting. But I promise, it’s worth every second.
Step 5: Time for the whipped topping! In a clean bowl, whip 1 cup of cold heavy cream with 1/4 cup powdered sugar on high until stiff peaks form—about 2 minutes. Once your cheesecake is fully set, remove it from the springform pan. Spread or pipe the whipped cream on top. Decorate with a few Oreos if you like. Slice, serve chilled, and watch everyone smile. Store leftovers in the fridge for up to 5 days—if they last that long!
Cook Time: 6 hours to overnight
Total Time: 6 hours 15 minutes
Yield: 10 to 12 servings
Category: Dessert
Three Fun Twists to Try
Mint Chocolate Dream: Swap the vanilla extract for 1/2 teaspoon peppermint extract. Crush a few Andes mints on top. It tastes like a cool, minty hug.
Peanut Butter Swirl: Warm 1/2 cup peanut butter in the microwave for 20 seconds. Drizzle it into the filling and swirl with a knife before chilling. Salty, sweet, and super creamy.
Berry Berry Nice: Add 1/2 cup fresh raspberries or sliced strawberries to the filling along with the Oreos. The tart fruit cuts the sweetness perfectly. Which one would you try first? Comment below!
How to Serve and Sip
This cheesecake is rich, so a small slice goes a long way. I like to serve it with a handful of fresh berries on the side. A little drizzle of chocolate sauce or caramel makes it extra fancy. For a crunchy touch, sprinkle crushed Oreos right on the whipped cream.
For drinks, pour a tall glass of cold oat milk or a milky chai latte. Grown-ups might enjoy a sweet dessert wine like a Moscato d’Asti. It matches the creamy vanilla and chocolate notes beautifully. Which would you choose tonight?
How to Store Your Oreo Cheesecake (And Why It Matters)
This cheesecake loves the fridge. Keep it in an airtight container for up to five days. The flavors get even better after a day or two. I once made two cheesecakes for a party and hid one in the back of the fridge. My family found it the next morning and ate it for breakfast with big smiles. That is when I learned why storing it right keeps it safe and tasty.
You can also freeze this cheesecake for up to three months. Wrap it tightly in plastic wrap, then foil. Thaw it overnight in the fridge before serving. This is perfect for batch cooking. Make two at once and save one for a busy week. Have you ever tried storing it this way? Share below! Storing ahead means you always have a special dessert ready for guests or a tough day. That matters because homemade treats remind us we are loved.
Three Common Problems and Easy Fixes
First, the crust can be too crumbly. This happens if your butter is not fully mixed in. Next time, press it firmly into the pan with the back of a spoon. I remember my first cheesecake crust fell apart like sand. My grandma laughed and showed me to use a flat glass to press it down. Now I never skip that step.
Second, the filling can feel lumpy. Make sure your cream cheese is soft at room temperature before mixing. Cold cream cheese makes lumps that will not go away. Soft cream cheese blends smooth as silk. Third, the whipped cream might fall flat. Whip it on high speed for exactly two minutes. Stop the moment you see stiff peaks. Over-whipping turns it into butter. Which of these problems have you run into before?
Why does this matter? Because fixing these small things builds your confidence in the kitchen. You learn to trust your eyes and hands. Also, a smooth cheesecake tastes twice as good as one with lumps. You deserve that first perfect bite.
Your Top 5 Questions Answered
Q: Can I use regular Oreos instead of gluten-free?
A: Yes, if you do not need gluten-free. The recipe works the same with regular Oreos.
Q: How far ahead can I make this cheesecake?
A: Make it up to two days early. Keep it in the fridge until serving.
Q: Can I swap the heavy cream for something lighter?
A: Heavy cream makes the filling thick and fluffy. Lighter creams will make it runny.
Q: What if I have an 8-inch pan instead of 9-inch?
A: Use the 8-inch pan. Your cheesecake will be a little taller and take an extra 30 minutes to chill.
Q: Can I skip the whipped topping?
A: Yes, but it adds a lovely light finish. It is like a cloud on top of the rich cheesecake. Which tip will you try first?
A Sweet Goodbye from Chloe
Thank you for spending time in the kitchen with me. I hope this cheesecake brings your family as much joy as it brings mine. Remember, cooking is about sharing love one bite at a time.
If you make this recipe, snap a photo and share it with us. Have you tried this recipe? Tag us on Pinterest! I would love to see your beautiful cheesecake. Happy cooking!
*Fun fact: Oreos were invented in 1912, but the first cheesecake goes back to ancient Greece. Two classics, one perfect dessert.
—Chloe Hartwell.
Gluten-Free Vegan Oreo Cheesecake Recipe
Description
Indulge in a rich, creamy gluten-free vegan Oreo cheesecake. This easy dessert is a decadent dairy-free treat everyone will love.
Ingredients
Crust
Filling
Whipped Topping
Instructions
- Prepare an 8 or 9-inch springform pan with parchment paper and non-stick baking spray.
- Press the mixture into the bottom and up the sides of the prepared pan.
- Place the crust in the fridge to chill.
- In another mixing bowl, whip the heavy whipping cream and powdered sugar together on high speed until stiff peaks form. This should take approximately 2 minutes.
- Gently fold the whipped cream into the cream cheese mixture until fully combined. Be careful to not beat the air out of the whipped cream.
- Gently fold the chopped Oreos into the cheesecake filling.
- Spread the Oreo cheesecake filling into the prepared crust and refrigerate for at least 6 hours, or preferably, overnight, until set.
- Remove the fully chilled and set cheesecake from the springform pan and top it with the whipped cream and Oreos. Serve chilled and enjoy!
In a mixing bowl, combine all of the ingredients and mix until a coarse, sandlike texture is achieved.
In a stand mixer or large mixing bowl with an electric mixer, beat the cream cheese, granulated sugar, vanilla, and salt together until smooth. Set aside.
In a stand mixer or medium mixing bowl with an electric mixer, add the heavy whipping cream and powdered sugar and whip on high until stiff peaks form. This should take approximately 2 minutes.
Notes
- Store leftover Oreo cheesecake in the fridge in an airtight container for up to 5 days or frozen for up to 3 months.


Leave a Reply