

Ingredients:
| Ingredient | Amount | Notes |
|---|---|---|
| All-purpose flour | 4 cups | |
| Sugar | 2 tablespoons | |
| Salt | 1 tablespoon | |
| Active dry yeast | 1 tablespoon | |
| Warm water | 1.5 cups | About 110°F |
| Unsalted butter | 2 tablespoons | Melted |
The Bread That Fills the House with Love
I still remember the first loaf I baked all by myself. I was maybe eleven, standing on a stool so I could reach the counter. The kitchen smelled like a warm hug for hours after. There is nothing quite like the feeling of pulling a golden-brown loaf out of your own oven. Doesn’t that smell amazing just thinking about it?
This recipe is the one my own grandma taught me, written on a crinkled card she kept in her apron pocket. It never fails, even for beginners. The secret is patience and a little bit of love. Trust me, the first time you slice into your own warm bread, you’ll feel like a real baker. Let me walk you through it, step by simple step.
Step 1: Grab a big mixing bowl. Add 2 cups of flour, the sugar, salt, and the packet of yeast. Stir them together with a wooden spoon until everything looks evenly mixed. I always pretend I’m stirring a potion when I do this. It makes the job feel like a game.
Step 2: Pour in the warm water very slowly while you stir. The water should feel like a nice warm bath, not hot. Keep stirring until the flour and water combine into a sticky, lumpy batter. (Hard-learned tip: If the water is too hot, it will kill the yeast and your bread won’t rise. Test it on your wrist like a baby bottle!)
Step 3: Now pour in the melted butter. Stir it in until it disappears. Then, add the rest of the flour, one cup at a time. Keep stirring until the dough gets too thick for the spoon. When that happens, it is time to use your hands.
Step 4: Sprinkle some flour on your counter and plop the dough out. Now comes the fun part: kneading! Push the dough away from you with the palm of your hand, fold it over, and turn it. Do this for about 8 to 10 minutes. Your dough should feel smooth and bouncy, like a squishy pillow. I like to sing a silly song while I knead. It makes the time fly.
Step 5: Put the smooth dough ball back into the bowl. Cover it tightly with a kitchen towel. Set it in a warm, draft-free spot and wait for one hour. The dough will double in size, like magic. Isn’t it neat how a blob of flour can grow that big? What is your favorite thing to put on fresh bread? Share below!
Step 6: Preheat your oven to 350 degrees. Punch the dough down with your fist. This part is very satisfying. Then, take the dough out, shape it into a loaf, and place it in a greased loaf pan. Cover it with the towel again and let it rise for another 30 minutes. It will puff up nicely.
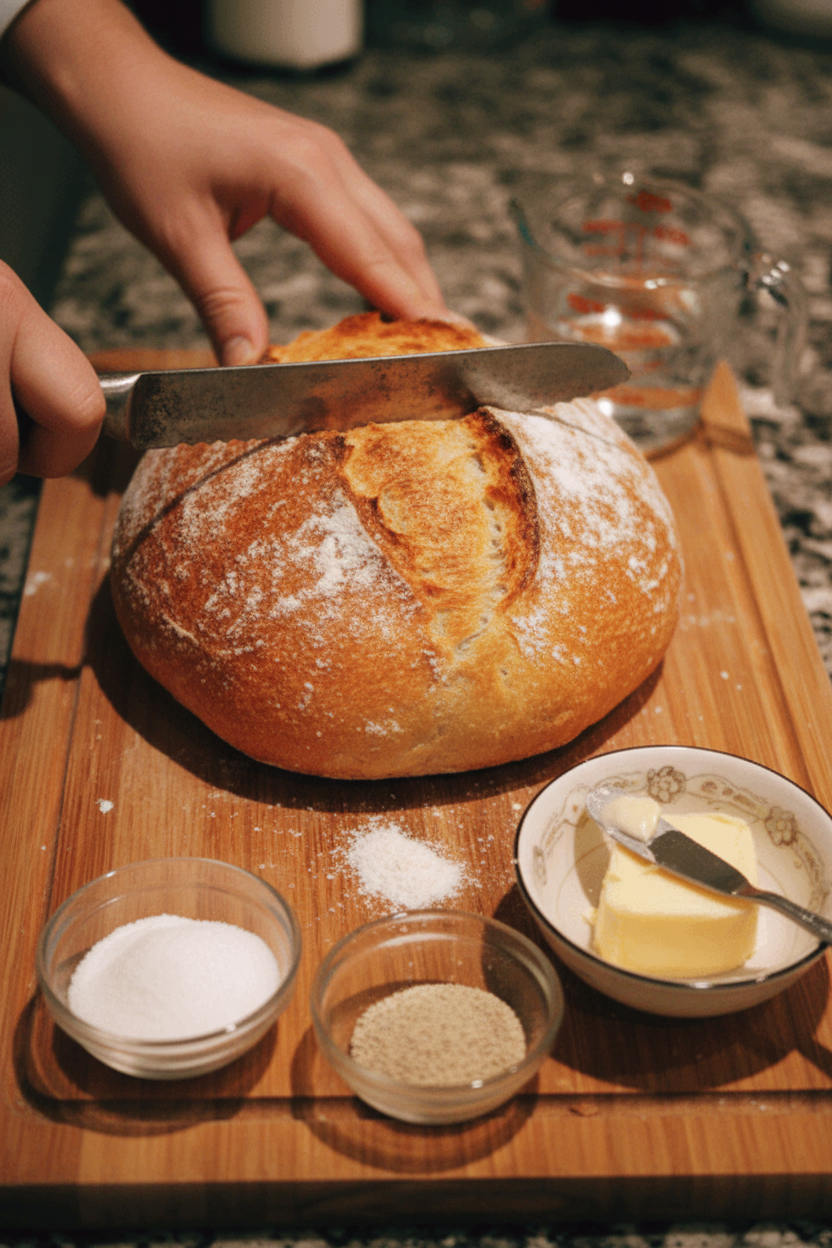
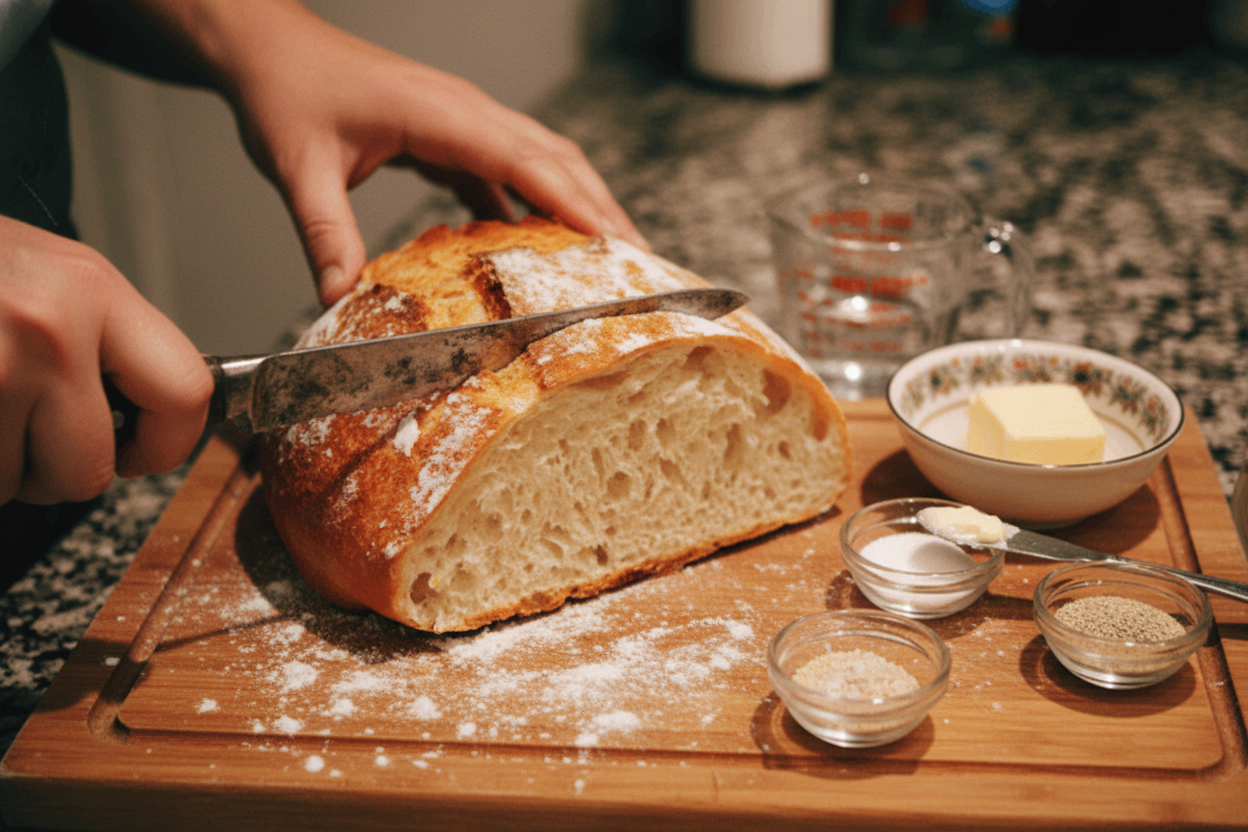
Step 7: Bake the loaf for about 30 minutes. It is done when the top is a deep golden brown. Tap the bottom of the loaf with your finger. If it sounds hollow, like a drum, it is perfect. Let it cool in the pan for 10 minutes, then move it to a wire rack. Try not to tear into it right away, even though it is so hard to wait!
Cook Time: 30 minutes
Total Time: 2 hours 10 minutes
Yield: 1 loaf, about 12 slices
Category: Bread, Side Dish
Three Fun Twists to Try
Once you master the plain loaf, you can play dress-up with your bread! Here are three of my favorite ways to change it up. They are all easy and add a little surprise to each slice. Which one would you try first? Comment below!
Cheesy Garlic Bread: Before you bake, sprinkle shredded cheddar and a pinch of garlic powder right on top of the dough. It melts into a crispy, cheesy crust that is impossible to resist.
Cinnamon Swirl Bread: After you punch down the dough, roll it out flat. Brush it with butter and sprinkle cinnamon and sugar all over. Roll it up like a log before putting it in the pan. Your kitchen will smell like a bakery.
Herb and Sun-Dried Tomato Bread: Add a tablespoon of dried rosemary or oregano and a handful of chopped sun-dried tomatoes when you add the flour. It makes a beautiful loaf that is perfect for dipping in olive oil.
How to Serve Your Homemade Bread
Fresh bread is a star all on its own, but it loves company too. Slice it thick and serve it with a bowl of tomato soup for the coziest lunch. You can also toast a slice and pile it high with mashed avocado and a sprinkle of salt. For dinner, it is wonderful alongside a simple salad or a plate of pasta.
For a drink, you can pour a tall glass of cold milk, which is the classic choice. Grown-ups might enjoy a glass of red wine, like a Merlot, which tastes lovely with the crust. No matter what you pick, the bread makes everything feel special. Which would you choose tonight?
How to Store Your Homemade Bread
Fresh bread is a gift. To keep it soft, wrap it tightly in plastic wrap or a clean kitchen towel. Store it at room temperature for up to three days. Do not put it in the fridge. The cold air dries the bread out fast.
For longer storage, slice the loaf first. Place the slices in a freezer-safe bag. Press out the air and seal it tight. Frozen bread stays fresh for up to three months. I once forgot a loaf in the freezer for months. When I reheated a slice, it tasted just like fresh bread. That was a happy surprise.
To reheat, pop a slice in the toaster or warm the whole loaf in a 350°F oven for 10 minutes. This brings back the crust’s crunch. Batch cooking matters here. Make two loaves at once, freeze one, and have bread ready for busy days. Have you ever tried storing it this way? Share below!
Common Bread Problems and Easy Fixes
Hard, dry bread is a common problem. This usually means you added too much flour. Next time, add flour just a little at a time until the dough feels soft but not sticky. I remember when my first loaf turned out like a rock. My grandma said, “Let the dough tell you what it needs.”
Another issue is bread that doesn’t rise. This often means the water was too hot or too cold. Yeast likes warm water around 110°F. If the water burns your wrist, it is too hot. Why this matters: Getting the temperature right builds your confidence in the kitchen. You learn to trust your hands.
The last problem is a dough that is too sticky to shape. Sprinkle a little flour on your hands and the counter. Knead gently for a minute more. Why this matters: Fixing sticky dough teaches you patience. And patience always makes better bread. Which of these problems have you run into before?
Your Bread Questions Answered
Q: Can I make this bread gluten-free?
A: Yes. Swap the all-purpose flour for a good gluten-free flour blend. Add 1 teaspoon of xanthan gum if the blend does not have it.
Q: Can I prepare the dough the night before?
A: Yes. After kneading, put the dough in the fridge, covered tight. Bake it in the morning for fresh bread at breakfast.
Q: What if I don’t have active dry yeast?
A: Use instant yeast instead. You can mix it right in with the flour without proofing it first.
Q: How do I double the recipe?
A: Simply double each ingredient. The rising time will stay about the same. Use a bigger bowl for the dough to grow.
Q: Can I add seeds or herbs?
A: Yes. Stir in 2 tablespoons of sesame seeds or dried rosemary with the flour. Which tip will you try first?
A Final Note from Chloe
I hope this recipe makes your kitchen smell like love. Baking bread is a small act that fills a whole home with warmth. Every loaf you make is a story worth sharing.
I would love to see your beautiful bread. Take a photo and share it online. Have you tried this recipe? Tag us on Pinterest! Your pictures make my day.
*Fun fact: The hollow sound a baked loaf makes is called the “bread song.” It tells you the crust is perfect.*
Keep baking, keep sharing, and keep showing up for yourself in the kitchen. Happy cooking! —Chloe Hartwell.

Grandma’s Perfect Homemade Bread Recipe and Tips
Description
Discover Grandma’s perfect homemade bread recipe with foolproof tips for soft, golden loaves every time. Easy, rustic, no-fail baking.
Ingredients
Instructions
- In a large mixing bowl, combine 2 cups of flour, sugar, salt, and active dry yeast. Mix well.
- Gradually add the warm water to the dry ingredients, stirring with a wooden spoon until the mixture is combined.
- Add the melted butter and continue adding the remaining flour, one cup at a time, until a soft dough forms.
- Once the dough comes together, turn it out onto a floured surface. Knead the dough for about 8-10 minutes until smooth and elastic.
- Place the kneaded dough back into the bowl and cover with a kitchen towel or plastic wrap. Let it rise in a warm area for about 1 hour, or until it has doubled in size.
- Preheat your oven to 350°F (175°C).
- Punch down the risen dough and transfer it to a lightly floured surface. Shape the dough into a loaf and place it into the greased loaf pan.
- Cover the loaf pan with a towel and let the dough rise for another 30 minutes, or until it’s puffed up.
- Bake the bread in the preheated oven for about 30 minutes, or until the top is golden brown and the bread sounds hollow when tapped on the bottom.
- Remove from the oven and let it cool in the pan for about 10 minutes. Then transfer it to a wire rack to cool completely.
Notes
- For a softer crust, brush the hot loaf with melted butter after baking.
My Very First Bread
I remember the first loaf I ever made all by myself. I was about your age. I mixed the flour and water all wrong. The dough was so sticky it glued my fingers together. I still laugh at that. My grandma just took my messy hands and showed me how to add a little more flour. She said bread is like a hug for the kitchen. Doesn’t that sound nice? Have you ever made something that turned into a sticky mess?Why Warm Water Is Your Best Friend
This recipe is very special because of one little secret: the warm water. It has to be warm, like a nice bath, not hot. About 110 degrees. If the water is too hot, it will kill the yeast. And yeast is the tiny worker that makes the bread puff up. *Fun fact: Yeast is alive! It is a tiny fungus that eats the sugar and burps out gas. That gas makes the dough rise.* Learning to love the little things, like warm water, makes a big difference in life. Does that make sense? When you add the warm water to the dry yeast and sugar, watch closely. After a few minutes, it will get foamy. That foamy look is the yeast waking up and saying hello. It means your bread will be light and fluffy. This is why you should never skip checking the water temperature. It is a small step that saves your whole loaf.The Squishy, Stretchy Part
Now comes the fun part: kneading. You take that soft dough and push it, fold it, and squish it. You do this for about eight to ten minutes. Your arms might get a little tired. But that is a good thing. The more you work the dough, the stronger and stretchier it gets. I once kneaded my dough for only five minutes, and the bread came out like a rock. We used it to prop open a door. This matters because kneading builds the gluten. Gluten is like the elastic bands in the bread that hold it together.Let It Take a Nap
After kneading, the dough needs to rest. You put it in a bowl, cover it with a clean towel, and let it sit. It needs to sit in a warm spot for about one hour. It will grow big, like a puffy pillow. This is called “rising.” You should not rush the rising time. I like to put my bowl near a sunny window. The warmth from the sun helps the dough feel cozy. Why do you think things need time to grow? A seed, a flower, or even a loaf of bread?Punch It and Bake It
Once the dough is big and puffy, you punch it down. Yes, punch it right in the middle! This pushes out the big gas bubbles so the bread has a nice, even texture. Then you shape it into a loaf and put it in a pan. Let it rest again for another 30 minutes. Preheat your oven to 350 degrees. When you bake it, your whole house will smell like a bakery. That smell is one of the best feelings in the world. Doesn’t that smell amazing just thinking about it?Ingredients:
| Ingredient | Amount | Notes |
|---|---|---|
| All-purpose flour | 4 cups | |
| Sugar | 2 tablespoons | |
| Salt | 1 tablespoon | |
| Active dry yeast | 1 tablespoon | |
| Warm water | 1.5 cups | About 110°F |
| Unsalted butter | 2 tablespoons | Melted |
The Bread That Fills the House with Love
I still remember the first loaf I baked all by myself. I was maybe eleven, standing on a stool so I could reach the counter. The kitchen smelled like a warm hug for hours after. There is nothing quite like the feeling of pulling a golden-brown loaf out of your own oven. Doesn’t that smell amazing just thinking about it?
This recipe is the one my own grandma taught me, written on a crinkled card she kept in her apron pocket. It never fails, even for beginners. The secret is patience and a little bit of love. Trust me, the first time you slice into your own warm bread, you’ll feel like a real baker. Let me walk you through it, step by simple step.
Step 1: Grab a big mixing bowl. Add 2 cups of flour, the sugar, salt, and the packet of yeast. Stir them together with a wooden spoon until everything looks evenly mixed. I always pretend I’m stirring a potion when I do this. It makes the job feel like a game.
Step 2: Pour in the warm water very slowly while you stir. The water should feel like a nice warm bath, not hot. Keep stirring until the flour and water combine into a sticky, lumpy batter. (Hard-learned tip: If the water is too hot, it will kill the yeast and your bread won’t rise. Test it on your wrist like a baby bottle!)
Step 3: Now pour in the melted butter. Stir it in until it disappears. Then, add the rest of the flour, one cup at a time. Keep stirring until the dough gets too thick for the spoon. When that happens, it is time to use your hands.
Step 4: Sprinkle some flour on your counter and plop the dough out. Now comes the fun part: kneading! Push the dough away from you with the palm of your hand, fold it over, and turn it. Do this for about 8 to 10 minutes. Your dough should feel smooth and bouncy, like a squishy pillow. I like to sing a silly song while I knead. It makes the time fly.
Step 5: Put the smooth dough ball back into the bowl. Cover it tightly with a kitchen towel. Set it in a warm, draft-free spot and wait for one hour. The dough will double in size, like magic. Isn’t it neat how a blob of flour can grow that big? What is your favorite thing to put on fresh bread? Share below!
Step 6: Preheat your oven to 350 degrees. Punch the dough down with your fist. This part is very satisfying. Then, take the dough out, shape it into a loaf, and place it in a greased loaf pan. Cover it with the towel again and let it rise for another 30 minutes. It will puff up nicely.
Step 7: Bake the loaf for about 30 minutes. It is done when the top is a deep golden brown. Tap the bottom of the loaf with your finger. If it sounds hollow, like a drum, it is perfect. Let it cool in the pan for 10 minutes, then move it to a wire rack. Try not to tear into it right away, even though it is so hard to wait!
Cook Time: 30 minutes
Total Time: 2 hours 10 minutes
Yield: 1 loaf, about 12 slices
Category: Bread, Side Dish
Three Fun Twists to Try
Once you master the plain loaf, you can play dress-up with your bread! Here are three of my favorite ways to change it up. They are all easy and add a little surprise to each slice. Which one would you try first? Comment below!
Cheesy Garlic Bread: Before you bake, sprinkle shredded cheddar and a pinch of garlic powder right on top of the dough. It melts into a crispy, cheesy crust that is impossible to resist.
Cinnamon Swirl Bread: After you punch down the dough, roll it out flat. Brush it with butter and sprinkle cinnamon and sugar all over. Roll it up like a log before putting it in the pan. Your kitchen will smell like a bakery.
Herb and Sun-Dried Tomato Bread: Add a tablespoon of dried rosemary or oregano and a handful of chopped sun-dried tomatoes when you add the flour. It makes a beautiful loaf that is perfect for dipping in olive oil.
How to Serve Your Homemade Bread
Fresh bread is a star all on its own, but it loves company too. Slice it thick and serve it with a bowl of tomato soup for the coziest lunch. You can also toast a slice and pile it high with mashed avocado and a sprinkle of salt. For dinner, it is wonderful alongside a simple salad or a plate of pasta.
For a drink, you can pour a tall glass of cold milk, which is the classic choice. Grown-ups might enjoy a glass of red wine, like a Merlot, which tastes lovely with the crust. No matter what you pick, the bread makes everything feel special. Which would you choose tonight?
How to Store Your Homemade Bread
Fresh bread is a gift. To keep it soft, wrap it tightly in plastic wrap or a clean kitchen towel. Store it at room temperature for up to three days. Do not put it in the fridge. The cold air dries the bread out fast.
For longer storage, slice the loaf first. Place the slices in a freezer-safe bag. Press out the air and seal it tight. Frozen bread stays fresh for up to three months. I once forgot a loaf in the freezer for months. When I reheated a slice, it tasted just like fresh bread. That was a happy surprise.
To reheat, pop a slice in the toaster or warm the whole loaf in a 350°F oven for 10 minutes. This brings back the crust’s crunch. Batch cooking matters here. Make two loaves at once, freeze one, and have bread ready for busy days. Have you ever tried storing it this way? Share below!
Common Bread Problems and Easy Fixes
Hard, dry bread is a common problem. This usually means you added too much flour. Next time, add flour just a little at a time until the dough feels soft but not sticky. I remember when my first loaf turned out like a rock. My grandma said, “Let the dough tell you what it needs.”
Another issue is bread that doesn’t rise. This often means the water was too hot or too cold. Yeast likes warm water around 110°F. If the water burns your wrist, it is too hot. Why this matters: Getting the temperature right builds your confidence in the kitchen. You learn to trust your hands.
The last problem is a dough that is too sticky to shape. Sprinkle a little flour on your hands and the counter. Knead gently for a minute more. Why this matters: Fixing sticky dough teaches you patience. And patience always makes better bread. Which of these problems have you run into before?
Your Bread Questions Answered
Q: Can I make this bread gluten-free?
A: Yes. Swap the all-purpose flour for a good gluten-free flour blend. Add 1 teaspoon of xanthan gum if the blend does not have it.
Q: Can I prepare the dough the night before?
A: Yes. After kneading, put the dough in the fridge, covered tight. Bake it in the morning for fresh bread at breakfast.
Q: What if I don’t have active dry yeast?
A: Use instant yeast instead. You can mix it right in with the flour without proofing it first.
Q: How do I double the recipe?
A: Simply double each ingredient. The rising time will stay about the same. Use a bigger bowl for the dough to grow.
Q: Can I add seeds or herbs?
A: Yes. Stir in 2 tablespoons of sesame seeds or dried rosemary with the flour. Which tip will you try first?
A Final Note from Chloe
I hope this recipe makes your kitchen smell like love. Baking bread is a small act that fills a whole home with warmth. Every loaf you make is a story worth sharing.
I would love to see your beautiful bread. Take a photo and share it online. Have you tried this recipe? Tag us on Pinterest! Your pictures make my day.
*Fun fact: The hollow sound a baked loaf makes is called the “bread song.” It tells you the crust is perfect.*
Keep baking, keep sharing, and keep showing up for yourself in the kitchen. Happy cooking! —Chloe Hartwell.


Leave a Reply