
Why I Love a Folded Dinner
I remember the first time my grandson asked me to make a “crunch wrap.” I had no idea what he meant. He showed me a picture on his phone, and I laughed. “That’s just a folded quesadilla with a secret inside,” I said. And he was right. The best part about this recipe is how you get to hide good things inside. Like broccoli and mushrooms. My kids would never eat those plain, but blended up? They gobble them down. Doesn’t that make you feel clever? *Fun fact: The phrase “crunch wrap” was made up by a big restaurant chain, but home cooks like us have been folding things into tortillas for hundreds of years.* I want to know: What is the one vegetable you never thought you’d eat in a wrap? Tell me about it in your mind as you read along.The Roasting Trick That Changes Everything
First, you chop the broccoli into little trees and slice the mushrooms thin. Then you toss them with olive oil and salt. Pop them in a hot oven until they get brown edges. That browning is where the magic happens. I still laugh at the time I forgot to set a timer. The veggies got a little too dark. But you know what? They tasted even better. Like little crunchy bits of caramel. Roasting brings out a sweetness you never knew was there. This matters because when you roast veggies, you don’t need a lot of fancy seasoning. The heat does the work for you. It’s nature’s flavor booster. And it makes your kitchen smell like a cozy fall day.A Bowl of Surprises
Once the veggies are cool, you blend them with guacamole and black beans. It turns into a thick, greenish paste. I know that sounds strange. But trust me. It’s like a creamy secret spread that nobody can guess. While that blends, you mix sour cream with shredded carrots. My neighbor saw me doing this once and asked if I was making carrot dip for a bunny. I said no, but I should try that next time. The carrots add a tiny bit of sweetness and a pretty orange color. Why does this matter? Because kids (and grown-ups) eat with their eyes first. If you hide the healthy stuff in a colorful paste, they take a bite before they can say “yuck.” I’ve tested this theory on six grandchildren. It works every time. Now I’m curious: Would you rather have crunchy chips inside your wrap or soft fillings only? I’m a chip girl myself, but I’d love to hear your pick.The Folding Secret
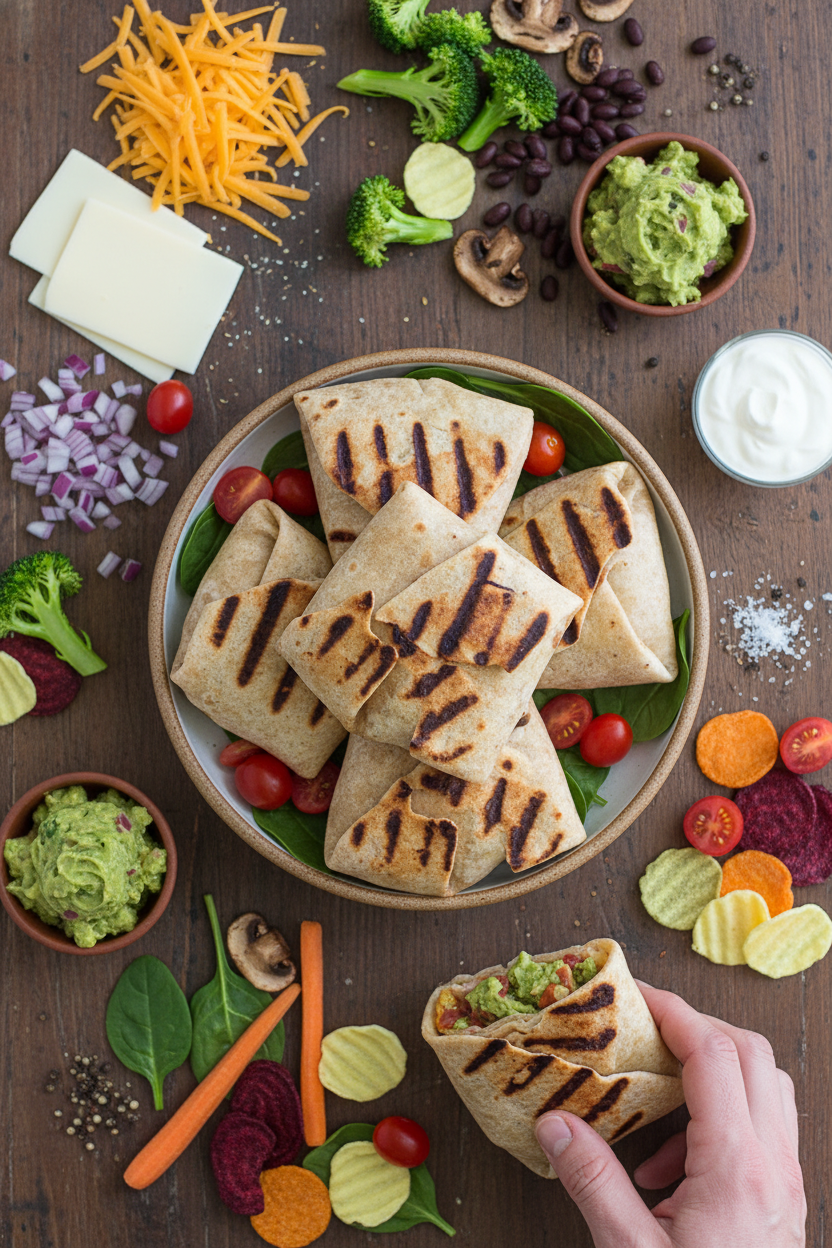
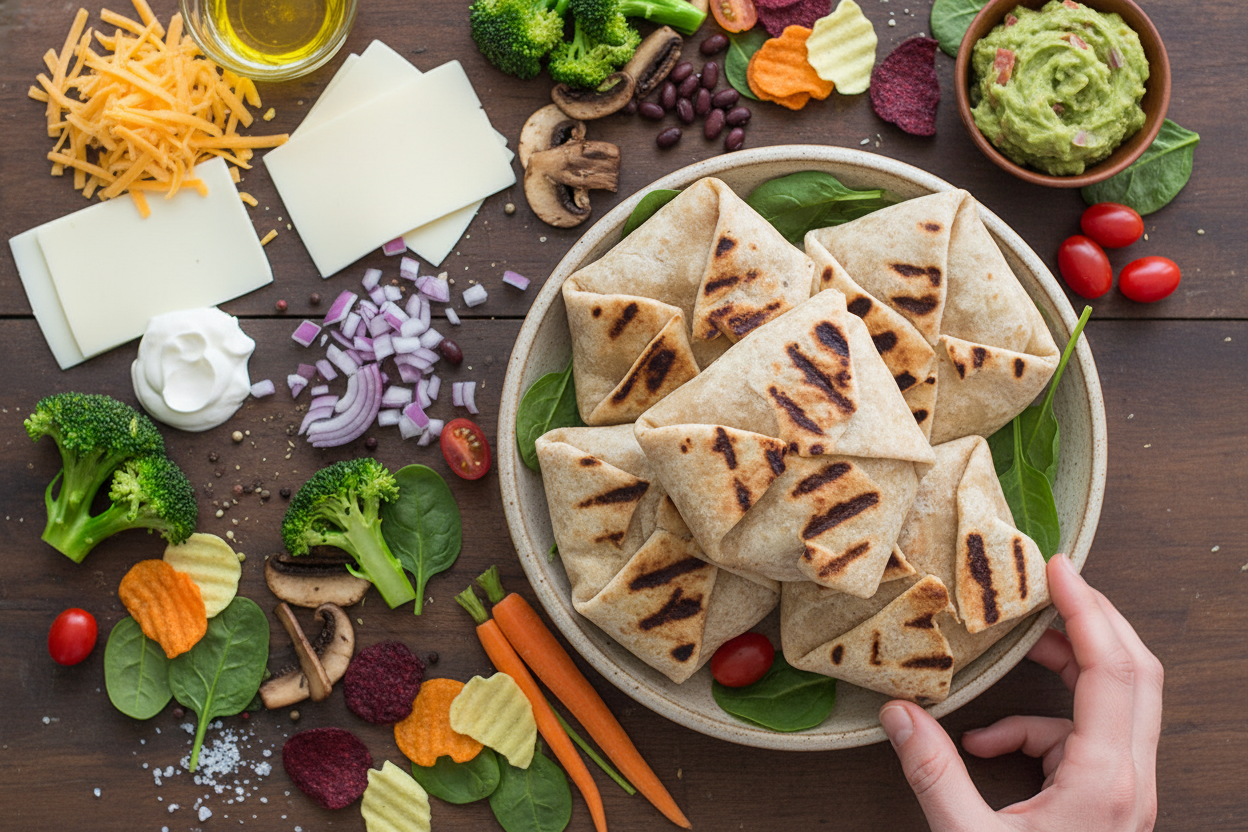
This is the part that used to make me grumpy. Folding a tortilla into a hexagon shape took me three tries the first time. But here’s the trick: warm the tortilla first. It becomes soft and bendy like a warm blanket. You start with an American single in the center. Then add your broccoli paste, then the veggie chips (I always pick the tomato flavor ones), then spinach, onions, tomatoes, and cheese on top. Then you fold the edges up toward the middle, like you’re wrapping a present. Hold the center down with one finger while you fold. It sounds tricky, but I promise, after two wraps, you’ll feel like a pro. I still laugh at my first one—it looked like a sad, lumpy star.Grill Time and Crunch Time
You lay the folded side down on a hot, oiled grill. Let it sit for two minutes. The cheese melts and seals the fold shut. Then flip it gently and let the other side get golden and toasty. The sound when you cut into it? That crunch is pure happiness. The chips inside stay crispy, the veggies are creamy, and the cheese stretches like a happy string. I always make two because one disappears too fast. Doesn’t that smell amazing just thinking about it? Toasty tortilla and melted cheese. It’s the smell of a good day.A Little Bit of Everything
When you serve these wraps with salsa, you get every color in the rainbow. Green from the guacamole, orange from the carrots, red from the tomatoes, and white from the sour cream. It’s a happy plate. This matters because eating colorful food isn’t just pretty. It means you’re getting different vitamins from each color. The orange carrots help your eyes. The green spinach helps your bones. And the black beans give you energy to play or read or run. *Fun fact: The first tortilla chips were made by accident when a woman cut up leftover tortillas and fried them. I think she’d be proud to see them inside a crunch wrap today.* One last question before you go: If you could invent a new crunch wrap filling, what would you put in it? I’d try sweet potato and black beans. But I’m always looking for new ideas.Ingredients:
| Ingredient | Amount | Notes |
|---|---|---|
| Organic Valley American Singles | 8 slices | |
| Organic Valley Sharp Cheddar Cheese | 1 cup | shredded |
| Organic Valley sour cream | 1 cup | |
| Whole wheat tortillas | 8 | organic |
| Broccoli | 1 stalk | organic |
| Brown mushrooms | 2 cups | organic |
| Extra Virgin Olive Oil | 4 Tbsp | organic, split in half |
| Kosher salt | ½ tsp | |
| Black beans | 1 cup | organic, low sodium |
| Southwestern guacamole | 1 cup | |
| Shredded carrots | 2 cups | organic |
| Organic baby spinach | 1 cup | loosely packed |
| Veggie chips | 1 cup | organic |
| Red onions | ¼ cup | chopped, organic |
| Cherry tomatoes | ¼ cup | halved, organic |
The Story Behind Our Little Crunch Wraps
I still remember the first time I made these crunch wraps for my grandkids. They had come over after a long day of playing in the garden, muddy knees and all. I needed something fast, but I also wanted it to feel like a treat. That’s when I started tossing leftovers onto a warm tortilla.
Doesn’t that smell amazing when you roast broccoli and mushrooms? My kitchen smelled like a cozy autumn afternoon. My youngest, Lily, kept peeking into the oven, asking if it was done yet. I just laughed and told her good things take a little time.
Now this recipe is a family favorite, especially on busy weeknights. You can even prep the filling the night before. Just keep it in a sealed bowl in the fridge. It makes the whole process go smoother, trust me.
Here’s a little secret I learned the hard way: don’t overstuff the tortillas. If you put too much inside, they will burst open on the grill. I’ve had a few sad wraps that spilled their guts all over the pan. We still ate them, but it was messy.
Let’s get to the fun part — making these little bundles of joy! I promise you’ll feel like a kitchen hero. And the best part? You can change up the fillings however you like. What veggie would you add to make it yours? Share below!
Step-by-Step Instructions
Step 1: Preheat your oven to 400 degrees. While it heats up, chop your broccoli into small florets. Cut your mushrooms into thin slices, like little coins. This helps them roast evenly and get nice and brown.
Step 2: Toss the chopped broccoli and mushrooms into a bowl. Drizzle with 2 tablespoons of olive oil and sprinkle in the salt. Mix everything gently with your hands so every piece is coated. (Hard-learned tip: use a big bowl so nothing flies out!)
Step 3: Spread the veggies on a baking tray in a single layer. Roast them for 15 minutes or until they look slightly browned. When I was new to roasting, I would crowd the pan, and everything steamed instead. Now I know to give them room to breathe.
Step 4: Let the roasted veggies cool for a few minutes. While they cool, mix the sour cream and shredded carrots in a bowl. Set that aside. I like to stir it with a fork until it turns a pretty orange color.
Step 5: Pop the cooled veggies into a blender. Add the guacamole and black beans. Blend until it becomes a thick, smooth paste. It should look like a spreadable green-brown mixture. Smells like earth and sunshine.
Step 6: Warm up one tortilla on a dry pan for about 10 seconds. Lay it flat on your counter. Place one slice of American cheese right in the center. Then add 2 tablespoons of the broccoli mixture over the cheese.
Step 7: Top the broccoli mixture with about 4 veggie chips. I am biased towards the tomato-flavored ones — they add a sweet crunch. Then add 5 leaves of baby spinach. Sprinkle with 1 teaspoon of chopped onions and a couple of cherry tomato halves.
Step 8: Finish with a sprinkle of shredded cheddar cheese. Now for the folding trick: lift the edges of the tortilla up toward the center. Hold the center down with one finger while you fold the rest. It creates a neat little parcel.
Step 9: Heat a grill pan on high and spray it with olive oil spray. Place your crunch wrap on the hot grill, folded side down first. Cook for about 2 minutes per side until it is charred and crispy. The sound of the sizzle is my favorite part.
Step 10: Repeat the folding and grilling for the remaining 7 tortillas. Serve them warm with your favorite salsa. My grandkids love to dip each bite into a little bowl of salsa. I love watching them giggle between bites.
Cook Time: 20 minutes
Total Time: 35 minutes
Yield: 8 wraps
Category: Lunch, Snack, Dinner
Three Fun Twists to Try
Go Southwestern: Swap the broccoli mixture for seasoned black beans and corn. Add a spoonful of salsa inside before folding. It tastes like a little fiesta in your hand.
Make It Spicy: Mix a teaspoon of chili powder or chopped jalapeno into the filling. You can also use pepper jack cheese instead of cheddar. My husband always sneaks extra hot sauce into his.
Try a Breakfast Version: Use scrambled eggs instead of the veggie paste. Add crumbled bacon or sausage. It’s like a breakfast burrito that you can hold in one hand. Which one would you try first? Comment below!
How to Serve and Sip
Serve these wraps on a big wooden board with small bowls of salsa and extra sour cream. Add some fresh lime wedges for a citrusy squeeze. I like to scatter extra veggie chips around the plate for a crunchy border.
For a side, a simple green salad with lime dressing works beautifully. You can also serve it with a cup of black bean soup for a heartier meal. My family loves to eat these outside on the porch when the weather is warm.
If you want a drink, a cold glass of lemonade is perfect for kids. For adults, try a light beer or a crisp white wine like Sauvignon Blanc. The freshness cuts right through the richness. Which would you choose tonight?
How to Store Your Crunch Wraps Like a Pro
Let me tell you about the first time I made these wraps. I made too many and stuffed them in the fridge. The next day, they were soggy and sad. I learned my lesson.
Here is the trick. Let the wraps cool completely on a plate. Do not stack them while warm. Wrap each one tightly in foil. Then put them in a zip-top bag.
They keep in the fridge for three days. For the freezer, wrap them in foil first. Then put them in a freezer bag. They keep for one month.
To reheat, use a hot skillet or toaster oven. Do not use the microwave. The microwave makes them soft. The skillet keeps them crispy.
Batch cooking these wraps is a lifesaver. Make a double batch on Sunday. Then lunch is ready all week. Why does this matter? It saves you time and money. You eat better food too. Have you ever tried storing it this way? Share below!
Three Common Problems and Easy Fixes
I remember the first time I made these. The inside was cold when the outside was burnt. It was a mess. Here is how to avoid that.
Problem one: The wrap falls apart. The fix is simple. Warm your tortilla first. A warm tortilla folds without cracking. Hold the center tight while you fold the edges up.
Problem two: The filling is too wet. This makes the wrap soggy. The fix is to drain your black beans. Pat them dry with a paper towel. Also, roast the veggies until they are dry on the edges.
Problem three: The cheese does not melt. The fix is to put the cheese on top of everything. The hot grill will melt it perfectly. Why does this matter? When you fix these problems, you gain confidence. You will love cooking more. Which of these problems have you run into before?
Quick Answers to Common Questions
Q: Can I make this gluten-free? A: Yes, use gluten-free tortillas. Everything else in this recipe is naturally gluten-free.
Q: Can I make the filling ahead of time? A: Yes, make the blended veggie mixture up to two days early. Store it in a sealed container in the fridge.
Q: What can I swap for mushrooms? A: Use chopped zucchini or bell peppers instead. Both work very well.
Q: Can I make half the recipe? A: Yes, simply cut all the ingredient amounts in half. The cooking time stays the same.
Q: Any tips for picky eaters? A: Serve the veggie chips on the side. Kids love dipping them in the sour cream mixture. Which tip will you try first?
From My Kitchen to Yours
I hope you love these wraps as much as I do. They remind me of summer picnics in my backyard. Every bite is crunchy and cheesy and good.
Remember, cooking is about trying and learning. Do not worry if your first wrap looks messy. It will still taste wonderful.
*Fun fact: These wraps were invented at a fast food place in the 1990s. Now we make them healthier at home.*
I would love to see your creations. Have you tried this recipe? Tag us on Pinterest! Happy cooking!
—Chloe Hartwell.
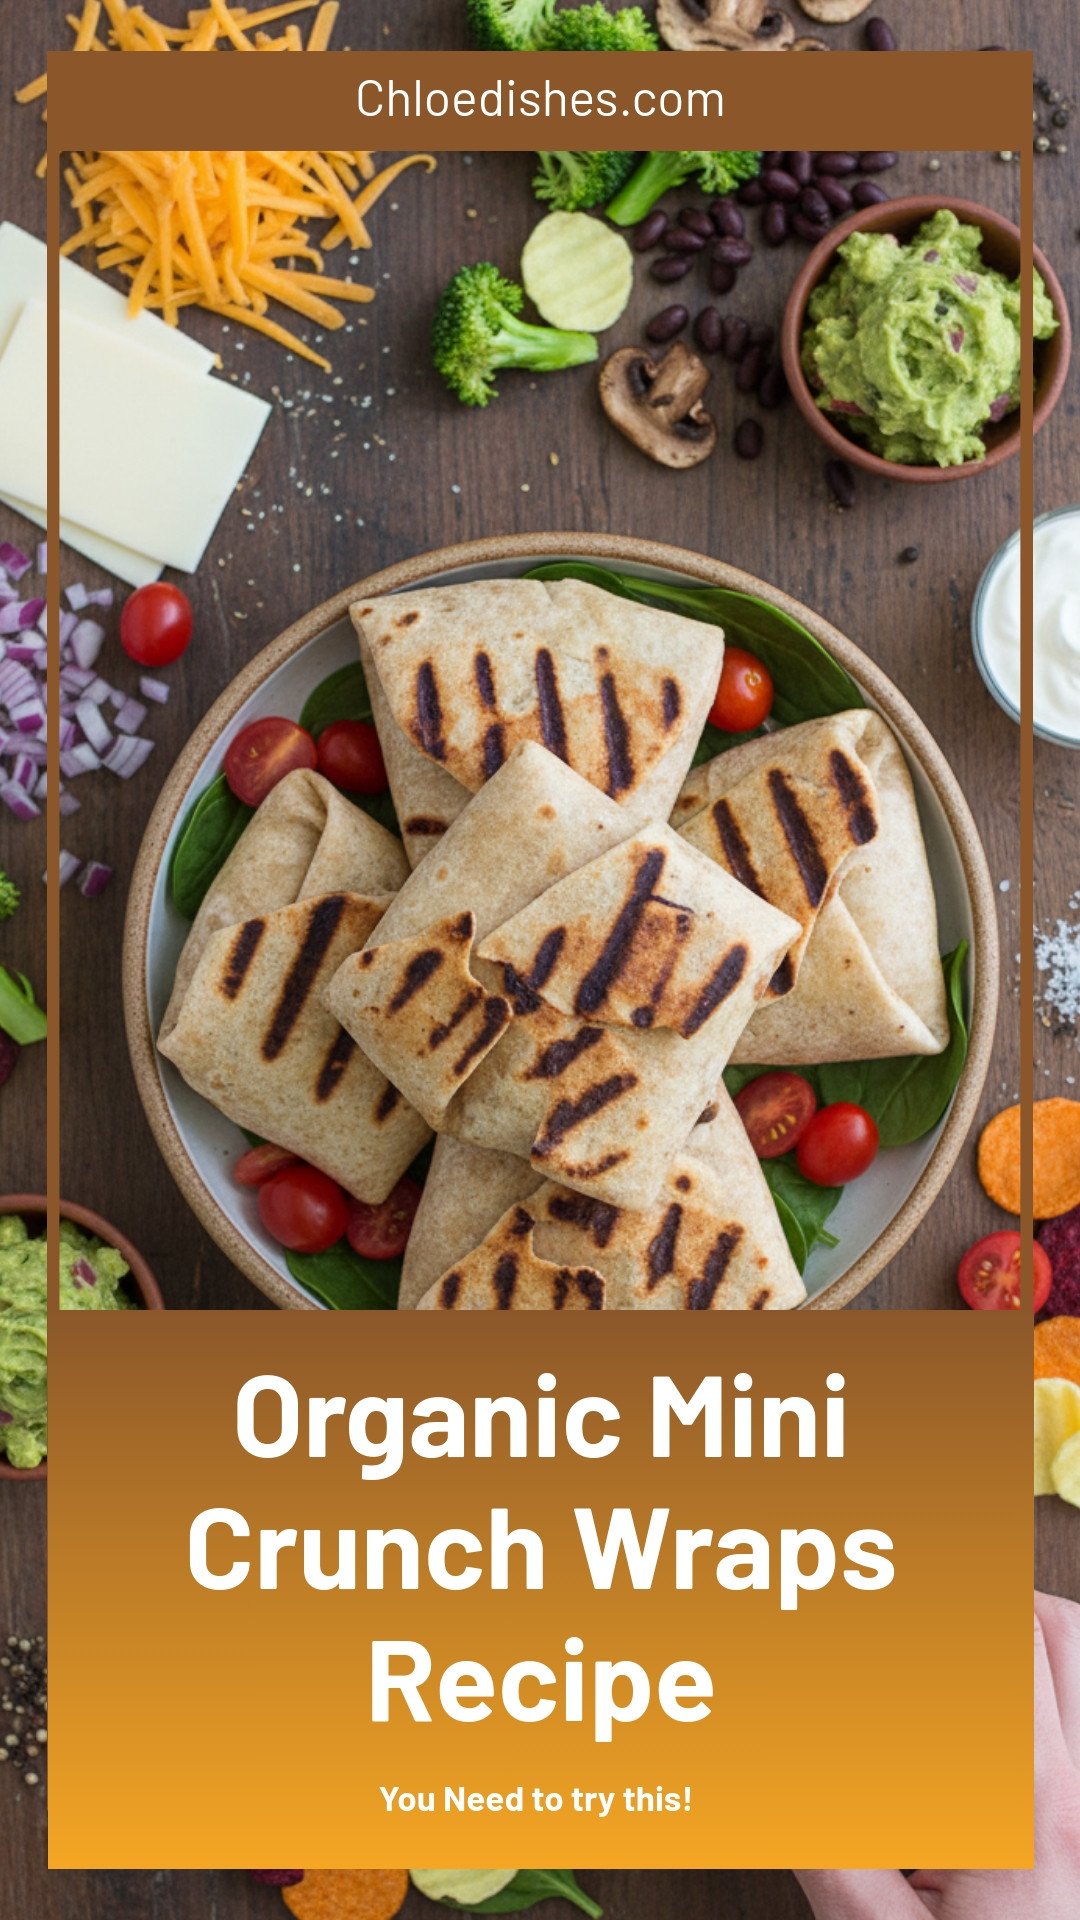
Organic Mini Crunch Wraps Recipe
Description
Crispy, healthy organic mini crunch wraps ready in minutes! A quick vegan snack or lunch idea perfect for meal prep.
Ingredients
Instructions
- Preheat oven to 400 degrees
- Chop the broccoli into florets and the mushrooms into thin slices
- In a bowl, add the chopped broccoli and mushrooms
- Add 2 Tbsp of olive oil and salt
- Transfer to baking tray and roast veggies for 15 minutes or until slightly browned
- Let them cool for a few minutes before blending them
- While the veggies are cooking, Mix the sour cream and carrots, set aside
- Blend the veggies until they are well blended
- Add the guacamole and black beans
- Blend until it’s in paste form. Set aside
- Warm up one tortilla and place it on a flat surface
- Place one American Single first
- Add 2Tbsp of broccoli mixture
- Top with about 4 veggie chips. Not surprisingly, I am biased towards the tomato ones
- Add a layer of baby spinach (about 5 leaves)
- Top with 1 tsp of onions and a couple tomatoes
- Finally, top with the cheese
- Heat a grill on high and spray it with organic olive oil spray
- While the grill is heating, fold the tortillas. Start by folding the edges upwards and bringing them to the center. Hold down the center while you fold
- Place the crunch wrap on the grill with the folded side down
- Grill each side for about 2 minutes or until charred
- Repeat steps 11 to 22 for the remaining 7 tortillas
- Serve with salsa


Leave a Reply